
Quilt patch styled basket with contrast 'stripe'
presents hexagon flowers plus daisies
and stylized bluebell fronds.
Built up
layers in the basket (lower half) base
conceal a compartment for a standard
gift card.
Bouquet also has built up layers to create
a channel into which the
card slider top fits.
Measures approx. 6.5" x 6.5" when closed.
ASSEMBLY: 1. Identify and cut the shapes:
A upper front panel B upper channel panels (5)
C upper back panel D flower panel silhouette base
E flower base 'dome'
F hex flowers (3) with center & 3 (ea.) hex overlays
G daisies base with 3 petal overlays, center
H right daisy with 3 petal overlays, center
I bluebell fronds, 3 ea. dot 'bells'
J basket main K basket 'stripe'
L lower panel front
M lower card frame build up (3)
N lower card build up back
O lower panel back


 4. Position and attach the flower centers
in each flower.
Position and attach three hexagon overlays
onto each flower in alternating positions.
(This gives definition to ALL six hexagons
of the flowers without needing SIX hexagons cut
separately.)

 6. Position and attach the petal overlays
onto the daisies.
Position and attach the centers.
 7. Position the separate right daisy flower
over the whole base silhouette,
align corresponding edges,
and attach.


 . . . and then the upper front panel to the appropriate
back or front surfaces of the channel panels build up,
continuing to line up the edges that correspond
as precisely as possible.


 13. Position and attach (surfaces that correspond)
frame build up and lower build up back panel
(contains push-out hole).
 14. Position and attach the lower build up front
panel . . .


 17. Close the card by inserting the frame
extension up into the channel, between
the front and back panel layers. . .


A upper front panel B upper channel panels (5)
C upper back panel D flower panel silhouette base
E flower base 'dome'
F hex flowers (3) with center & 3 (ea.) hex overlays
G daisies base with 3 petal overlays, center
H right daisy with 3 petal overlays, center
I bluebell fronds, 3 ea. dot 'bells'
J basket main K basket 'stripe'
L lower panel front
M lower card frame build up (3)
N lower card build up back
O lower panel back

2. Attach the 'stripe' to the front of the
main basket shape.
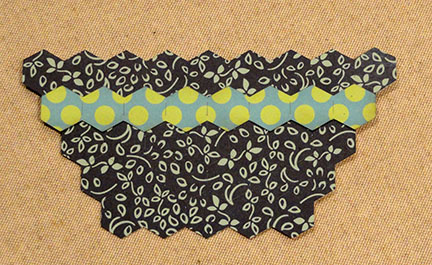
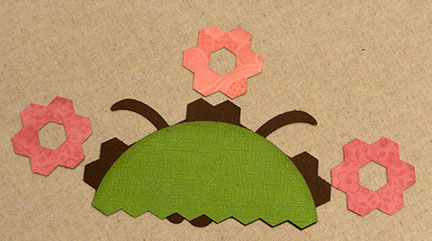
3. Position and attach the dome to the flower
silhouette base.
Also position the three hexagon flower shapes
over their side and center positions,
aligning outer/upper edges with the silhouette
edge shapes that correspond.
in each flower.
Position and attach three hexagon overlays
onto each flower in alternating positions.
(This gives definition to ALL six hexagons
of the flowers without needing SIX hexagons cut
separately.)

5. Prepare the daisy whole and right separate
blossoms by identifying where the separate
petal overlays will be positioned on top
of the bases (shown here near the base
shapes to which they will be attached).
Position and attach the green 'bluebell' frond
shapes on the whole daisy base.

onto the daisies.
Position and attach the centers.

over the whole base silhouette,
align corresponding edges,
and attach.

8. Position the daisy unit over the green dome
and other flowers, etc., of the upper (flowers)
base, lining up the frond edges that correspond,
and attach in place.
NOTE that the 'bluebell' circle punches
are shown here in their relative positions,
but they will NOT be attached until
later in the assembly process.

9. Prepare the upper build up by attaching the
5 channel shapes one by one into a stack,
taking care to line up ALL edges as precisely
as possible (here and throughout).
NOTE: it may be helpful to use a flat weight
to assist the attachment of each layer
and to keep the layers from curling undesirably.

10. Position and attach the upper back panel . . .

back or front surfaces of the channel panels build up,
continuing to line up the edges that correspond
as precisely as possible.

11. Position the flowers unit over the upper front
with the zigzag bottom edges that correspond
lined up, and the sides and top edges offset slightly,
and glue in place.

12. Prepare the lower build up by aligning and
attaching the three card frame shapes.

frame build up and lower build up back panel
(contains push-out hole).

panel . . .

. . . and then the lower build up back panel.

15. Position and attach the basket decor unit,
lining up the zigzag edges that correspond,
and offset inside slightly at sides and bottom.

16. To insert the gift card, slide it into
the frame opening by slipping it under the
lower front edges.

extension up into the channel, between
the front and back panel layers. . .

. . . then push the upper and lower together
to fit the zigzag edges flush.

No comments:
Post a Comment