Box measures approx.
3.5" tall x 3.5" wide x 3.5" deep (closed).
Plain strip tag is also included,
to attach to the box's tip.
(Includes an optional "print & cut"
version of the strip tag
that includes colored phrase "You're Sweet" and "XOXOXOX".
Options for preparing the strip tag are included at the end
of this tutorial.)
Options for preparing the strip tag are included at the end
of this tutorial.)
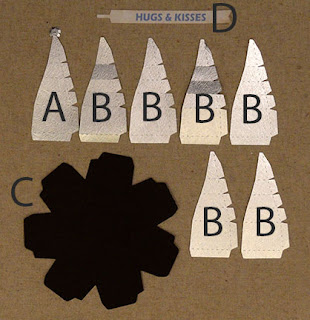
ASSEMBLY: 1. Identify and cut the shapes:
A LID wedge with tip cap shape
B LID wedge shapes (6)
C BASE shape
D ribbon tag strip (print & cut or plain)
(NOTE: the "Hugs & Kisses" version has been
substituted with "XOXOXOX" and "You're Sweet")
2. Prepare the base shape by bending back
side walls, wall side tabs, and rim tabs.
Also bend finger hole cutouts slightly.
3. Bend adjacent walls upward to bringthe straight edge of one to overlap the adjacent
tab to align at the perforation line,
and glue in place.
Repeat this process for the remaining 6 seams.
4. Bend the rim tabs to the inside and glue in place.
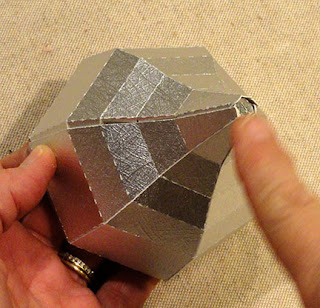
5. Prepare the LID sections by bending
the segments as shown
(bottom flange tab back,
bottom two perf lines back,
top two perf lines forward.
Bend side tabs back, including thetop wedge tab, taking care to finger crease
the perforation all the way to the tip.
6. Prepare the tip section in the same manner,
but also bend the tip cap back, tiny tabs back.
7. Join the first two sections by firstaligning the bottom segment straight edge
of one shape overlapping the adjacent
shape's tab to perforation line, as shown.
Take care to adjust so that the top and bottom
perforations that define the segments
are lined up.
8. Continue to work up the seam, bending
segments so that straight edge and corresponding
perforation lines up, to join each of the
remaining portions of the seam.
9. Position and join the next section insimilar manner.
10. Continue to add the remaining sections,
one at a time, until all are joined.
As the final seam is aligned, as box lid is
formed into a pyramid tube, make sure that
the cap is bent into position, with tabs bent down.
Apply glue to cap tabs . . .
. . . then align and complete
the final seam segments. Watch the cap
positioning and attachment to make sure
it remains in desired position.
11. Bend rim tabs to the inside and glue in place.
(Find "Print & Cut" instructions starting in step 15.)
12. Prepare the ribbon tag strip by adding back curl to the
top half . . .
. . . and front curl to the bottom half as shown.
13. Insert the ribbon tag into the cap slot . . .
. . . add glue to the inside at tip, then press the
tag end in place with a rod tool to secure in place.
14. Close the box by fitting the LID over the
BASE as shown.
15. If you wish to use a ribbon tab with printed
sentiment, this can be done with the
Silhouette Cameo system.
You may wish to review a tutorial for this process at:
https://www.youtube.com/watch?v=gMcWKW8Ep70
A. Begin by placing the ribbon strip with colored phrase
onto the on-screen design mat.
B. Open the "Registration Marks Window" and
adjust the "Style" box from "Off" to "ON"
C. If conserving paper, adjust the "Position/Bottom Inset"
to 8 or 8.5 to move bottom registration marks
up on the page.
D. Adjust the cut shape position to make sure
it is NOT overlapping the registration markings.
E. Select "File" at the top left of the screen,
select "Print" and send to your specific printer.
Regular type paper is recommended
for the ribbon to replicate a chocolate kiss tag.
F. As the print job is completed, you will see
the "Print & Cut" registration marks on the
printed page, along with the colored phrase.
G. Position the printed type sheet onto the
cutting mat in the top/left position as shown.
H. Adjust cutting settings for "Copy Paper",
adjust blade depth, etc., as needed,
then send the job to "Silhouette" (cutting machine).
I. The cutting software will use its "optical eye" tofirst "see" the printed registration markings on the sheet,
then cut the red cut lines of the ribbon tag.
J. Remove the cut ribbon shape from the mat,
then refer to steps 12 & 13 to attach to kiss box.
If your cutting system does not provide the
"Print & Cut" features, you may also prepare
the printed ribbon tag following the steps outlined
in a separate tutorial on this blog:
http://needlesnknowledge.blogspot.com/2016/02/
printing-on-cut-shape-using-office.html .
Or follow these steps:
K. Ungroup the colored phrase from its surrounding
cut lines, and move the cut lines off the mat.
L. Adjust the paper size on the mat to "Letter"
M. Make sure the colored phrase is in an
appropriate position on the letter paper silhouette
so that it will print on the paper.
N. Select "File" at the top left of the screen,
select "Print" and send to your specific printer.
O. Set up and send the ribbon "outline" cut lines
to the cutter, to produce a template for tracing.
P. Position the ribbon template frame
over the printed phrase, and lightly trace.
Q. Hand cut the shape, then attach as
instructed in the tutorial.


I love this! I am cutting it out right now. Such a cute idea!
ReplyDeleteWHERE CAN I FIND THE SVG TO MAKE THIS CUTE BOX
ReplyDeleteRose, unfortunately I apparently crossed a copyright infringement line and Silhouette America pulled the design because Hersheys recently won a design ownership court case where the "kiss" shape was deemed to be their intellectual property! I can't even find it in my own data base -- that's a strong control by Hersheys if they can sort of reach into my file and snatch back the file.
ReplyDelete