In time for harvest season crafting
is another in the series of "canister wrap" characters
from SnapDragon Snippets.
New to this design (and compatible with past characters)
is a canister form than can be constructed from cardstock.
Or you can continue using the emptied and "stripped"
Crystal Light powdered drink plastic canisters.
This version includes dimensional eight-panel straw hat
with fringed over lays, dimensional push-thru nose,
straw bangs, and other face and clothing details.

ASSEMBLY:
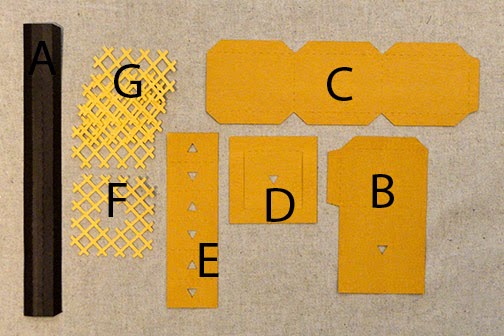
1. Identify and cut the shapes.
A canister body B upper & lower ends
C bottom whole shape
D body decor wrap (front & sides only)
E face decor shapes with straw hair
F dimensional nose shape
G other decor shape
H hat crown shapes (8)
I hat base shape J hat flange
K & L hat decor shapes

2. Prepare the canister shape by folding the top and bottom two-step opening tabs back. Fold the complete tab areas back as "mountain" folds on perforation lines. Fold the end tabs forward as "valley" folds.

3. Fold the canister body into a tube to bring the long side straight edge to overlap the opposite long tab. Apply adhesive, align straight edge at tab perf line (with ends of each aligned exactly) and glue in place.

It will be helpful when gluing this side seam to place the tube on a flat surface, then flatten the canister shape to apply pressure along the edges being joined.

4. Apply adhesive under the "rim backside" portion of the tab sections, then fold them to the inside of the tube and apply pressure until each segment is securely attached. NOTE that the edge tabs are NOT glued down, but are folded upward to extend toward the tube's center. These tabs will hold the rim ring.
Both top and bottom openings follow this same assembly and appearance. TOP edge has a deeper inset, to accommodate the hat flange insertion.

5. Apply adhesive to backside of rim ring. Insert it into the end opening of BOTH upper and lower ends so that inner edges of all canister panels adjust snugly to match its shape. (Rings are interchangeable for either end of tube.)

Use fingers inserted into the opening to apply pressure to join ring to rim tabs underneath. Work around the ring to ensure all edges of ring and tabs are securely joined.
Complete rim ring assembly for both ends of tube.

6. At bottom of tube, apply adhesive to rim ring's top surface, then insert and position whole bottom shape over rim ring.

Apply pressure all around the edges until shape is completely attached. This is a rather gentle pressure process, since there is nothing hard or sturdy below to press against.

7. Prepare the decor canister panel by folding the panel slightly on its' vertical perforation lines. Apply adhesive to the entire underside of panel, then position and attach over the canister's front, aligning perf lines over canister body ridges. Smooth and apply pressure to ensure a complete join.

8. Prepare the dimensional nose by folding angled lines as "mountain" folds, tabs outward.
Fold the shape so that the lower left straight edge aligns at the adjoining angled tab perf line, and glue in place.

9. Assemble the face with eyes, cheek circles and mouth.
10. Apply adhesive to the top surfaces of nose tabs, then insert the nose through the face opening from the backside.

Here is the face and nose assembly in process, as seen from the backside.

11. Fold the straw hair section on the perforation line, tab folding under. Unfold, then slide the face assembly top edge between. Center and glue tab to face backside.
Fold hair over face and crease well along perforation.
(If hair does not stay folded down into position, apply light adhesive strategically to assist.)

12. Position face/hair assembly over canister front, top edges even.

13. Position assembled suspenders below face, with top edge abutted to face lower edge, suspended width centered over canister ridge (half will be unattached). Glue the inner half of the suspended to the canister front.
Repeat for both suspenders.
14. Add layered buttons between suspenders, layered neckerchief at face neck area.
13. Position assembled suspenders below face, with top edge abutted to face lower edge, suspended width centered over canister ridge (half will be unattached). Glue the inner half of the suspended to the canister front.
Repeat for both suspenders.
14. Add layered buttons between suspenders, layered neckerchief at face neck area.

15. Fold all hat sections as shown here, tabs back, top two cross perforation lines and inward (mountain) folds, and bottom two as outward folds. Bottom folds will form hat rim area.

16. Overlap two sections to be joined, with straight edge of middle segment of right section aligned at corresponding perforation line of the left as shown here. Apply adhesive to tab face surface, align and attach.
17. Fold the two sections so that the next higher segment edge and perf lines align, apply ahesive and join.
18. Repeat for the top segment.

19. At the bottom area of the assembly, fold the brim segments outward and upward, so that the narrow rim areas align (glue the tiny tab if you wish), then continue until the brim segment edge and perf lines align. NOTE that the tab in this area should be behind the brim segments.
Here is how the assembly should appear at this point.
20. View the complete straw hat assembly athttp://needlesnknowledge.blogspot.com/2013/09/3d-straw-scarecrow-hat-tutorial.html , following steps 4-11, to continue to join sections into halves, join halves to complete the straw hat. Then return to finish assembly here.

21. Add some curl to the straw decor shape tines. Curl plain shapes back, and lattice front shapes forward.

22. Position and glue a plain shape behind each wedge brim segment ...

... and a lattice decor shape over the front.
Complete for all eight segments of brim.

23. Prepare hat flange by folding shape in half lengthwise, folding and gluing rim tabs back behind flange except keep the end tab opposite the tab end of flange free until ends are joined.
24. Form the flange into a ring, overlapping straight end over tab to perforation, then glue tab and end together. Fold final rim tab back and glue in place.

25. Insert edge tabs through hat base shape slots front-to-back, then fold inward and glue in place.

26. Fold the hat base edge tabs downward.
Apply adhesive to the tab undersides, then insert the base shape into the bottom inner opening of hat. Adjust so that the tab edges are even with the inner brim rim perf lines, and apply pressure to glue in place.

27. Place hat onto canister by inserting flange extension into canister upper opening.
16. Overlap two sections to be joined, with straight edge of middle segment of right section aligned at corresponding perforation line of the left as shown here. Apply adhesive to tab face surface, align and attach.
17. Fold the two sections so that the next higher segment edge and perf lines align, apply ahesive and join.
18. Repeat for the top segment.
19. At the bottom area of the assembly, fold the brim segments outward and upward, so that the narrow rim areas align (glue the tiny tab if you wish), then continue until the brim segment edge and perf lines align. NOTE that the tab in this area should be behind the brim segments.
Here is how the assembly should appear at this point.
20. View the complete straw hat assembly athttp://needlesnknowledge.blogspot.com/2013/09/3d-straw-scarecrow-hat-tutorial.html , following steps 4-11, to continue to join sections into halves, join halves to complete the straw hat. Then return to finish assembly here.
21. Add some curl to the straw decor shape tines. Curl plain shapes back, and lattice front shapes forward.
22. Position and glue a plain shape behind each wedge brim segment ...
... and a lattice decor shape over the front.
Complete for all eight segments of brim.
23. Prepare hat flange by folding shape in half lengthwise, folding and gluing rim tabs back behind flange except keep the end tab opposite the tab end of flange free until ends are joined.
24. Form the flange into a ring, overlapping straight end over tab to perforation, then glue tab and end together. Fold final rim tab back and glue in place.
25. Insert edge tabs through hat base shape slots front-to-back, then fold inward and glue in place.
26. Fold the hat base edge tabs downward.
Apply adhesive to the tab undersides, then insert the base shape into the bottom inner opening of hat. Adjust so that the tab edges are even with the inner brim rim perf lines, and apply pressure to glue in place.
27. Place hat onto canister by inserting flange extension into canister upper opening.