Tuesday, February 7, 2017

Heart Echo Strips Ornament

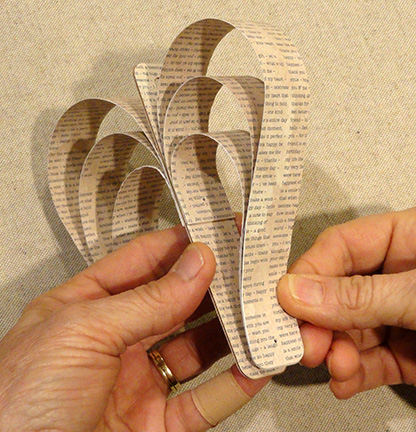
Three strips arch on each side 
to create an "echo" heart, 
attach to reinforced hanger center strip. 
Tie a ribbon bow and loop a hanging string 
to provide fun and unique decoration for 
Valentine's Day or Christmas. 
Measures approx. 4.75" wide x 5" tall x 1" deep. 

ASSEMBLY: 1. Identify and cut the shapes:
NOTE this project will work with card stock
that has a single or double printed side(s) 
(providing the backside is acceptable) or
using printed paper weight (65 lb or less)
where a front and back for each strip is cut,
which is what this sample project has used.

Large strips: front & back for each left, right
Middle strips: two pair as for large
Short: two pair as for large
Center front & back face strips
Center reinforcement strips (2-3) (cut from
card stock or heavy card stock)
2. If using lighter paper, (liquid) glue the front
and back shapes together, for each
of the strip length pairs, taking care
that edges and punch holes line up
as accurately as possible.
3. Identify the bottom end of each
strip length as the rounded corner end.
4. Before the glue dries completely (if layering),
or as this step in the assembly, add
some curl to the top half of each strip by
running strip over a rod tool (such as this pen shaft)
while applying finger or thumb pressure.
Here is the completed curled strip.
5. Prepare the center "stem" strips by
layering the reinforcing layers together . . . 
. . . then attaching the face strips on
each side.
While the gluing cures place a flat weight
on top to help flatten and avoid warping
or curling.
6. Prepare a heart layout with the three
strip lengths on each side, center stem strip
in the middle.
7. Assembly each of 2 heart arch halves by gluing
the bottom ends of the sequence together,
matching up the bottom guide mark punch holes.
NOTE: apply glue at end and upward only
to barely above the punch hole on each strip.
Here is one arch half with bottom ends glued.
8. Bring the top ends together, aligning
the edges and punch holes, and glue
together as for bottom ends.
Complete this step for both arches.
9. Identify the center punch guide mark
on the center stem.
Also identify the dash guide marks on the
long strips that show the glue-to level.
Apply glue to the inside/underside surface
of the long strip of the first arch assembly
front end to the guide marks ONLY . . . 
. . . then position that end against the stem,
aligning punch circles, and making sure
side edges match up.
Repeat for the second arch on opposite side
of stem, then apply finger pressure until secure.
10. Curve each arch bottom end down into
position, then attach each in place, lining up
side edges and punch holes.
Apply finger pressure until both arch bottom ends
are secure. OR, use clips to hold in place.
11. Apply decorative nail heads over the
guide mark circles at bottom and at center,
as desired.
12. Tie a length of ribbon (18" approx.)
through the stem's top hole.
To hang, create a loop of twine with tied ends,
and loop through the end hole . . .
. . . then thread knot end through loop.
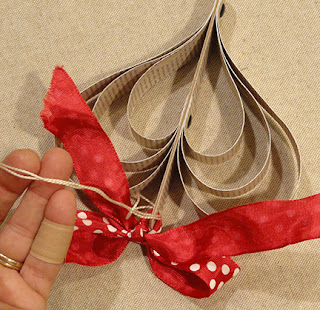
Here is the completed Heart Echo ornament.


Hearts Stitched Centers Card

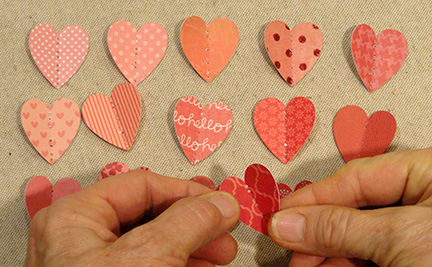
Small hearts cut from fifteen paper prints 
are arrayed in three rows. 
Center needle holes on each align 
with card front overlay so that they can be 
stitched in place with perle cotton or floss. 
Contrast card base is slightly offset, 
measures approx. 5x7 when top folded. 

ASSEMBLY: 1. Cut the shapes:
card base (gray in this sample)
card accent front with stitching holes
15 hearts with stitching holes & perf lines
If a gradation color sequence is desired,
consider this method:
Select 15 or more print papers to use,
then line them up in light (no. 1) to dark (no. 15)
order. Step back and "squint" to see if the order
needs adjustment. Select the 15 best,
then cut one heart from each.
One way to arrange the hearts for gradation
from light upper left to darker lower right
is to place the print order hearts as shown.
Switch hearts around as desired or preferred.

2. Bend each of the hearts face-to-face
along the center perforation/holes line.
3. Begin with the first (no. 1 position) heart,
apply a thin line of adhesive at the fold
on backside . . .
. . . then position it in over the accent front with
holes aligned, and hold in place until secure,
but take care that only the fold area attaches.
(NOTE that the TOP of the front accent card
has a slightly wider margin.)
4. Thread a 36-40 inch length of perle cotton
(no. 5 recommended) or 6-ply floss into a blunt
tapestry needle. Anchor the tail end with
a small strip of "paper" tape on backside
near the no. 1 top hole.
5. Insert the needle into the top hole,
push through to front . . .
. . . and pull through completely.
6. Insert the needle into the next lower hole
and push through to backside, then draw
thread to backside completely. This is
the first stitch.
Continue in the same fashion to complete
the following three stitches to attach heart no. 1.
Also complete the stitch below the first heart
as shown.
7. Position and glue heart no. 2 in place . . . 
. . . and complete the four stitches plus 
the between stitch to attach second heart.
Bend the heart sides upward slightly to make
sure that only the ridge is attached to card front.
8. Continue to add the next heart, complete
stitches to finish the first column of hearts.
Work the next column bottom to top, then
continue until all hearts are in place
and stitching is completed.
9. After the final stitch is complete, draw
the remaining thread fully to the backside,
clip excess leaving approx. 1" tail . . .
. . . and anchor with a small piece of tape. 
Here is the completed hearts panel.
(Quicker than you might think!)
10. Position and attach the front panel
to the front of the card base to complete the card.
Here is the finished card.
Change the hearts color to make this card
fit any occasion: green for St. Patrick's Day,
pastel for Easter, red white and blue for
Independence Day, etc.

Sunday, February 5, 2017

Rosette Heart Pillow Box

Flattened tube with fold-in oval ends 
is a clever treat box for Valentine's Day 
or other special occasions. 
Pleated scallop edge rosette has scallop and 
plain circle medallion embellishment 
with layered heart decoration 
Box measures approx. 4.75" long x 2.5" wide 
x .75" deep. 

ASSEMBLY: 1. Identify and cut the shapes:
A box body   B rosette strips (2)
C rosette center covers (2)
D medallion (scallop circle, plain circle,
large and small hearts.
2. Prepare the body by bending back at flange tab
and middle perforation lines.
3. Carefully bend back along the curved end
perforation lines working in small sections
to bend only as far eventual resistance allows.
4. Fold the body in half with flange tucked
under, and glue the seam.
NOTE that with end curved panels
bent into flat position, the body can be
pressed flat to help secure the seam.
5. Prepare the rosette strips, beginning at
the tab end, to bend as valley, then alternate
folding mountain then valley, in accordion fashion
across the entire strip.
6. Attach the first ends seam by positioning
end straight edge over the corresponding tab
to perf line, taking care that bottom 
straight edges are aligned.
7. Form the strip assembly into a ring to bring
the opposite straight edge end and tab together
and join as for the first seam.
8. Complete the rosette form by carefully forcing
the top accordion edges into the center . . . 
. . . compressing the pleats as tightly as possible.
Hold the pleats in tight position while applying
hot glue at the pleat inner edge ring,
then quickly place the cover circle over the
center opening and glue ring.
Quickly work to push the pleats toward the center
as the hot glue cools and solidifies, to ensure
that the pleats are even all around.
9. Flip the rosette assembly over and attach
the "front" circle cover with hot glue.
10. Assemble the medallion shapes . . . 
. . . position and attach to the center of
the rosette, then attach to the box body,
centering over the guide mark punch hole.
11. To form the "box", bend the finger tab 
end panel inward . . .
. . . then bend the plain end panel inward.
Insert gift card, cash, goodies or treats, etc.,
then close the final end panels.