Friday, May 22, 2015

Trout Jumping Gift Card Box Assembly

Give a customized box
to your favorite fishing enthusiast.
Lid box with detailed trout jumping decoration 
opens to reveal a gift card. 
Or use without the insert to hold treats or other small gift. 
Measures approx. 5" x 5" x 1.5".


ASSEMBLY:
1. Identify and cut the shapes:
A box base
B box lid with accent top and side shapes
C insert for gift card with tabs
D trout shapes
E gills shape (on square for contrast)


2. Prepare the box base by folding inward on all perforation lines.


3. Bend into box tray shape so that the straight side edges align with the adjacent tab perforation, and glue in place. Repeat for all four corners.


4. Fold rim tabs into box interior and glue each in place.


5. Repeat the preparation folding for the lid in similar fashion as for the base, in step 2.


6. Bend sides to form lid into tray shape, align and glue each of four corner seam as for base, in step 3.


7. Fold rim tabs into lid interior and glue each in place.

Turn the lid over, face up, and attach the top and sides accent shapes.


8. Build the jumping trout "applique" shape by layering and gluing layers in place, as follows:

a. start with the "under body" silhouette shape.

b. layer on  the "light salmon pink" shape that will show through as the body bottom "stripe", and the similar colored tail shape which will show as the farthest in back body stripe.


c. layer on the darker pink or light violet (rust in this sample) shape that will show through as the middle "stripe", and the next tail shape (NOTE that the "show thru" portions of the back body striping will get narrower in sequence).


d. layer on the top body piece and the corresponding tail shape.


e. add the contrast green tail shape (includes a narrow kind of "finger" that extends over the previous darker green shape and the dorsal fin, right side "arm" fin, the lower fin near the tail on outside of body.


f. layer on the final shapes, including the pair of ventral (under-tummy) fins, the outer white and inner black eye shapes, the very fine narrow gill shape


9. Position the trout applique (assembled unit) over the lid accent shape, center and adjust positioning, then glue in place.


10. Prepare the gift card insert by folding th side panels back to 90 degree angles.

Insert gift card, then place insert into box base.


Place the lid on top, and its completed.


Fishing Vest Card Assembly Notes

Detailed fishing vest has fronts and back joined at shoulders, 
with pockets full of fun fishing gear. 
Tiny punch holes around the edges of the front panels 
are just big enough to accept a darning needle 
and perle cotton or floss for real stitched detail. 
Other details include: bait worms, scissors, 
pockets with flaps, hooks inserted through slit panel, bobber floats. 

(This post is under construction.
Please return after 5-23-15 to view completed tutorial.)
ASSEMBLY:
1. Identify and cut the shapes:
A right vest front with pockets and flaps
B left vest front with pockets, hook panel
C best back panel
D vest front panel "liners"
E right front panel decorations
F left front panel decorations


2. To lace the vest front, cut a 1 yard length of contrast color perle cotton "string"or 6-ply floss and thread onto a small to medium size darning needle. You will be stitching a single "strand".

On the backside, cello-tape the tail end of the "string" near the bottom center edge, close to where the first insertion point for the needle is - at the corner.


3. Insert the needle from backside through the corner hole, and push all the way through, pulling thread through completely.


4. Working along the center front "opening" edge, insert the needle downward through the next hole, and pull string through completely (now and going forward after each stitch). This will create a top-side stitch.


5. Continue to work needle up and down through the sequence of holes all along the edge of the vest (right vest is shown) . . .


. . . until the needle is inserted into the through the final hole, bringing the needle and excess string to the vest backside.


6. Trim excess string leaving approx. 1/2" tail.  Secure in place with a small strip of cello tape. Be sure to keep both cello-tape anchors within the ring of stitching.

7. Repeat the lacing process for the left vest.


8. Prepare the decoration shapes, then refer to the opening or ending images of this post to attach to their respective front panels. NOTE that each vest front includes tiny cuts to help position bottom corners of pockets.

Bobbers: layer white shape over "whole" red base,
attach "hook" shape behind base stem.


Hooks and panel: slide the hook stems under the "bridge" between the slit pairs.

(May need to use a tool such as spatula to help open the slits to slide stems in.)


9. Fold back panel tabs back, and attach laced and assembled front panels over the tabs.

NOTE that the outer corners of front and back should line up; inner corners/edges do not line up -- front is wider.


10. On the inside/underside of each vest front, position and attach liner vest front shape, which is slightly offset smaller than the front shape. This covers the lacing and makes the inside of the card neater.


Here is the finished vest card.


Sunday, May 17, 2015

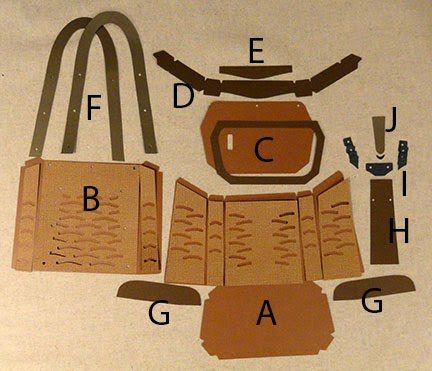
Fishing Creel 3d Box Assembly Guide

Giving a gift, goodies or gift card to someone who likes to fish?
Here's the perfect gift box that looks like a traditional wicker creel.
Build the two part box base, attach simulated wicker overlays,
corner reinforcements, front panel and latch, back handle,
build and attach the lid with latch strap.
Eyelet fasteners add realistic accents.
Create the trout danglers from separate cut file
and attach with lanyard clips through "lip" punch holes.
Measures approx. 5.75" tall x 3.5" deep x 6.5" wide.  


ASSEMBLY:
1. Identify and cut the shapes:
A front basket with bottom, overlays
B back basket with overlays
C lid main shape with accent edge
D lid rim front and sides
E rim front reinforcement (underlay)
F back handle and reinforcement
G front lower corner reinforcement accents
H center front accent panel
I latch main with side build-up shapes
J latch strap with accent tip


2. Prepare the main basket (front) shape by folding back panels and tabs on all perforations.

3. Position and attach front and side front accent overlays on each of the panel sections.


4. Prepare the back basket shape by folding back on all panel and tab perforation lines. Take care that punch holes line up exactly.

5. Position and attach back accent overlay on back panel, and side back overlays on corresponding panels.


6. Join front basket assembly to back basket assembly by overlapping straight front side edge over back side long tab.


7. Fold back (to basket inside) and glue in place the upper basket opening tabs, except  leave the tab at the top of the unattached front side edge flat, to be folded down later.


8. Prepare latch by gluing 3 or 4 side latch dimension shapes into a stack for left side and a stack for right side.


Attach each stack to underside on ends of main latch shape.


9. Apply glue to the stack surfaces -- excluding a small margin at the outer edges that will NOT touch the accent panel -- then position and attach latch on the front of the center accent panel.

Attach eyelets/grommets through the pair of punch holes at this point of assembly.


10. Position and attach the center accent panel assembly on the front of the main basket assembly, taking care to match upper and lower edges with corresponding edge or perforation line.

Tiny hash marks on the front accent shape will assist with the centering of the panel.


11. Prepare lid main shape by folding back tab, pushing in tabs in opening.


12. Prepare the lid rim shape by folding panels and tabs back.

13. Center and attach the front edge of the lid to the front top tab of the rim shape.


14. Bend the rim shape into place to align the lid straight edges at the corresponding rim perforation lines, one at a time, until each tab and edge is attached, along both ends of rim shape.


15. Glue the hole tabs to the underside of rim.


16. Fold the rim tabs to the backside of rim and glue each in place, including the small end tabs.


17. Apply glue, position and attach the front rim reinforcement shape behind the front panel of the rim.


18. Apply glue to the underside of the accent lid shape, then position with outer edges even and attach to the lid assembly.


19. Position and attach the lid flange tab at the upper edge of the back panel of main basket assembly, taking care to align punch holes.

20. Prepare the handle by gluing two handle shapes with backsides together.

21. Attach eyelets/grommets in all back panel punch holes (lid flange and handle).


22. Form the basket assembly into a tube to bring the final side seam edge and tab perforation together, adjust and attach.


23. Fold the final top opening tab to the inside and glue in place.


24. Fold basket bottom panel tabs inward and push bottom into place in the bottom opening of basket "tube". 

Glue the tabs to the inside of the basket panels, keeping perforation edge of bottom even with bottom straight edges of basket body.


It will be helpful, as the tabs are being attached, to apply pressure from the inside of the basket.


25. Position and attach the latch strap onto the front rim panel of the lid, top straight edge of strap even with top of rim panel. 

Small dash marks will assist with centering alignment. It may also help to close the lid and insert the latch strap under the latch to make sure they will align once attached.


Here is the completed creel box.


Here is another finished view from the front . . .
. . . and from the back . . .
. . . and finally, with the fish trout hanger shapes
hanging from the basket handle 
(punch or poke a hole by hand, if desired).