Showing posts sorted by relevance for query creel. Sort by date Show all posts

Monday, June 8, 2015

Creel Fishing Bag Card Assembly Guide

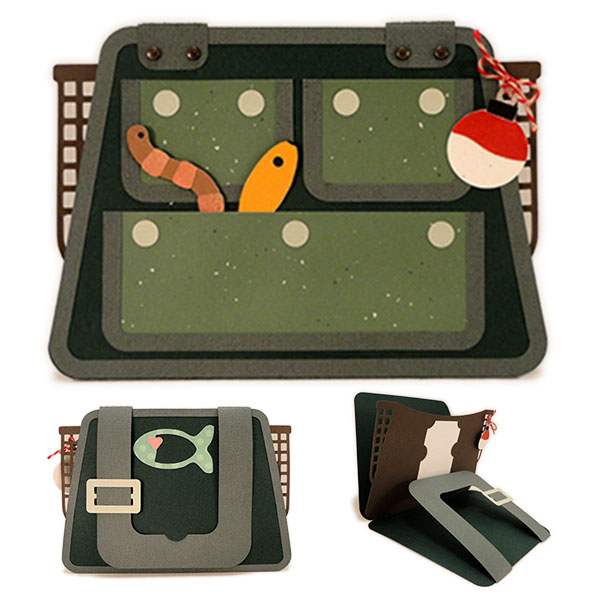
Replica canvas creel bag folds at the bottom, 
with middle layer to hold gift card
(or substituted included plaque with message) 
that includes the end netting "pockets" of a real creel. 
Three front pockets have edge trim like the front and back panels, 
with punch holes to position circle "buttons". 
Strap with faux buckle accent attaches to card front 
with small brad fasteners, then wraps over the top 
to a half-circle cutout latch on the back, acting as closure. 

ASSEMBLY:
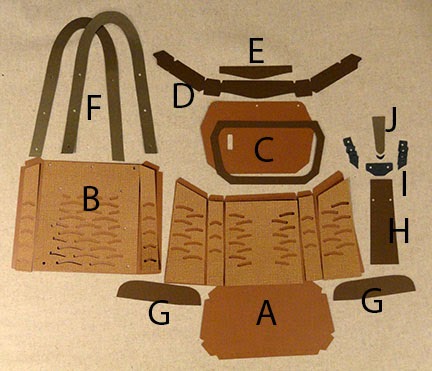
1. Identify and cut the shapes:
A creel card base (frt & bck) with edge trim           and back decor fishy/heart
B insert (represents end netting) with gift               card tabs
C strap handle (card closure)
D buckle and separate strap for buckle
E lower and upper pockets with trim shapes
F pocket contents: bobber, lure, worm
G optional sentiment insert in place of card
H pocket button circles (6)


2. Prepare the main card shape by folding inner sides together at center bottom perforation line.

3. Attach front and back rim edge accent shapes, taking care to line up outer cut edges as exactly a possible.


4. Prepare the insert shape by folding the bottom tabs back on perforation lines.


5. Position the insert face side down against the backside of the card base front. Line up insert tab perf lines at the card base perf lines, and center side to side. Glue tabs in place to attach them to the backside of the card base back.

NOTE that the pointing finger is showing that the insert lower side shaped edges are slightly offset from the card base shaped edges.


To help the insert tabs attach properly, after the tabs have some initial "grab", fold the card base closed and apply pressure along the fold edge (where the tabs are attaching inside).


6. Prepare the large and small pockets by attaching the rim accent shapes at corresponding side/bottom edges. Also position and attach the buttons, centered over the positioning hole punches.


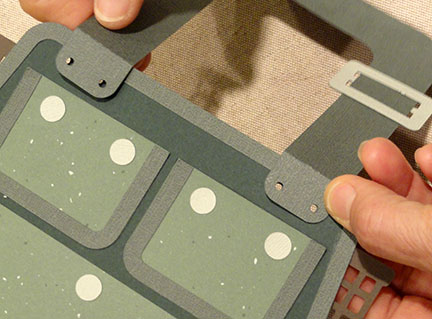
7. Prepare to attach the pockets to the card front by locating the tiny guide marks which will be used to position the upper side "corners" of each pocket.


8. Apply adhesive to the margin near the side and bottom edges only (backside) of the large pocket, then position with the highest point (corner) of the side edges lined up with the top of the two guidemarks for the large bottom pocket. Attach pocket, taking care that the bottom of pocket and card front trim edges remain evenly parallel to each other.

9. Repeat the prep, aligning and attaching process for the top two pockets, using the pairs of guide marks visibly on the card front.


10. Prepare the buckle accent shape by weaving the separate strip over the buckle prong. Insert the strip end from the backside on one end, toward the front, over the prong, then back downward to the backside of the buckle. Adjust so that the strip's end edges do now show beyond buckle edges, and so that the strip is centered in the openings.

Glue the end edges to the backside of the buckle ends.


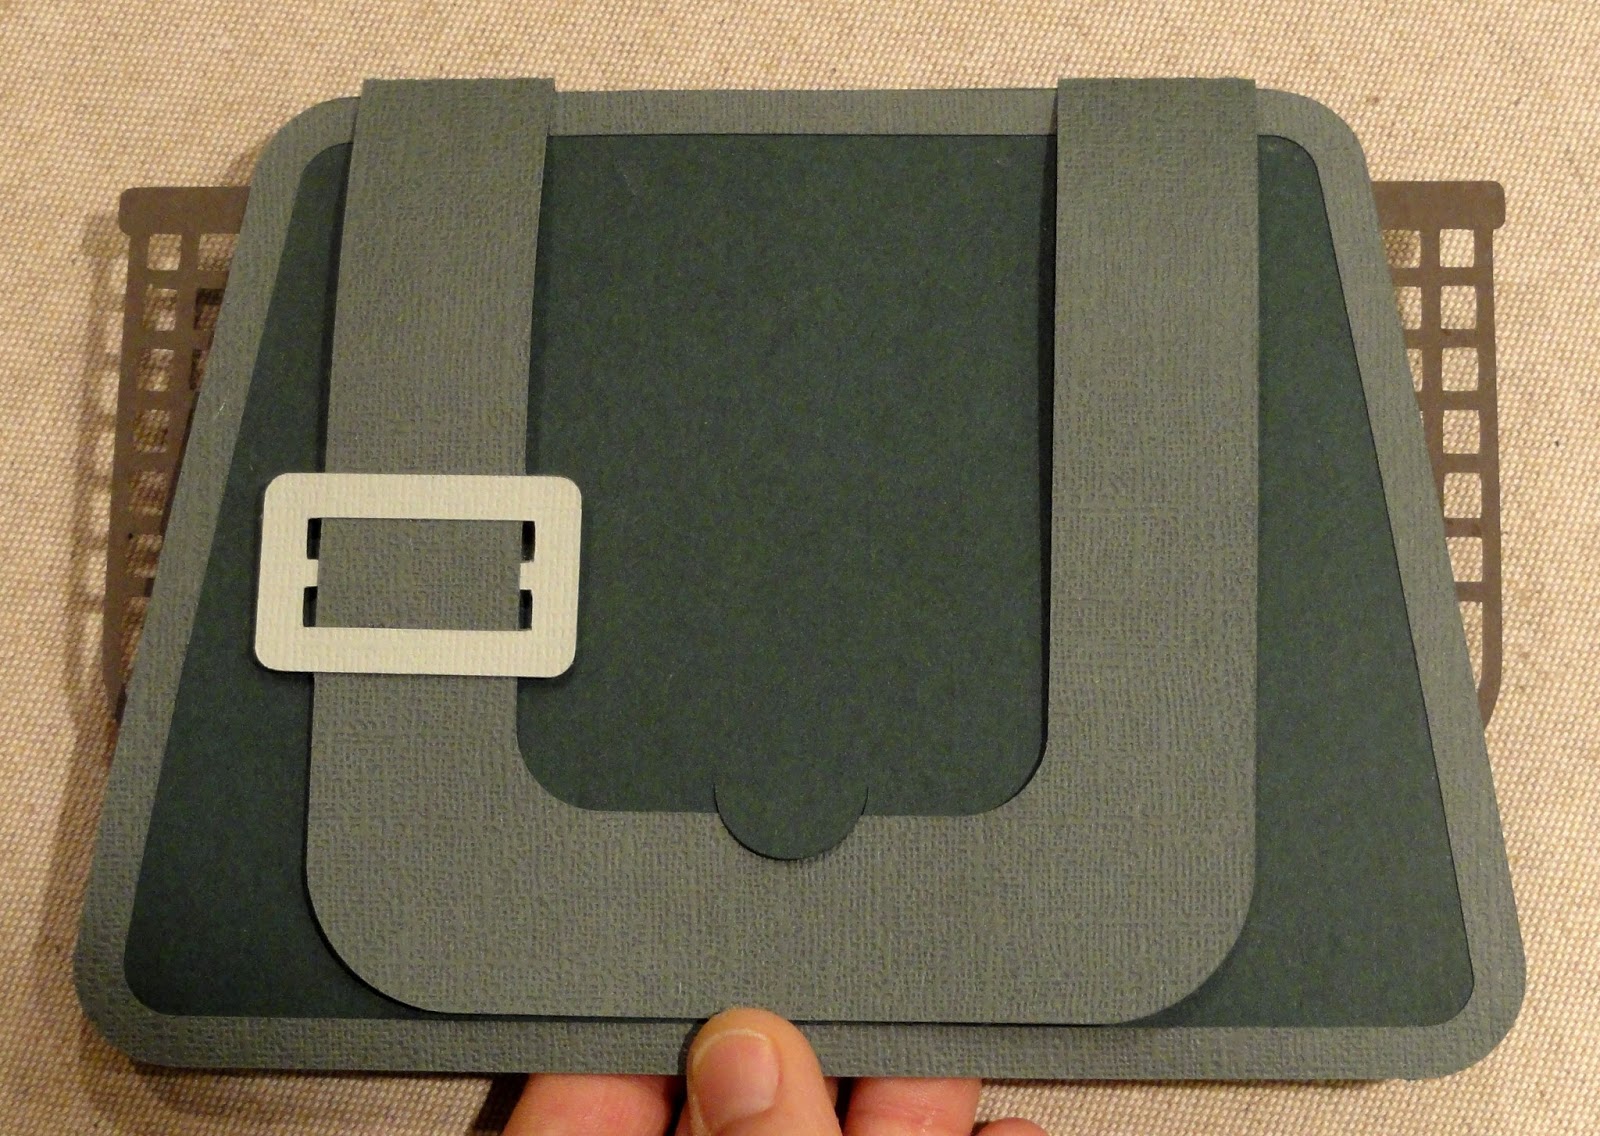
Here is how the unit should look from the front.


11. Position and attach the buckle over the corresponding shaped edges of the strap handle face side.


12. Position the strap ends over the top front of the card assembly so that the hole punches align.


Attach (4) accent brads of your choice.


To close the card, the strap handle will fold over the top layers of the card front, insert and back, and be brought downward until the semi-circle latch cutout can "catch" the inner edge of the handle U arch, as shown.


13. Attach the tiny heart onto the fishy accent shape, then position and attach the fishy between the handle straps onto the card back.


14. Prepare the creel card for giving by inserting a gift card between the two semicircle holder tabs.

Alternately, use the message sentiment card in that position. (You can print message on paper or card, then cut and trim to size (use cut file shape as template), if preferred.


Here is the completed, closed creel bag card finished.
(Tuck the assembled worm, lure and bobber into pockets,
as shown. Or, tie the bobber top loop to the netting 
with Trendy Twine.

Here's a view of the card's back to compare.

Monday, June 11, 2018

Creel 3D Thin Gift Box

Fishing theme box is large enough to hold candy bars 
or other "flattish" treats, but can also be 
the storage or gift container for the set of magnetic fish 
for the fishing pole 3D toy design. 
Creel box measures approx. 1" deep x 6.5" wide x 5.5" tall. 

Details include wicker-suggestive overlays, lid box flap, 
strapping and trim. For extra fun, create and tie on 
the "Grab Bait Celebrate Gift Tag". 

ASSEMBLY:  1. Identify and cut the shapes:
A box front panel
B box back panel   C box lid flap
D boxing strips to be joined
E box front "wicker" overlay panels
F center panel for latch hardware
G lid flap accents: overlay, rim, hole rim
H latch strap layers, accent tip
I latch hardware main (2) and sides (3 ea.)
J carry strap main (2 for build up)
K carry strap offset accents (1 front partial,
1 back whole)
NOT SHOWN: circle cover for latch strap rivet
2. Prepare the lid flap by bending back at
the perforation lines for top panel, flange tab.
3. Position at top of box back panel, with
back upper straight edge overlapping lid flange
to perf line, align side to side, and glue seam.
4. Prepare the boxing strips by bending back
on all vertical segment separation perf lines,
also on all end, top and bottom tab perf lines.
5. Identify the center edge and tab, then overlap
straight edge to perf line on opposite tab,
adjust top to bottom, then glue seam.
6. Prepare front box panel by positioning accent
overlays by aligning vertical edges with cut guidemarks
at top and bottom, then glue in place.
7. Position and attach the center panel
using the cut guide marks at top and bottom
for alignment assistance.
8. Prepare the latch mechanism by layering
the main shapes (2), and the left and right
side shapes (3 each), and gluing together,
taking care to align all edges as precisely
as possible. Use a flat weight to press built-up
layers during the drying process if using liquid
adhesive. This will help minimize curling
or warping.
9. Position each side build up shape under
the appropriate side edge of the main latch shape,
aligning edges and punch hole precisely.
Press assembled unit with flat weight while drying.
10. Position the latch build up unit over the box front
panel, aligning punch holes, and glue in place.
11. Prepare the lid flap accents by layering
the edge and hole rim onto the main overlay shape,
and gluing in place.
12. Position the lid flap accent assembly onto
the flap portion of the box back panel, offset
slightly within the panel as shown, and glue in place.
13. Position the box front lower edge
(should have latch assembly
in place at this point; not shown in image) over
the center segment flange of the boxing strip,
align the lower edge "corners" with the perf lines
marking the ends of center segment, and glue in place.
NOTE: the box back panel includes small guide marks
to help identify the corners; transfer these positions
to front panel with pencil marks, if desired.
14. Bend the boxing so that next segment tab edge
lines up with front panel edge, adjust, and glue
in place. Continue . . . 
. . . in similar fashion to bend and adjust boxing
strip to align segment perforation edge with
box front panel edge, and glue in place . . . 
. . . the remaining two segments on box side.
Then repeat the process for the opposite side.
15. Position and attach the box back panel
in the same manner attaching bottom edge
(use guide mark cuts that mark corners)
then working along one side to attach edges
to flange tabs, then along opposite side
until boxing is fully attached to both front & back.
16. Position and attach the latch strap tip accent
shape to front of strap, then layer two strap shapes
(for strength) and glue together. Press flat
during drying process.
17. Position strap top edge at flap center edge,
matching punch holes, and glue in place.
Insert and attach a mini eyelet through punch hole
to help strengthen strap attachment to flap.
Attach nail head accents to latch over punch holes.
To close the box, the strap will be inserted under
latch and pushed through fully.
18. Layer and attach the two handle shapes;
press under large flat weight during drying.
19. Position and attach the accent shapes
to front (half arch shape) and back (whole)
to handle layers. Press flat while drying.
20. Position straps on back box panel,
centered, with bottom straight edges aligned,
and glue in place.
21. Position and attach the circle cover shape
over the mini rivet to conceal the rough, 
scratchy edges.
Fill the creel box with goodies for gift giving,
or use the creel to hold the magnetic fish.

Sunday, May 17, 2015

Fishing Creel 3d Box Assembly Guide

Giving a gift, goodies or gift card to someone who likes to fish?
Here's the perfect gift box that looks like a traditional wicker creel.
Build the two part box base, attach simulated wicker overlays,
corner reinforcements, front panel and latch, back handle,
build and attach the lid with latch strap.
Eyelet fasteners add realistic accents.
Create the trout danglers from separate cut file
and attach with lanyard clips through "lip" punch holes.
Measures approx. 5.75" tall x 3.5" deep x 6.5" wide.  


ASSEMBLY:
1. Identify and cut the shapes:
A front basket with bottom, overlays
B back basket with overlays
C lid main shape with accent edge
D lid rim front and sides
E rim front reinforcement (underlay)
F back handle and reinforcement
G front lower corner reinforcement accents
H center front accent panel
I latch main with side build-up shapes
J latch strap with accent tip


2. Prepare the main basket (front) shape by folding back panels and tabs on all perforations.

3. Position and attach front and side front accent overlays on each of the panel sections.


4. Prepare the back basket shape by folding back on all panel and tab perforation lines. Take care that punch holes line up exactly.

5. Position and attach back accent overlay on back panel, and side back overlays on corresponding panels.


6. Join front basket assembly to back basket assembly by overlapping straight front side edge over back side long tab.


7. Fold back (to basket inside) and glue in place the upper basket opening tabs, except  leave the tab at the top of the unattached front side edge flat, to be folded down later.


8. Prepare latch by gluing 3 or 4 side latch dimension shapes into a stack for left side and a stack for right side.


Attach each stack to underside on ends of main latch shape.


9. Apply glue to the stack surfaces -- excluding a small margin at the outer edges that will NOT touch the accent panel -- then position and attach latch on the front of the center accent panel.

Attach eyelets/grommets through the pair of punch holes at this point of assembly.


10. Position and attach the center accent panel assembly on the front of the main basket assembly, taking care to match upper and lower edges with corresponding edge or perforation line.

Tiny hash marks on the front accent shape will assist with the centering of the panel.


11. Prepare lid main shape by folding back tab, pushing in tabs in opening.


12. Prepare the lid rim shape by folding panels and tabs back.

13. Center and attach the front edge of the lid to the front top tab of the rim shape.


14. Bend the rim shape into place to align the lid straight edges at the corresponding rim perforation lines, one at a time, until each tab and edge is attached, along both ends of rim shape.


15. Glue the hole tabs to the underside of rim.


16. Fold the rim tabs to the backside of rim and glue each in place, including the small end tabs.


17. Apply glue, position and attach the front rim reinforcement shape behind the front panel of the rim.


18. Apply glue to the underside of the accent lid shape, then position with outer edges even and attach to the lid assembly.


19. Position and attach the lid flange tab at the upper edge of the back panel of main basket assembly, taking care to align punch holes.

20. Prepare the handle by gluing two handle shapes with backsides together.

21. Attach eyelets/grommets in all back panel punch holes (lid flange and handle).


22. Form the basket assembly into a tube to bring the final side seam edge and tab perforation together, adjust and attach.


23. Fold the final top opening tab to the inside and glue in place.


24. Fold basket bottom panel tabs inward and push bottom into place in the bottom opening of basket "tube". 

Glue the tabs to the inside of the basket panels, keeping perforation edge of bottom even with bottom straight edges of basket body.


It will be helpful, as the tabs are being attached, to apply pressure from the inside of the basket.


25. Position and attach the latch strap onto the front rim panel of the lid, top straight edge of strap even with top of rim panel. 

Small dash marks will assist with centering alignment. It may also help to close the lid and insert the latch strap under the latch to make sure they will align once attached.


Here is the completed creel box.


Here is another finished view from the front . . .
. . . and from the back . . .
. . . and finally, with the fish trout hanger shapes
hanging from the basket handle 
(punch or poke a hole by hand, if desired).