
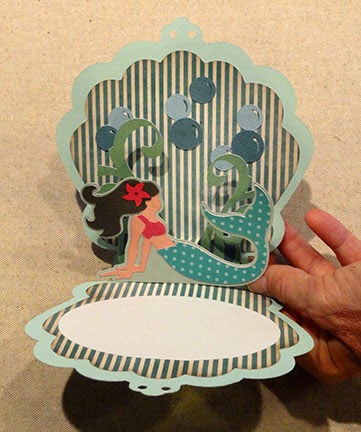
This fantasy mermaid card in the shape of a shell
would make a wonderful invitation to a swimming party,
or an "under the sea" birthday party.
Banner shape with word cut outs adorn the card front shell shape.
Card inner liner includes the "pop up" sections that provide surfaces
for the mermaid and large & small seaweed shapes.
Bubbles embellish the backdrop, and a large oval
provides a place for party details
(who, what, when, where, etc.)

CONSTRUCTION
1. Identify and cut the shapes
from left to right - shell outer card with front
shell inner card (includes pop up cuts) & oval
front decor (top)
mermaid and seaweed decorative shapes
bubbles

2. Layer the banner base (includes lettering cutout silhouettes to assist with positioning, with decorative offset banner shape. Attach eyelets (optional). Position lettering, including extra 'S' shape, with optional low-relief dimensional foam dots for added interest. Position and attach the shell front shape with banner/letters unit.

3. Prepare the inner card shape so that the pop up "bridges" are in the required positions. The demonstration shape here will help the cuts and folds to be more visible. a) fold the card at the centerline perf dashes so that the face sides are coming together, while at the same time pushing the three bridges forward, folding the connecting edge perfs as "valley" folds, and their intermediate perfs as "mountain" folds.

The results are two side tall bridges and a center shorter bridge.

Once the bridges are folding outward correctly, carefully fold the inner card shape completely closed/flat to help "lock in" the correct folds for all edges. Press well.

4. Open the inner card (now showing the actual patterned inner card for the sample card) and position over the inside of the main card base. Line up the center perforation of card base with the center perf dashes of the inner card, and glue in place.
TAKE CARE when applying adhesive to leave CLEAR the bridge sections. You CAN apply glue above and below the end perforations of each bridge area, BUT NOT the area of the actual bridge between the cut edges. DO glue the non-bridge space between the bridge cut edges.
(This is the trickiest part of this construction!)

As the gluing process progresses and BEFORE the adhesive is set, fold the card to make sure that the bridges are functioning as they need to, and not inadvertently glued down.
5. Attach the base shapes to both the tall and shorter seaweed shapes (smaller, right side unit shown here).

6. Position and attach the left (tall) seaweed base as completely as possible to the vertical "face" of the left bridge. Take care that the bottom edge of the seaweed base is even (not beyond) the bottom perforation of the bridge.

Once the seaweed is placed, and before the glue has dried, fold the card and apply pressure behind the seaweed's attachment area. This will help any adjustment needed to be made between the base and shapes.

7. Position and attach the right (shorter) seaweed decor shape to the right bridge's face in a similar manner, to the right of the center bridge's cut edge.
Once the shape is glued in place, fold the card and apply pressure behind the right bridge and decor shape, as in the second part of step 7, above.

8. Assemble the mermaid decoration. Shown here are all the individual shapes that compose her. The pink shape is the base for all the shapes above it, and it will be covered except for the face/neck area, midriff and arms. Once the main mermaid is layered, it is positioned within the larger, offset shape so that a narrow, even margin remains showing the aqua base shape.

9. Position the mermaid assembly in front of the center bridge face, taking care to align the tiny triangle cut out "registration" shape. The bottom straight edge of the mermaid shape should be even and not extend beyond the bridge's bottom perforation line. Glue in place.
Repeat the folding of card and applying of pressure behind the mermaid shape.

To help the shape attach while the bridge is "open" (the position to best see how the shape is positioned and not below the perf line, you may wish to insert a rod (like a pencil shaft) into the bridge tunnel to press against to join shapes.

10. Position the bubble base shapes (lighter blue here) and attach to the inside back of the card. Refer to the next photo to see suggested positions. Then, add the darker bubble single shapes over the corresponding portions of the base shapes.
11. Position and attach the information oval on the inside bottom of the card. Use the print and cut feature of the Silhouette software to include the "when, where, what" information about your gathering or mermaid party, or other sentiments if using this as a regular greeting or birthday card, etc.
If you don't have the print & cut option available, consider using a word processing program to layout your print information in a test document. Once it is adjusted as necessary, print a final "carrier" page, then center and temp tape (removable cello or masking) the cut oval over the printed area on the page, then re-insert this make-ready page into the paper supply of your printer, and print another copy. This time, the print will be made onto the positioned oval. Remove the printed oval, then repeat the process for all copies you need. (Test your printer to make sure this works for yours).

12. Use a short length of sheer narrow (or other of choice that fits) threaded through the clasp holes pair of bottom, then through top when card is closed, to secure the card or invitation shut until delivered and opened by the recipient.
Here is the finished card
in its closed position.

I made this card today for my MIL...Sadly I didn't have a 12x6 piece of patterned paper for the inside so I had to do a little surgery, still came out cute.
ReplyDeleteThank you for detailed instructions!
I made this card for our Grand-Nann's birthday, she loved it. I replaced the mermaid with a little seahorse I designed (they are her favorite things) - he was peeking out from the seaweed. I didn't get to see her receive it, because of a bout of tonsillitis.. but she LOVED it! she has a little memory loss, but she remembered it! I was so chuffed!! Thank you so much for sharing this :)
ReplyDeleteWhat a wonderful story. Thanks for letting us in on your experience. It makes a difference to us when we know we make some of these special life moments even better.
Deletehi, i would like to make this card for my daughter, can you let me know what design i need to buy on the silhouette cameo design shop? i have the pop up card in my card. does that include the mermaid and the seaweed and bubbles?? or are they seperate
ReplyDeleteSearch by name "mermaid splash pop up card", or by number (63237) which is harder to do with the revised Silh America website. The card comes complete with everything you see pictured in the Silhouette thumbnail and in the image at the start of this post, including card base, mermaid, seaweed, bubbles and all.
DeleteDo you have this in SVG form as well for the Cricut?
ReplyDeleteThank you for this really cute card I just made for my girlfriend for her birthday. It was perfect since last fall we went to the Sip 'N Dip Tiki Lounge in Great Falls, MT which have live mermaids swimming in a pool as we enjoyed fruity drinks.
ReplyDeleteSo nice of you to let me know. I appreciate that.
Delete