Keep the right "reason" in the Christmas season
by creating a paper nativity 3d box block set.

Essential figures boxes include:
Baby Jesus in manger, Mary, Joseph, donkey.

Tall and kneeling shepherds will help tell the wonderful story,
along with lamb and ox (or spotted cow).

Large stable backdrop with hanging star
and angel on stand compliment the group.

Three magi wisemen with camel
round out the scene.
Tall and kneeling shepherds will help tell the wonderful story,
along with lamb and ox (or spotted cow).
Box construction for each of the figures is very similar.
View the posts on this blog that show the process
with Mary, Baby Jesus, and Joseph by visiting HERE.
Then come back to this post to see illustrations that show
where the boxing strips for LID and BASE are joined.
These joints are marked on the cut shapes with
tiny cutout symbols (circles, squares, triangles, stars, etc.).
Unique assembly tips when there are some will also be explained.

CONSTRUCTION EXAMPLE:
DONKEY
Most of the Nativity 3d figure boxes are assembled in the same manner, with a lid and a base that fit snugly together. Assembled decor 2d figure shape is adhered to the lid front.
The following steps show the main steps in assembling the Donkey 3d box. Other boxes are also shown with shapes layout and boxing strip symbol locations to assist with knowing where each of the side strips start and stop.
 1. Identify and cut the shapes.
Donkey decor shape shown pre-assembled. Dark gray whole "base" shape is used to assemble the smaller pieces, and shows through as back ear, nostril, eye.
Boxing strips for LID A (at top)
Boxing strips for BASE B (at bottom)

2. Identify the symbols in the boxing strip tabs that help show how they join to each other, and also where those "joints" fall on the box silhouette.
Base strip symbols will be paired, so they can be distinguished from the Lid strips.

Here you can see the circle symbol in the LID bottom/front boxing strip, and you can compare that to the illustration above to see that this joint will fall at the neck/head angle when being attached to the main Lid shape.

3. You can distinguish the LID silhouette from the BASE silhouette by comparing their sizes. The LID shape is slightly larger, as is indicated by the pointing finger.
NOTE that these shapes are being shown here from the back of the box as it would appear when assembled. Therefore, we are seeing the BASE face side but the little bit of the LID that we are seeing is the back side.
Make sure that silhouette shapes are laid out as shown in the Step 1 or Step 2 illustrations before beginning to add boxing strips.

4. Prepare the boxing strip to be joined first (shown here is the bottom front, but you can begin anywhere you choose, as long as you can accurately tell where the strip should be joined). Fold the top edge and end tabs back. Also fold on the vertical perforation lines, to correspond to the required angle determined by the silhouette shape's angles, as back or forward folds.
You can determine which of these folds is correct by comparing the strip in its upright position to the edge(s) to which it will attach, as is shown here.
 5. Select the frst edge to be joined to the strip. Apply glue to the tab, then overlap the main shape's straight edge to the tab perforation, adjust so that the ends also line up - shape and strip segment, then apply pressure until secure.
Once you have initial glue "set", it may be helpful to turn the assemblage over on a flat surface and press the tab from the backside (box inside) to get a thorough, smooth connection.
6. Bend to align next segment and edge, and continue attaching strip to Lid shape. Join strips end to end as assembly progresses. At the final end joint and tab attachment step, you will need to apply glue to both and position in one step to avoid un-doing previous tab seams. You may also find it helpful to apply glue to strip segments in pairs or groups, then join these in the same step to help with the positioning and adjustments.
The following steps show the main steps in assembling the Donkey 3d box. Other boxes are also shown with shapes layout and boxing strip symbol locations to assist with knowing where each of the side strips start and stop.
Donkey decor shape shown pre-assembled. Dark gray whole "base" shape is used to assemble the smaller pieces, and shows through as back ear, nostril, eye.
Boxing strips for LID A (at top)
Boxing strips for BASE B (at bottom)
2. Identify the symbols in the boxing strip tabs that help show how they join to each other, and also where those "joints" fall on the box silhouette.
Base strip symbols will be paired, so they can be distinguished from the Lid strips.
Here you can see the circle symbol in the LID bottom/front boxing strip, and you can compare that to the illustration above to see that this joint will fall at the neck/head angle when being attached to the main Lid shape.
3. You can distinguish the LID silhouette from the BASE silhouette by comparing their sizes. The LID shape is slightly larger, as is indicated by the pointing finger.
NOTE that these shapes are being shown here from the back of the box as it would appear when assembled. Therefore, we are seeing the BASE face side but the little bit of the LID that we are seeing is the back side.
Make sure that silhouette shapes are laid out as shown in the Step 1 or Step 2 illustrations before beginning to add boxing strips.
4. Prepare the boxing strip to be joined first (shown here is the bottom front, but you can begin anywhere you choose, as long as you can accurately tell where the strip should be joined). Fold the top edge and end tabs back. Also fold on the vertical perforation lines, to correspond to the required angle determined by the silhouette shape's angles, as back or forward folds.
You can determine which of these folds is correct by comparing the strip in its upright position to the edge(s) to which it will attach, as is shown here.
Once you have initial glue "set", it may be helpful to turn the assemblage over on a flat surface and press the tab from the backside (box inside) to get a thorough, smooth connection.
6. Bend to align next segment and edge, and continue attaching strip to Lid shape. Join strips end to end as assembly progresses. At the final end joint and tab attachment step, you will need to apply glue to both and position in one step to avoid un-doing previous tab seams. You may also find it helpful to apply glue to strip segments in pairs or groups, then join these in the same step to help with the positioning and adjustments.

7. Layer the decor shapes and glue. Position and attach to the Lid front. Turn the Lid over, face down on smooth flat surface, and apply thorough pressure from the backside.
(NOTE: If you are confident and neat in the assembly of the boxing strips to main shape, you may consider adding the decor shape to the Lid silhouette before strips are added, for ease as you work with flat shapes.)

8. Assemble the BASE with its boxing strips in the same manner as the LID.
9. Fit the Base inside the Lid. The fit is intentionally snug, and the shapes may need to be adjusted slightly.

10. The boxes can be used as boxes, of course. But if you intend to use them more as blocks you may consider adding glue between the Lid and Base so they will attach thoroughly, and stand better.

Here is my Donkey box complete, and ready to watch over the manger scene.

LAMB ASSEMBLY
Decor shape can be layered on a dark "base" shape that shows through as ear, eye, and legs. Swirls at cut shapes that attach to the body.
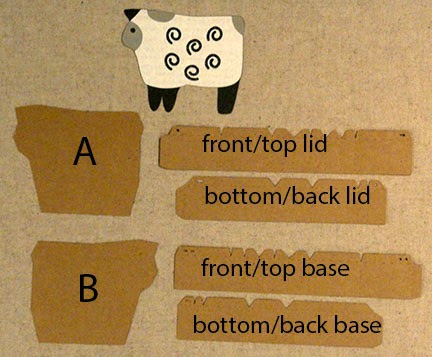
Here you can identify the shapes for box LID and BASE. Decor shape has been pre-assembled.

This illustration shows where the symbols in the boxing strip tabs will fall when the strips are joined.

SPOTTED COW (OR OX)
Decor shape can be layered with dark "base" shape that shows through as eyes, horns. Head also has "underlay" for contrast inner ear coloration. All other shapes either fit onto the "base" shape like puzzle pieces, or are placed on top.
 Here you can identify the shapes for box LID and BASE. Decor shape has been pre-assembled

SHEPHERD KNEELING
Decor shape can be layered onto dark "base" shape that shows through as eye. Other shapes are layered onto the "base" like puzzle pieces, with stripe accents added on top.
Arm shape can be layered as fleshtone "base" with sleeve and details added on top.


This illustration shows where the symbols in the boxing strip tabs will fall when the strips are joined.

Before joining staff and front arm, you will need to compare the position of the staff within the Lid front main shape. Here I have the pre-assembled decor shape layed on top of the Lid front silhouette. I have placed the staff for accuracy within the Lid's shape, then will layer the assembled arm unit as it lines up with the decor "base" shape. Adjust as necessary, then glue staff lower portion over body, arm over staff.

SHEPHERD TALL
Decor shape can be layered onto dark "base" shape that shows through as eye. Other shapes are layered onto the "base" like puzzle pieces, with stripe accents added on top. Robe shape has overtunic layered on top.
Arm shape can be layered as fleshtone "base" with sleeve and details added on top.

Here you can identify the shapes for box LID and BASE. Decor shape has been pre-assembled.
Staff and arm decor shapes will need to be compared to Lid main shape, in similar manner as is described above for the Kneeling Shepherd.

This illustration shows where the symbols in the boxing strip tabs will fall when the strips are joined.

ANGEL ON STAND
This figure has a stand alone tutorial that you can view HERE.

STABLE BACKDROP AND STAR
This project has a stand alone tutorial that you can view HERE.

MAGI WISEMAN WITH GOLD COFFER

Decor shape can be layered onto dark "base" shape that shows through as eye. Other shapes are layered onto the "base" like puzzle pieces, with stripe accents added on top. Robe shape has overtunic layered on top.
Arm shape can be layered as fleshtone "base" with sleeve and details added on top.

Here you can identify the shapes for box LID and BASE. Decor shapes has been pre-assembled as body, head and arm units.

MAGI WISEMAN WITH FRANKINCENSE CENSOR

Decor shape can be layered onto dark "base" shape that shows through as eye. Other shapes are layered onto the "base" like puzzle pieces, with stripe accents added on top. Robe shape has overtunic layered on top.
Arm shape can be layered as fleshtone "base" with sleeve and details added on top. Censor handle can be slipped over hand shape tip.

Here you can identify the shapes for box LID and BASE. Decor shapes has been pre-assembled as body, head and arm units.

MAGI WISEMAN WITH MYRRH BOX

Decor shape can be layered onto dark "base" shape that shows through as eye. Other shapes are layered onto the "base" like puzzle pieces, with stripe accents added on top. Robe shape has three-part layered on top. Hat has crescent shapes that layer on.
Arm shape can be layered as fleshtone "base" with sleeve and details added on top.

Here you can identify the shapes for box LID and BASE. Decor shapes has been pre-assembled as body, head and arm units.

CAMEL BOX

Decor shape can be layered with smaller head show-thru for ear contour lines. Saddle wth pennant decor layers, dots should through as cutouts, tassel has top shape that layers on, tail has top shape with tail tip shape.

Here you can identify the shapes for box LID and BASE. Decor shapes has been pre-assembled onto body.

This is awesome! Super excited about this set!
ReplyDeleteThese are great! I can't wait to see the rest of the set. Making these for my Pre-School Sunday School class. They will love it!
ReplyDeleteMy scheduled production calendar has the rest completed and available before Thanksgiving. Keeping fingers crossed.
DeleteGreat set!
ReplyDeleteHappy you like them!
ReplyDeleteI love this set and have already started making it. When I got to the adult shepherd I noticed that the front and back of the lid are the same size. Will this work or is that a mistake?
ReplyDeleteThey may look like they are the same size, but the base is actually just a little smaller all around, as in about .02" offset inside.
Delete