Create this fun six-sided gift box
to give a gift or special small surprise
for a kid (or adult) who loves dinosaur stuff.
Composed of base and lid, each with
pock-marked contoured accent shapes,
the top and bottom fit together by means of
base platform tall tabs that fit into
corresponding slots on lid's underside.
Optional lid panel includes a push-through slot punch tab
to attach two-layer dino track tag.
Measures approx. 4.25" tall x 2.75" deep x 3.75",
which is large enough to tuck in a gift card
before closing.
(This tutorial is under construction.
Please return soon to view the completed assembly guide.)
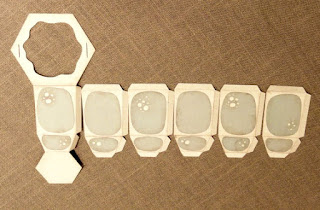
ASSEMBLY:1. Identify and cut the shapes:
A base (bottom) front wedge
B base side wedges (5)
C connector tabs (2)
D base accent shapes
E lid (top) front wedge
F lid side wedges (4)
G lid side wedge that includes tag tab slot
H lid side accent shapes
I lid top accent shapes
K tag tab with punch hole
L tab two layers
2. Prepare the base wedges by folding back on horizontal (crosswise) perforations, folding tabs back. (Shown is the front wedge. Prepare the sides similarly.)
Position the accent shapes in preferred arrangement on the lower and upper panels of each wedge.
3. Prepare the lid wedges in similar fashion, EXCEPT there is an additional perforated fold line on the lid wedges at near the bottom edge that should be folded as a "valley" fold.
This will create a rim and ledge at the bottom of the lid assembly.
This image shows the ledge on the front shape, folded with "valley" fold as well.
4. Position the accent shapes in preferred arrangement on the lower and upper panels of each wedge. Also position and attach the accent shape on the top of the front wedge.
NOTE that the side wedge that includes the tag tab slot is lined up to be attached next to the front/top wedge.
5. Line up the front base wedge and the first side wedge to be attached, with the upper panel straight edge and corresponding tab perforation line even. Overlap edge over tab, adjust so that upper and lower edges match, then glue in place.
6. Bend the edges together to line up the straight edge of the lower panel over the adjacent lower tab, adjust and glue in place.
7. Position and attach the next wedge to the assembly in similar manner, working with the upper and then lower panel edge and tab.
8. Continue to attach the remaining side wedges to the assembly.
Finally, position and attach the final side wedge to the free edge of the front wedge to form a tube.
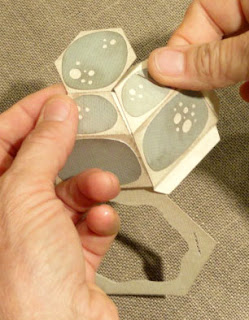
9. Fold the bottom attached hexagon into position, adjust to line up edges and tab perforation lines, and glue in place.
It may be helpful to place the base bottom down on a flat surface to reach inside and press to help these seams to attach fully.
10. Follow a similar procedure to attach a lid wedge to the front wedge, first the bottom panel . . . .
. . . then the upper panel, and then . . .
. . . attach the remaining side wedges into one assembly.
11. Fold the top attached hexagon into position and glue in place.
12. Prepare the tag tab by folding in half, with end tabs folded out. Glue the punch hole panels ONLY together.
13. From the inside, insert the punch hole end of tab through the slot . . .
. . . push through completely, and glue the tabs in place on the underside of the lid.
14. Apply glue to the underside of the rim fold areas of each wedge, fold the rim toward the inside of the lid, and press to attach.
(NOTE: tabs should remain perpendicular to form a continuous ledge, though they may be folded back flat to assist with applying pressure to attach rims.)
15. Apply glue to the perpendicular tabs ledge, then bend the attached hollow hexagon into position.
Adjust for best fit, then apply pressure to thoroughly attach each tab to hexagon by inserting fingers through opening as needed.
16. Prepare the attachment tabs in a manner similar to tag tab.
NOTE that the attachment tabs have have an angled side that will fit into the hexagon "corner" on the outside of the base box.
20. Insert one tab through each slot from the underside of the base upper hexagon and glue in place.
21. Place the lid onto the base by lining up and sliding the attachment tabs through the corresponding slots on the underside of the lid.
Here is the completed, closed box.
22. As a finishing touch, layer the oval tag, then attach to the punch tab with twine or ribbon.
Here is the finished presentation.


so so cool can't wait to play!
ReplyDelete