
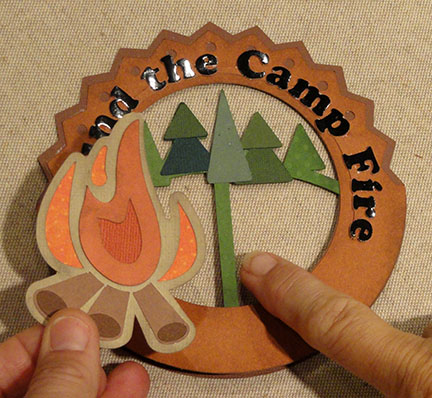
Circular rocker card with self stand
captures the spirit of those camping memories.
Details include sawtooth base and offset front,
layered campfire, pine tree horizon,
letter cut out phrase and positioning guide base,
marshmallow roast sticks.
Finished size: approx. 5" x 5".

ASSEMBLY:
1. Identify and cut the shapes:
(clockwise from top left)
back folded circle, lettering with base positioning silhouette, trees shapes, trees horizon base shape, marshmallow assembly, fire assembly, front and back main rings

2. Prepare the horizon trees layer by layering two-part triangle trees lower and upper shapes, then assembling single triangle trees, two-part trees and center triangle tree.
NOTE: shapes also available in the cut file include separate trees only silhouette, and separate side triangle single trees as needed for the coloration option you may need.

3. Position the trees layer behind the front ring shape, lining up the lower curved edges, and attach the surfaces that touch.

4. Position and attach front and back main ring shapes, lining up the lower half curved edges that match.

6. Fold the back ring in half, then position on the backside of the back main ring, lining up the lower half of the outer curve edges.

Also line up the fold corner at the bottom of the lowest sawtooth "point".
Glue the lower portions together, leaving the top of the back ring free to fold up flat for sending, fold down to create the rocker stand.

7. Position the letter cut outs onto the corresponding silhouette on the positioning guide, and glue in place.
NOTE: though it appears "red" in this image, the positioning guide should be cut to match the front ring shape paper, so that when the phrase arch is in place, the guide "disappears".

8. Position, pivot so that it is balanced with bottom edges of letters even, and attach in place.
9. Assemble the camp fire unit by layering the silhouette shape over flames underlay, with main flame and its underlay on top. Add logs with end contrast ovals.
10. Position, center, over the upright trees horizon layer support with the bottom just above the curve edge at the bottom and attach in place.
(See the following image for final positioning guidance.)

11. Prepare the marshmallow and stick decorations, then position and attach at the bottom of the card assembly, as shown.

Fold the back circle upper half down to form a self-stand, fold flat to send.
No comments:
Post a Comment