
Dimensional card folds into a box,
but also can
be folded flat sending.
Front panel includes rounded barrel staves in three
layers,
with bands and nail head detail.
Layered autumn stencil sign can
"hang" by twine
from tiny nib "loop" at top front top.
Three "bridges" are attached in the
box's interior
to hold a dozen apples (3 sizes) with oval leaves.
 ASSEMBLY:
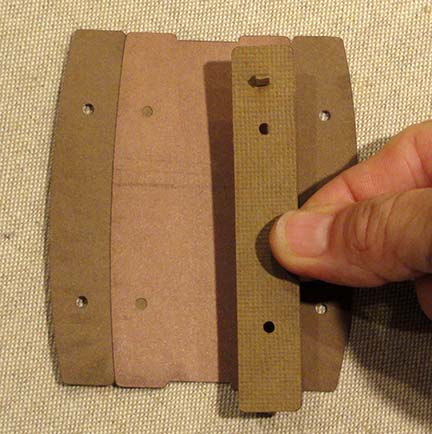
1. Identify and cut the shapes:
A box base shape with back extensions
B front barrel base with stave layers, bands
C nib loop tab
D side base with stave layers, bands
(2 sets)

2. Fold the nib loop tab in half and insert from backside through the slot at the top of the center front single stave.
Fold each end tab outward, and slide fold end in to the point where the stave surface is even with the tab perforations.

Use a pointed tool to open up the loop so that twine can be passed through.

Glue the tabs to the backside of the stave.
3. Layer and attach the outer and middle stave layers, taking care to center narrower on top of the wider layer, with top and bottom edges even.
4. Position and attach center front stave that includes the loop tab (which designates the top of the assembly).

5. Layer the side stave assemblies in similar manner.
6. Position and attach front and side bands, lining up the punch holes.
(This image indicates that the center front band ends are shaped; the side band ends are straight cut.)

7. Prepare the box base shape by bending inward on each of the vertical perforation lines, including at the tab. Form the box into a tube to bring the straight side edge to overlap the tab perforation line. Adjust to make sure the bottom edges are even, then glue in place.

NOTE that the box base's symmetry allows it to be folded flat to apply pressure along the seam, until it is completely secure.

8. Prepare the bridge shapes by attaching apple accents in place as suggested by the shaped upper edges (if using the shaped bridges; these have 'F' for front, 'M' for middle, but 'back' bridge has no marking).
If you choose to use plain bridges, make your own arrangement of apples at upper edges.
9. Bend side tabs back on each bridge.

10. Position the 'back' (tallest) bridge assembly inside the box base interior, adjust so that the top of the tab shape is even with the top of the box's side walls, in a position approx. 1/4 of the distance from back to front walls. Make sure the bridge is perpendicular.
Apply pressure to attach the tabs in place, however, before the glue completely dries . . .

. . . close the box card into a flattened position . . .

. . . and apply finger pressure at the positions where the end tabs are attached.
Pressing in this way allows the bridges to "self-adjust" a bit so that the box card will fold flat.
(Repeat this folding/flattening step after each bridge is attached.)

11. Position the middle bridge at the halfway point within box's interior, and repeat the attaching process.

12. Position and attach the front bridge approximately 1/4 of the box interior behind the front (or halfway from middle bridge to the front).
13. Attach the leaves to the selected apple tops.

14. Add the "nail head" punch dot circles into the punch holes on the bands.
15. Position and attach the side barrel assemblies to the side panels of the box card. Take care that bottom edges are even.

16. Attach sign layers into a unit. Tie in place on front panel with a short length of twine or equivalent, passing twine through loop, tying onto sign punch holes.
17. Position and attach front panel assembly to the front of the box card, with bottom edges even.

18. Assemble the arch with "delicious" word cut out centered, with the 'i's lined up under the bump-out of the arch's top edge, as shown. Attach the 'i' jots, and leaf pairs.

19. Position the arch at back of card, with tips overlapping the back panel extensions. Center arch, and attach overlapped arch and extension tips.
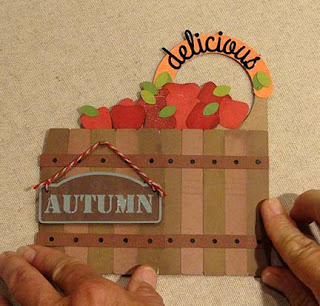
Fold the card flat as shown to place into an envelope and send.

No comments:
Post a Comment