Perky slice-form snowman holds a candy ball (Lindt)
wrapped chocolate ball in his middle.
Measures approx. 3.75" tall x 3" wide x 3" deep.
Place one at the top of a winter feast place setting,
(such as a Frozen party)
or give as a small but unique treat.
ASSEMBLY: 1. Identify and cut the shapes:
Body sections (numbered for assembly order around
the snowman's vertical axis) 1-4 left half, 5-8 right half
A earmuffs and muff ovals
B eye base and pupils assembly
C nose D mouth front and back halves
E scarf ring F scarf tails
2. Prepare the body shapes by bending forward
on center perforation lines.
3. Arrange the sections in order, then separate
shapes 1 thru 4 for the left half assembly.
Begin with body #1 (left in this image)
and body #2. Bring left and right halves respectively
together - NOTE that the cut edges should match.
Glue the surfaces that touch together thoroughly.
4. Line up body #3 and join to left edge of #2,
then add body #4 at left edge of #3.
This completes the body left half.
Eye platform is visible at the top of right edge,
indicating this is the front of the snowman.
5. Assemble body sections #5 thru #8
in similar fashion to complete the right half.
Here they are shown as they will eventually
be joined together.
6. Position the chocolate candy ball in the hollow
of one of the halves (shown here in 1-4 half),
with the wrapper extended above the hollow "window",
and attach the wrapper to the surfaces it touches.
NOTE: use a strong, quick-grab adhesive such as
hot glue, or Fabri-Tack.
Tuck the bottom end wrapper up under the ball
so that it won't interfere with subsequent joining
of halves (it does NOT need to be attached).
7. When candy is secure, fit the opposite body half
over the first half, with hollow fitting over the candy ball,
and glue body surfaces to matching components.
NOTE this process of attaching halves may take
special care to make sure that the joining is complete,
particularly at the center where all the body shapes
radiate. Apply sufficient adhesive and pressure
to assure a complete and secure joining.
8. Prepare and attach the accent shapes:
Fit earmuff base (front and back) over
oval extensions at head sides.
Fit contrast muff ovals over front and back.
Position and attach arm twigs front and back.
Assemble pupils on eye base, then attach
on eyes platform partial eye base shapes.
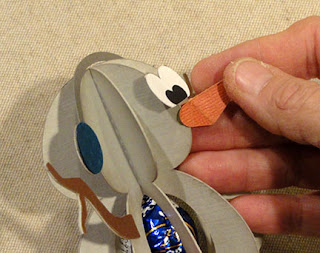
Prepare nose by bending back on center
and cross-wise perforations, forward on end tabs.
Position nose on front slice below eye platform,
with a tab on each side of slice, and attach in place.
Push nose back so that side perforations
are closer to body. Apply a little thick style
glue underneath to help hold this shape, if desired.
Prepare the coal nugget mouth unit.
Bend the tab back on the back mouth halves,
then attach to matching half on back of
main mouth shape. Tabs should remain free . . .
. . . so they can be positioned and attached
on each side of the center slice below nose.
Open the scarf ring at back split,
flex to insert around neck indent,
then arrange split into "closed" position at back.
Attach left and right tail shapes top ends
onto top of scarf at front or side front.
Here's the completed snowman candy tummy favor.


No comments:
Post a Comment