
Create a little "Cupid Effect" this Valentine's season
with a dimensional quiver box and 3d arrows.
Irregular octagon box (similar to canister characters)
has a "secret" compartment at bottom
which is fastened in place by means of front and back
rivet circles and twine. Back bracket holds leather strapping.
Arrows are a hex tube built around a cut-to-length
section of 5/16" dowel. Arrowhead assembly fits
into tube edge slots, with arrow tabs that attach
to shaft, and then are further secured with twine wrapping.
Fletching sections have tabs that connect near bottom.
ASSEMBLY GUIDE:
(Arrow assembly follows the quiver.)
1. Identify and cut the shapes for the quiver canister:
A main canister shape with accent panel overlays
B top canister rim reinforcement
C bottom rim reinforcement D whole bottom panel
E flange reinforcements
F canister bottom shape with accent panels
G bottom upper rim reinforcement
H bottom whole panel
I scallop accent strips for bottom (2)
J closure circles (8)
K strap bracket L heart front accents


 8. Position bracket on back panel, matching
punch holes, and glue edge tabs only in place.


 14. On the bottom, apply glue to the top surface
of the reinforcement ring, then position and
attach the whole bottom panel.
 15. Prepare the connector flanges by folding
each in half (the portion with slightly angled edges
is the backside). NOTE that flanges are sized to
fit the varied facet edges of the canister bottom
rim: front & back widest; angle edges narrowest;
sides middle size.


 20. Attach circle closures at punch holes
as noted in step 6.
Also attach eyelet through punch holes.
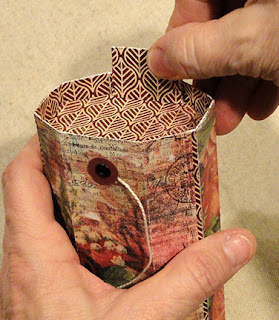
21. Form bottom canister into a tube,
overlap straight edge at opposite perf line,
and glue side seam.


 Use opening to "pinch" and apply pressure
to edges to secure ring.
It may also be helpful to place the bottom canister
bottom down on flat surface, to reach inside
and apply pressure.


 26. Cut lengths of leather lacing or narrow strips
(or equivalent), one at 14" and one at 15".
Insert and glue ends under bracket,
wrap ends toward front . . .
 . . . then insert opposite ends
into remaining end of bracket, and glue inside.
 27. Attach hearts (shown with optional
eyelet accents) on front panel to complete quiver.


 33. Apply glue to the half of the underside of
"feathers" area (leaving tabs glue-free),
fold in half to attach the two halves.
34. Position and attach tabs to adjacent faces
of shaft, aligning bottom fletch point with shaft bottom.


 . . . then wrap snugly in 7 or 8 rows.
Trim excess and glue end in place.


(Arrow assembly follows the quiver.)
1. Identify and cut the shapes for the quiver canister:
A main canister shape with accent panel overlays
B top canister rim reinforcement
C bottom rim reinforcement D whole bottom panel
E flange reinforcements
F canister bottom shape with accent panels
G bottom upper rim reinforcement
H bottom whole panel
I scallop accent strips for bottom (2)
J closure circles (8)
K strap bracket L heart front accents

2. Prepare the main canister by bending back on all
vertical perforation lines, on inner top and bottom tab perfs;
bend forward on outer top and bottom tab perfs.
Also prepare the large accent panels by bending
back on the perforations.
3. Position the front panel accent panels over
corresponding front, back and angle panels
of the main canister,
matching the closure punch holes.
Position narrow panels over side panels.
4. Cut two 6 inch lengths of twine (or perle cotton).
Thread scant 1/2" through each punch hole
(retain to for bottom of canister holes)
and secure with glue on the backside near hole.

5. Glue pairs of closure circles together to
prepare four closure circle units.

6. Apply glue to underside of the circle,
but ONLY near the opening so that the
twine can wrap under the outer edge
for closure.
Position over opening and glue in place
(twine will be caught between circle and canister).

7. Prepare strap bracket by bending edge tabs forward
at perforations.
(NOTE that there are two sizes of bracket
in the cut file to accommodate varied strap materials.)
Also add some curl between
the perforations by rolling/pulling across a round
shaft like the handle of this tool, or a pen, etc.

punch holes, and glue edge tabs only in place.

9. Form the canister into a tube, overlap the
straight edge at opposite tab perf line,
and glue side seam.

10. At bottom, bend tabs inward, with outer tabs
bending perpendicular into the canister interior.
Glue the inner portion of each tab to the backside
of the canister body.
Attach eyelet through circle closure punch holes.

11. At top, repeat the process from step 10.

12. At top, apply glue to the backside
of reinforcement ring, then position on top of
the "ledge" formed by the perpendicular tabs,
adjusting the canister shape to allow proper fit.

13. At bottom, do the same with reinforcement ring
as in step 12 for the bottom.

of the reinforcement ring, then position and
attach the whole bottom panel.

each in half (the portion with slightly angled edges
is the backside). NOTE that flanges are sized to
fit the varied facet edges of the canister bottom
rim: front & back widest; angle edges narrowest;
sides middle size.

16. Position flanges inside of bottom rim extension,
each size in the corresponding size position
with bottom straight edges snug against bottom panel,
and glue in place.
NOTE: these flanges will tuck inside the top rim
of the bottom canister to assist closure.

17. Prepare bottom canister shape by bending
back on all perforations.
Also bend back scallop strips on perforations.
18. Position and attach the accent panels
on the bottom canister.
19. Position scallop strips above accent panels
matching perforation lines and punch holes.
NOTE that the scallop edge extends above
the top tab perforation fold edge.

Also NOTE that because of varied paper thickness,
the scallop strips may be slightly long;
trim excess on ends as necessary.

as noted in step 6.
Also attach eyelet through punch holes.
21. Form bottom canister into a tube,
overlap straight edge at opposite perf line,
and glue side seam.

22. Bend top tabs back and glue in place
to inside of bottom canister.

23. Bend bottom tabs inward at 90 degree angle.
Position and attach bottom reinforcement ring,
adjusting canister shape to match up all ring
edges with perforation lines.

to edges to secure ring.
It may also be helpful to place the bottom canister
bottom down on flat surface, to reach inside
and apply pressure.

24. Position and attach whole bottom panel.

25. Place the bottom canister onto the
main canister by tucking flanges inside,
while keeping scallop edges on the outside
to overlap bottom edge of upper canister.
Complete closure by "figure eight" wrapping
twine around circles.

(or equivalent), one at 14" and one at 15".
Insert and glue ends under bracket,
wrap ends toward front . . .

into remaining end of bracket, and glue inside.

eyelet accents) on front panel to complete quiver.

Another view of completed quiver.

ARROW ASSEMBLY
28. Identify and cut the shapes for each arrow:
A main arrow shaft B end hexagon
C main arrow head (2)
D arrow head overlay with attachment tabs (2)
E fold-over fletch shape (3)
NOTE: there is a left & right half variation
of fletch shape, to provide paper/pattern use options.

29. Prepare the shaft by bending on long perforation lines.

30. Form the shaft into a tube, bringing straight
side edge to overlap opposite tab perf line.
Use a length of 5/16" wooden dowel inserted
into shaft tube to provide a press-against gluing surface.

31. Cut a 5/16" dowel length to 9 1/8" to
provide strength and form to arrow shaft.
Apply glue inside the bottom edge of shaft . . .

. . . then insert dowel to be even with bottom edge.
Apply glue and attach end hex shape.

32. Prepare fletch shapes by bending back
at center perforation line, forward at edge tabs.
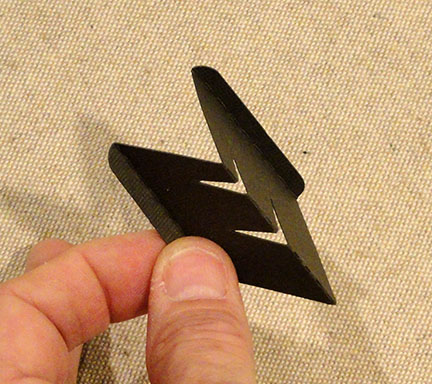
"feathers" area (leaving tabs glue-free),
fold in half to attach the two halves.
34. Position and attach tabs to adjacent faces
of shaft, aligning bottom fletch point with shaft bottom.

35. Prepare arrow head halves by
applying glue to the overlay ONLY in areas
away from tabs, then centering design edges
within main arrow head shape.

36. Layer and join arrow head assembly halves,
with tabs still remaining free.

37. Position the arrow head centered on shaft top
with edges inserted into slots, then . . .

. . . press tabs down and glue to shaft.

38. For wrap, cut a length of twine approx. 11 - 12 inches.
Anchor one end as shown at center of tabs on one side . . .

Trim excess and glue end in place.

Here is the completed arrow.

Very cool idea! This could be a fun decoration idea even if it isn't valentine's day. Arrows are definitely a popular thing right now!
ReplyDelete