Delicate embroidery stitches can be easily
made
through the tiny lacing holes provided
for three stitching elements:
backstitch vine and stems,
lazy daisy stitch leaves (add optional center long
stitch)
and colonial (or french) knot berry trios.
Cut from card stock, complete
stitching
with embroidery floss (recommended 3 ply),
then use the optional
plain scallop mat shape
to attach to backside to hide the stitchery
construction.
For a fabric version (wool or wool felt),
cut the top mat layer
as a template to transfer pencil dots
as pattern for completing as regular
embroidery stitching with 1 ply (vine and knots)
and 2-3 ply (daisy leaves)
and 2-3 ply (daisy leaves)
like the thumbnail project shown.
Mat measures
approx. 11.75" in diameter.
ASSEMBLY: 1. Identify and cut the shapes:
A Card stock front with punched needle holes
B card stock back "cover"
OR . . .
. . . C fabric mat template with holes
for marking stitch locations onto wool felt.
(this is the same shape as B above from
lower quality card stock)
(NOTE: fabric version will be demonstrated
first and in more detail.)
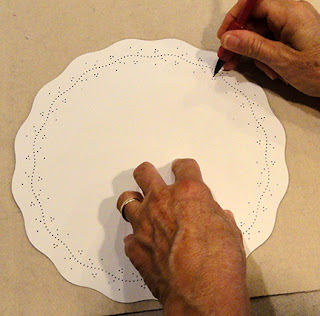
2. Position fabric template onto front side
of wool felt and mark the outline (trim line for later)
and each of the needle holes using a .5mm or .7mm
mechanical pencil or equivalent.
Take care that the template does not move during
the process (consider temporary securing method
such as double stick tape).
Repeat this stitch all along the marked vine line,
also completing tiny branch stitch pairs as they
are encountered during the process.
4. Next prepare to stitch the leaves, using 2 or 3 ply
floss loaded in the needle.
Here is a line drawing of the lazy daisy stitch
that will be used to create the leaves:
NOTE that the guide mark for the base of each leaf
is also a guide mark used in the vine stitching,
three stitches behind or to the right in this image
of the vine branch.
ASSEMBLY: 1. Identify and cut the shapes:
A Card stock front with punched needle holes
B card stock back "cover"
OR . . .
. . . C fabric mat template with holes
for marking stitch locations onto wool felt.
(this is the same shape as B above from
lower quality card stock)
(NOTE: fabric version will be demonstrated
first and in more detail.)
2. Position fabric template onto front side
of wool felt and mark the outline (trim line for later)
and each of the needle holes using a .5mm or .7mm
mechanical pencil or equivalent.
Take care that the template does not move during
the process (consider temporary securing method
such as double stick tape).
Here is the marked felt.
Trim excess away a bit beyond the trim line
(final trim after manipulation that occurs
during the stitching process).
This illustration shows the marked dots and
the stitching that corresponds to the marks.
3. Prepare to stitch vine by threading 1 ply floss
on the finest needle you are comfortable with.
Here is a line drawing of the back stitch
that will be used to stitch the vine:
Knot and anchor on the backside, then insert
and bring needle to the front at one of the stitch
marks (pull floss completely through drawing
length fully through - here and throughout).
Next, make a "back stitch" by inserting needle
down at the mark behind the exit hole of the
"up" stitch.
Shown here: a few stitches already completed,
exit thread in front, needle re-insert behind
previous exit stitch . . .
. . . then bring needle up at the mark
in front of the previous exit hole . . .
. . . to complete a stitch.Repeat this stitch all along the marked vine line,
also completing tiny branch stitch pairs as they
are encountered during the process.
4. Next prepare to stitch the leaves, using 2 or 3 ply
floss loaded in the needle.
Here is a line drawing of the lazy daisy stitch
that will be used to create the leaves:
is also a guide mark used in the vine stitching,
three stitches behind or to the right in this image
of the vine branch.
A. Anchor floss on the back with small knot
and tail and bring needle to the front at
the appropriate vine-shared hole.
B. Loop floss around to the top, then
re-insert needle into the same exit hole.
C. Bring needle point up again at the outer
guide mark for that stitch.
D. Draw needle and floss through and slowlyclose the loop stitch until it is stopped by
exiting floss.
E. Re-insert needle at or very near the outer
guide mark for this stitch.
F. Draw needle and floss away from work
on back side until the top hold stitch is
flush on top.
G. To fill in the leaf, add a center long stitch
by inserting (up) the needle at the leaf base guide mark,
. . . and drawing the needle through until stitch
is flush with mat surface.
5. Prepare to add the Colonial knot berry stitches
at the trio cluster marks by threading 1 ply floss
onto the needle.
Here is a line drawing of the Colonial knot stitch:
6. Complete a knot stitch at each of the marks
in all the trio clusters, anchoring the floss on
back side, and "stringing" between the knots
and between the clusters (take care not to
cinch the mat between the clusters if you
do "string" between stitches).
7. When stitching is completed, carefully trim
on the outer marked line.
8. Position (back to back) stitched mat front
over second wool felt layer for back,
and secure in place with fabric or other glue stick
or straight pins.
9. Trim back layer exactly even with front.
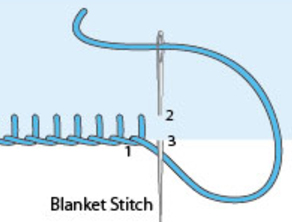
10. Complete an edge overstitch to join
the front and back layers, such as a "blanket"
stitch by hand, illustrated here:
OR
a machine blanket stitch, shown here
in process.
CARD STOCK STITCHED MAT
11. Create a card stock mat in a similar fashion,
with these differences.
A. Anchor floss on backside with small strip
of cello tape, both at beginning and
tie-off.
B. Use 3 ply floss for vine stitching,
leaf and Colonial knots.
C. When stitching is completed,
use glue-strip tape (such as the Scotch
brand "Advanced Tape Glide" system)
to join the back "cover" layer in place
at edges.
Here is the completed wool felt mat.
(NOTE that the stitched sample
is an 80% reduction of the cut file original.)


No comments:
Post a Comment