
Dimensional
bunny can sit on Easter feast table top
with arms wrapped to hold Lindt miniature
foil-wrapped
chocolate carrot (see Step 15) or other tall treat.

Accent overlays and
details provide whimsy,
while tray between feet and body enables it to
stand.

Backside is decorated with accents also,
with optional back panel that
has three bend-out tabs
to hold rounded corner rectangle card for
personalizing.
Measures approx. 5.3” tall x 2.75” wide x .75” deep.
ASSEMBLY: 1. Identify and cut the shapes:
A main body base
B arm base with overlay L & R
C feet base
D foot with overlay & pad L & R
E eyes & lashes L & R
F nose, muzzle, teeth, mouth
G mini tray
H front accent overlay array
I back accent overlay array with place card tabs
J tail & overlay
K optional guest name place card


 4. Position and attach the muzzle assembly
over the front head as shown.
Also position and attach eyes and lashes.
(See thumbnail above or Step 13 for positioning.)

 6. Layer and attach the tail circle over the scallop
circle. Position and attach at the back center bottom.

 . . . add curl to the middle and paw end of each.
 8. Assemble feet by layering and attaching the three shapes.


 11. Join the 4 corner seams by bending the side panels
and front or back panels so that the straight edge
overlaps adjacent tab to perf line, then join seam.

 Also bend the side free walls inward slightly
(match the angle on each left and right sides)
and glue tab to feet base backside.

 . . . position and attach to the front bottom
body assembly with bottom edges aligned.


 Here is the completed bunny candy holder.


A main body base
B arm base with overlay L & R
C feet base
D foot with overlay & pad L & R
E eyes & lashes L & R
F nose, muzzle, teeth, mouth
G mini tray
H front accent overlay array
I back accent overlay array with place card tabs
J tail & overlay
K optional guest name place card

2. Position and attach the offset front accent array
shapes (head, body, ears). NOTE it may be helpful
to place the liquid glued-up assembly under a heavy
flat weight until dry to eliminate curling or warping.

3. Assemble the muzzle by layering and attaching
(bottom up in this pic) mouth, teeth, muzzle and nose,
centering and aligning upper matched edges
at each step.

over the front head as shown.
Also position and attach eyes and lashes.
(See thumbnail above or Step 13 for positioning.)

5. Position and attach the back overlay shapes
onto the backside of the body base assembly.
The sample shows the optional body with tabs
that can hold the place card.
(NOTE that the head shape in the final cut file
has slight offset at edges.)

circle. Position and attach at the back center bottom.

7. Prepare the left and right arm base shapes by
bending forward on the tiny petal tab perforations.
Position and attach the overlays on each base,
keeping overlay edge free from crossing
perf line. Then before glue is completely dry . . .


9. Position and attach each foot assembly over
corresponding area of feet base with edges that
match aligned.

10. Prepare the mini tray by bending back on all perf lines.

and front or back panels so that the straight edge
overlaps adjacent tab to perf line, then join seam.
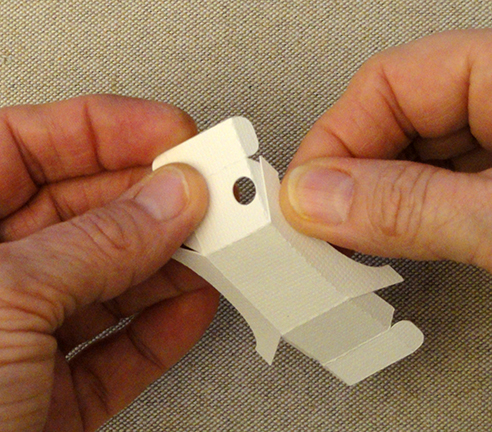
12. Position and attach the mini tray to the back of
the feet assembly/base, with bottom edges lined up
and the carrot tip hole away from feet and on the right.

(match the angle on each left and right sides)
and glue tab to feet base backside.

13. Apply glue to the tray back wall and tabs, then . . .

body assembly with bottom edges aligned.

14. Position each arm top petal tab to the body base
at rounded extension where edges will match up.
NOTE keep the perforation line of the arm tab
oriented so it would intersect the body shape angled
edges above and below extension, then . . .

. . . glue the petal tab in place.


15. If using the place card back option,
prepare the cards by hand ink and pen writing
names on, or use the Silhouette software's
print & cut features.
Bend the mini tabs outward slightly, then
slide the card under . . .

. . . and push across to center.

16. To prepare the Lindt chocolate carrot as the candy . . .

. . . being "hugged", carefully unwrap the foil to expose
the base of the plastic hook and snip it off.
Re-position foil neatly.

Insert the carrot downward between the curled arms
with tip directed into the punch hole on side of tray.

Add a dab of glue or a glue dot where paws overlap.

Tie a twine bow around carrot top if desired.

No comments:
Post a Comment