Multi-faceted edges imply "roundness" of this container
composed of base and lid. Base
includes holes
on each side of boxing to attach hat box style cord.
Lid has folded-back boxing rim edge.
Top decoration includes daisy-leaf and circle cutouts
and a scalloped ring to coordinate with
Suitable as container for other small gifts and treats.
Measures approx. 5.125” in diameter x
1.25” deep when closed.
(Optional taller boxing strips allow it to fit
other 3D Hat easel card designs.)
ASSEMBLY: 1. Identify and cut the shapes:
A box base main panel (includes semi circle notch
at the center top edge)
B base boxing strips (2)
C box lid main panel D lid boxing strips (2)
E lid overlay F scallop ring accent
2. Position, center, and attach the scallop ring accent
onto the front of the overlay.
3. Position and attach the overlay onto the lid main panel.
NOTE: these can be attached later in the process,
but if liquid adhesive is being used, and weighting
these layers while they dry thoroughly is prescribed,
it is better to accomplish this while they are unattached.
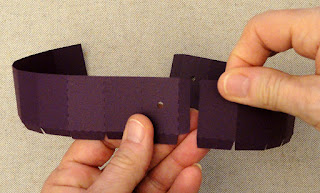
4. Prepare the base boxing strips by bending back on
vertical segment perforations, and also bend back
each of the edge and end tabs.
5. Overlap the ends of the strips and join side seam #1 . . .
. . . then form the strips into a ring to repeat for
side seam #2.
6. Locate the notch edge of base panel, positionthat at the "top", then locate one side edge.
Position that edge in line with the bottom tab of
the boxing ring, at the segment with the cord hole punch.
7. Center the panel edge at the tab perf line edge
overlapping the tab, and glue in place.
8. Adjust and align each of the edges, one at a time,
working around the panel, until all edges are attached,
NOTE: it may be helpful to divide the ring and edges into
quarters, positioning and attaching the bottom segment
and edge, then adjusting and fitting the segments
in between. Then moving on to position the second
side center (with hole punch) segment and edge,
then segments in between and so forth.
9. Now or later, obtain a length of soft cord approx.14-15" long, and insert ends outside-in through side
holes.
Once ends are inside, tie a modest or tight knot (or apply
glue as 'bead' or melt the ends) to provide a 'stop' so cord
won't pull through.
10. Prepare the lid boxing strips in similar manner
to base boxing strips, except also bend back the rim
edge tabs.
11. Position and attach side seam #1.
12. Bend the rim tabs back and glue into place,
except leave the end rim tab that is on the remaining
straight edge flat, to be folded down and glued later.
13. Form the strip into a ring and overlap to
complete side seam #2.
14. Bend the final rim tab down into position
and glue in place.
15. Locate a side edge (side will be an edge that falls
BETWEEN the daisy oval petal trio cutouts)
and position and attach the first tab - one with
the hole punch to the tab at that position
in the same manner as was done for base boxing.
16. Position and attach remaining edges and tabs
in same manner as for base boxing.
Fit the lid onto the base - NOTE this is a tight fit
and may involve some finesse, a blade tool, or slight
squashing to get it on. If the paper you have selected
is thicker than this design was calibrated for, it may
be necessary to reduce the size of base panel AND
base boxing strips at a small amount, say 99.5%
(be sure to have MAINTAIN ASPECT RATIO active)
and then re-cut.
Here is the completed box. NOTE that the semi-circle
notches on the lid should help it fit snugly onto base.
Insert the hat easel card inside for giving.


No comments:
Post a Comment