
A
quartet of stylized legs, with top platform circle
and lower
smaller circles, all slot together (with glue)
to provide a decorative stand
for a cupcake or special treat,
small figurine or paper project
like “Egg 3D Gift Box Wedge Overlays”.
small figurine or paper project
like “Egg 3D Gift Box Wedge Overlays”.

Components are thickened by
layering 8-9 duplicate-cut shapes,
pressing under
heavy flat weights until thoroughly dried.
Measures approx.3.5”
tall (scroll arms) x 4.5” wide
x 4.5” deep at widest dimensions.
Platform circle
measures 3” in diameter.
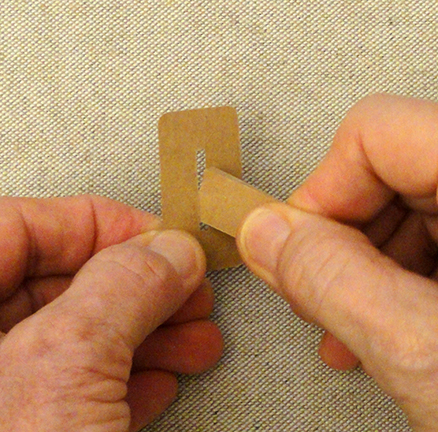
ASSEMBLY: Before setting up to cut the component shapes,
determine how many layers are needed to enable
the notch slots to fit snugly together by using the test
rectangle with slot (A) and the layer test strips (B).

Begin with 9 or 10 test strips, and layer into a stack.

a strip, then re-test. If the stack will NOT fit, remove
a layer and re-test.
NOTE that if using a different face card stock from core,
make sure the test strip stack includes that paper
for an accurate reading.
Remove and COUNT the test strips that gave you
the best fit. This is the target cutting amount.
(For the sample, the target count is 8; substitute
your own test-determined count.)

1. Identify and cut the shapes:
A scroll leg (sample has face left, face right,
6 core) - cut 4 sets
plus left & right accent offset inner legs
B platform (sample has face shape, 7 core)
C & D lower rings (sample has face shape, 7 core each)

Here is the layout of shapes for each of 4 legs.

2. Layer the first two shapes (here the top face layer
is added to the first core layer). Take care that ALL cut edges
line up as precisely as possible - here and throughout -
with special precision at the notch cut outs.
It is easy to have the layers begin skewing to one side
even though they may appear to be exactly stacked.

Continue adding the layers under the original two
that were joined, until all are joined, including (for sample)
the opposite face layer which is FACE-OUTWARD.
3. Add the accent overlay, centered, to front and back.

to place each stacked component under a heavy, flat
weight such as the fabric-covered re-purposed flat bar weight
shown here. Leave the component under the weight until
it is completely dry - usually several hours or over night.

4. Repeat the layering and joining process for the lower rings,
taking care as always that cut edges are precisely aligned,
especially at the notch cutouts.

Press the lower rings flat during the drying process
as with the leg components.

including precision edge and notch alignment,
and pressing under flat weight until dry.

6. Begin to assemble the platform stand by notching
together the scroll leg's upper notch to one of the notches
of the platform disc, carefully but firmly working the two
notches FULLY together.
NOTE: if the notch openings are not precisely aligned,
use a tool to press/trim to achieve fully-opened notches.
USE A DAB OF QUICK-GRAB GLUE in the notch to join.

7. In similar manner, add the two lower rings by
pushing the notched areas together.
GLUE notches with a dab of quick-dry glue,
making sure that the rings and platforms maintain
perpendicular alignment while remaining legs are
attached.

and ring slots, with glue to secure.
9. Add the remaining two legs in similar manner.

10. With all legs notches to platform and lower rings,
and while glue may still be somewhat pliable,
check for straightness, perpendicular quality, etc.
and make adjustments necessary, then allow joints to dry.

Consider using the stand for lightweight objects
such as the decorated egg box shown here.

No comments:
Post a Comment