
****IMPORTANT NOTE***
Some corrections were made to the 'S' letter box
in the downloadable cut file on 6-16-2022.
If you purchased and downloaded this file
prior to that date, please re-download the new file.
Replica wooden block letters composed of 3D lids
that fit
over bases to celebrate Independence Day,
or as an anytime patriotic
display.
Other decorations elevate the fun: liberty bell, one-star flag on
stick,
layered rocket burst, fold-over triangle flags on stringer,
3D pinwheel.
For platform, cut a rectangle base from
1/4” thick foam core (mounting board)
which is covered
by 65 lb. patterned paper, then hot melt glue letters in
place.
Tallest (S) letter measures approx. 4” wide x
6” tall x 1.75” deep when
assembled.
Tutorial begins with U S A letter box assembly.
Find assembly info for FLAG (step 20) or PINWHEEL (step 38).
ASSEMBLY FOR LETTERS:
1. Identify and cut the shapes for S.

LID (left)l with front face with stars overlay shape
upper/side boxing wall strip (with hex opening for flag)
lower/side boxing wall strip, end wall shapes
BASE (right) with back face
upper/side boxing wall strip (with hex opening)
lower/side boxing wall strip, end wall shapes
NOTES: Tiny cutout symbols in the tabs of strips will identify
which end goes at top or bottom of their 'S' face shape.
A diagram of these follows in step 16.
Double symbols mean it is a BASE strip.
U and A letters have limited identifying symbols.
Use visual clues and logic to identify where they attach.
2. Identify and cut the shapes for letter A
LID (left) with front face overlay shape
upper/side boxing wall strip (includes single circle symbol)
lower/side boxing wall strip, interior opening wall shape
BASE (right) with back face
upper/side boxing wall strip (includes double circles)
lower/side boxing wall strip, interior opening wall shape

3. Identify and cut the shapes for letter U
LID (left) with front face overlay shape
outer boxing wall strip
inner boxing wall strip, top end shapes
BASE (right) with back face
outer boxing wall strip (includes double circles)
inner boxing wall strip, top end shapes

4. Identify and cut the accent shapes (from L to R):
liberty bell; rocket burst layers (top #1, bottom #2);
triangle flags with double layer stringer & end buttons;
flag pole wrap & reinforcement insert strip; flag shapes;
pinwheel (main shape has front print with white back),
star and discs, star accents.

U LETTER BOX ASSEMBLY
5. Add back curl to the outer boxing strip and forward curl
near center to help them conform to the face shape,
using first knuckle and thumb or a rod tool such as pencil
or dowel.

NOTE: it may be helpful to lay out the strips (if necessary)
so you can visualize where the boxing strips go
in relation to the lid face 'U'.
(For accurate pre-arrangement of strips and face shapes,
(For accurate pre-arrangement of strips and face shapes,
the boxing strips in this shot should have the tabs upward.)

6. Align and attach the inner top edge of the LID 'U' shape corner
with the first end tab of the inner boxing strip (shortest)
with the 'U' edge aligned exactly at the perforation, top edges of each even.
Repeat for the opposite arm inner top corner and strip end.
Then adjust and shape the multi-tab section of boxing strip edge
and attach in place along curved section of the face 'U' shape.

7. Repeat the process of steps 5-6 for the outer boxing strip
and the outer edges of the 'U' shape. Then . . .

. . . repeat the process to mold, shape and glue in place
the multiple tab curved strip edge along the bottom curve.

8. Fold side and top edge tabs of end pieces back,
then position and attach between the inner and outer boxing strips
at each open end of the 'U'.

9. Repeat the curling, fitting, and joining of the inner,
outer strips and end pieces for the 'U' base pieces
to the base U face shape.
10. Assemble the letter box by fitting the completed BASE shape
into the backside of the LID shape to assemble the box.
11. Center the outline accent 'U' shape on the LID front.
12. Assemble the liberty bell decorative piece:
A) layer bell (cracked) overlay onto base silhouette;
B) position and attach trim strips;
C) layer yoke overlay onto yoke base silhouette
with center "wrap" (not shown on image) with
accent bolt heads;
D) position yoke onto at top of bell to determine
where a cut can be made to "insert" bell loop
hooked realism (or simply overlap and attach).
13. Position and attach onto letter block as shown.

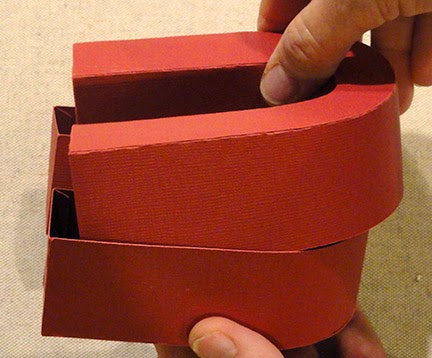
S LETTER BOX CONSTRUCTION
14. Identify the top position of both the 'S' LID shape and the reversed 'S' BASE shape by the up single and
double arrow cut symbols as shown here.

Add curl to the upper and lower boxing strips to match
the 'S' shape edges to which they will be attached.
This means that one end will curl in one direction,
and the other end will curl opposite.

Note that the LID 'S' and the BASE 'S' shapes are nearly identical.
Tiny symbol cutouts help identify which boxing strips attach
at each edge, as illustrated here.

15. Layout the strips in the general shape
of the S LID. Then . . .

. . . begin at the top edge of the LID 'S' to align and attach
to the top upper edge of the face 'S' shape.

One way to do this is to apply glue to just a few tabs then attach,
curving the boxing around to match the shape
of the 'S' edge. Continue joining a few more tabs until about
half way through the bulge of the upper curve.
Leave the center section unattached.
Instead, align the opposite boxing end to the corresponding edge
of 'S', and join a few tabs at the 'S' edge.
Continue joining until a few past the inner curve.

Apply glue to some or all of the remaining middle section
tabs, then flex and shape the boxing strip to
align and attach to the 'S' edge.
 |
Turn the assembly to work from the inside to press and make sure the tabs as secure and evenly attached. |

16. Repeat the process for the LOWER boxing strip,
joining labeled ends of boxing strip at ends,
then fitting and attaching the middle section.

17. Fold end piece tabs back, then apply adhesive and
slide into place at the end openings between upper
and lower boxing strips. Align fold corners to straight edges,
then press and hold until glue is secure.

18. Repeat the process for the BASE, preparing and
joining upper and lower boxing strips and ends to base 'S' shape.
19. To close box into its block form, insert BASE shape
into bottom of the LID shape.

Join the letter box lid and base by applying adhesive
between the boxing layers.
NOTE 1: having the flag post prepared is helpful,
so it can be inserted through the LID and BASE cut hex
and circle holes. Skip to Steps 20-24, then return here.
NOTE 2: there may be more space between walls
due to the S letter's inherent shape; determine
the several spots where the walls touch to add glue.
Here hot glue is introduced between
the box edges by using a spatula tool to open up the space
between slightly so hot glue can be piped in.

FLAG CONSTRUCTION:
20. Fold the pole shape back on all the perforations
20. Fold the pole shape back on all the perforations
for long tube and end cap, tabs.

21. Apply glue to the long tab, form shape into a tube
with tab under the long straight edge and join seam.
Insert a pencil into tube to provide a surface to press against.
Slide pencil up along until entire length of pole is joined.

22. Fold cap tabs downward, then fold cap into place
and glue the tabs over the pole end.

23. Fold the reinforcement shape in accordion folds
into roughly "T" shape. Glue the narrow portion
where the two surfaces come together (see cut file notes).

24. Insert the reinforcement strip into the bottom end of pole
and push in fully.
NOTE that the tall portion of the reinforcement fits across
the widest dimension of the pole's hexagon shape.

25. Assemble the flag with white base rectangle behind
stripes shape, white small rectangle behind star shape,
then join the two components.
Fold the end tab in Z folds as shown.

26. Wrap the tab around two sections of the pole,
approx. 1/4" below cap end, and glue in place.

This image shows how the attached flag looks from the front.

27. Insert the pole through the 'S' box holes,
working through the series of paired openings until
pole extends all the way to the bottom of the letter box.

Here is the completed flag and 'S' box.

28. Layer and join the rocket burst designs with #1 on top of #2.
Position and attach the rocket burst assembly shape behind
the 'S' letter box, matching the echo 'S' shape to backside of box.
Also position and attach the accent front overlay 'S'.

A LETTER BOX CONSTRUCTION:
29. Position the 'A' LID shape with the corresponding boxing
shapes around it. Fold the boxing strips at perforations
to match the shaping of the 'A' edges.
30. Fold the middle boxing shape into a triangle,
and join end tab under opposite end.

31. Position the triangle boxing behind the opening,
align perforation edge of opening with LID shape edges,
adjust, then attach in place.

32. Align and join the first edge of boxing to LID 'A' shape.
Continue folding edges in place and joining until
all edges of the first strip are completely attached.

33. Join second boxing strip end to first strip,
with tab under corresponding straight edge.

34. At the top of the 'A' front, join in one step the final tab
and the boxing strips end tab and straight edge.
35. Repeat to complete the assembly process for the 'A' BASE.

36. Slide BASE into back of LID. Glue together
by applying glue between the side layers.

37. Attach the front accent shape in place.

PINWHEEL & MINI PINWHEEL ASSEMBLY
38. Identify and cut the shapes for the mini pinwheel.
Shown here are the shapes for a larger version;
assembly is very similar for either.
(Mini pinwheel includes tiny star shapes to glue in place.)
A NOTE ABOUT CUTTING: Cut the pinwheel body
with the print paper face up on cutting mat.
Face side becomes the back of the pinwheel body,
with print face brought to front as curling pinwheel arms.

37. Add some curl to each of the pinwheel arms or points.

With body face down, position and attach the center shape
with the point edge aligned as continuation of the arm point cut edge.
Also attach stars near points.

38. Bring each arm, one by one, to center,
aligning holes with center hole and glue in place.

39. Assemble the medallion by gluing centers
of scallop circle, plain circle, star.
Insert decorative brad through hole; leave prongs straight.

40. Insert prongs through center hole,
then bend back to secure in place.

41. attach one or two small dimensional foam squares
behind at center . . .

. . . then position and attach to the A box.

FINAL ASSEMBLY ONTO BASE
42. To complete the project as shown,
prepare a strip of foam core 12x2 inches as a base
(or simulate your project's length and adjust as desired).
Cover the foam core with a coordinated piece of print paper,
or equivalent, as desired. (For the sample project, the selected paper
is not long enough, so it is seamed with an abutted joint.
Glue the paper to the top of the foam core base.

Score the paper along the edge of foam core base,
working from the backside of the paper, as shown.

Fold paper at the score. Apply adhesive to the narrow depth
front edge of the base, then wrap the paper and
smooth the surface along the edge.
Score paper again along this second base edge.
Fold at score, apply glue, wrap as before,
and smooth glued surfaces. Trim excess paper.
Repeat as needed for the remaining portion of board.

43. Use quick dry adhesive such as Fabri-Tac or hot melt glue
to attach the letter box bases of the 'U' and the 'A' at base ends.
Center 'S' between remaining space, then glue in place,
taking care that the flag pole's final position is
perpendicular to the base.
44. Position and attach flags banner, with end buttons
on 'U' and 'A' as shown on finished project image, below.

And here is the final project on its base.

I love this file! after the 3rd day of trying, I had to just give up! I could not get the S shape to come out right. the base box always ended up being about 1/2" to short to fit lid right and bottom hole would never line up. I love your files and will continue to do them but this one got the best of all my white paper and me! lol
ReplyDeleteSo sorry. I will try to review, revise and send any changes to Silhouette and to YOU, if you will send me your email address to hearthsewnpatterns@yahoo.com. This file and design was prepared for a different outlet in 2014. I revised and refined what was obvious, but did not rebuild. I will do that now.
ReplyDeleteThe cut file for this design has been revised to correct the error mentioned by lori. If you downloaded the Silh America file prior to 6-16-2022, please re-download the new revised file. Or contact me directly as noted in original response.
ReplyDeleteThis comment has been removed by the author.
ReplyDeleteJodi, I sent you my email. Thank you!
Delete