
Small
dimensional roman candle box built as
a snugly fitting LID and BASE with
stripes and stars panels
to decorate front face.
Useful for many decorative
situations,
this box is custom sized for use as the ‘I’ letter box
in the
America 3D Letter Box Ensemble,
measuring approx. 5.75” tall x 2” wide x 2”
deep.
Twist and glue a short length of cotton string or
thick twine and glue to top panel as
faux wick.
Shown here in patriotic colors, it would also work
with other decorating or holiday color schemes.
Lid and base columns are built as simple square tubes
so that they can be hand trimmed to shorter heights
to create an ensemble, if desired.
ASSEMBLY: 1. Identify and cut the shapes:
A LID body hull (no upper tabs on the final version)
B LID top opening collar
C LID top opening cover with wick opening
D BASE body hull
E BASE bottom panel (with identifying notch)
F BASE upper opening reinforcing collar (notched)
G front panel decoration stripes, stars, contrast
(NOTE the sample project has the decoration on
only the front; cut 4 sets to decorate all four sides.)

on all vertical perforation lines. (The top edge flanges
have been removed as unnecessary in final design -
see the LID hull in Step 7 to visually confirm this.)

 4. Identify the stripes positioning hash cut guides

3. Prepare the front decoration stars panel by
positioning and attaching the slightly smaller contrast
panel behind the stars panel (shown top downward
in these images - rotated into correct position on sample).

on hull to identify the front panel, then . . .
 . . . position and attach the stars panel (rotated 180 degrees)

to the top of that panel slightly offset from top cut edge
and within perforations at sides.
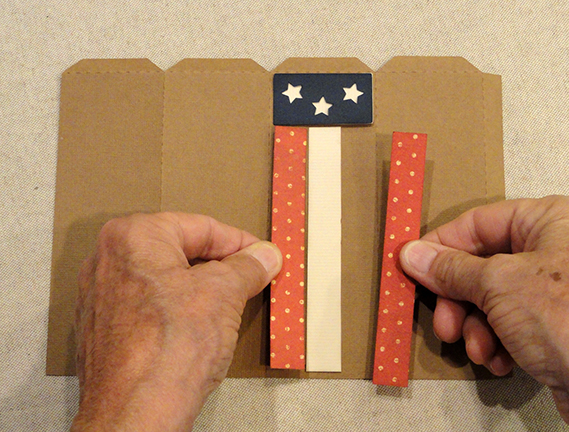
 5. Next position the center stripe to abut top edge

under stars panel and within the upper (pointed at)
and lower dash guide marks, and . . .
 . . . attach in place. Also position and attach side stripes

exactly next to center stripe. NOTE that bottom edges
of stripes will be slightly offset from hull bottom edge.

 To assist with gluing side seam, press the hull tube
6. Form the LID hull into a tube with straight side edge
overlapping side flange and aligned at perforation fold
of opposite side, and glue seam.

flat and apply fingertip or weight pressure all
along edge until fully secure.
 7. Prepare the top opening collar shape by bending

top flanges forward.


Apply adhesive to the backside of the flanges, then
carefully slip collar inside the top opening.

Gently slide the snug-fitting collar down until the top
edges of collar align with hull top edges, then
apply pinch pressure all around to fully secure.
 8. Prepare the wick by cutting a 4-5 inch length of

household cotton string or very thick twine.
Fold in half, press the fold flat and twist tightly.
Apply white craft glue to the top 1" at loop end
and continue to keep twists tight until the glue
secures the twisted wick end fully.

center punch hole, stopping with the twisted 1"
fully through and the separate ends on the backside . . .
 . . . where they should be directed in opposite

directions (180 degrees from each other) and
glued securely to underside of cover.
 10. Apply adhesive to LID collar frame bottom edges

surrounding opening, then slide into position
at LID hull top recess,
press down into place and secure.

11. Prepare the BASE hull in similar manner to
LID hull as shown in steps 2 & 6. At bottom edges,
bend flanges inward at right angle. Apply glue to
flanges, then position and attach the separate
bottom panel in place, within the edge perforations.
Take care that the BASE is squared up properly
so it will fit into the LID, then apply pressure to
secure bottom panel in place.

12. Repeat step 7 above to prepare the BASE
reinforcement collar by bending edge flanges,
applying glue to flanges underside, then inserting
into opening, easing down into place until upper
edges of collar and hull align.

13. To finish the box, gently insert the top end of
BASE into the bottom open end of LID . . .

. . . and gently slide into position. When nearly all
the way inserted, apply glue to the side panels of
BASE approx. 1/2" above bottom edges, then
continue to slide inward until LID edges match up
with BASE bottom edges. Apply gentle pressure all
around to secure LID and BASE together.


And here is an image of the AMERICA letter box
ensemble project with the firecracker box standing
in place of the letter 'I'.
(image to follow)
No comments:
Post a Comment