
the dimensional
letter-shaped boxes in this ensemble design
are constructed as LIDs that fit snugly over BASEs,
aiming
at resembling wooden block cut outs.
Part 1 includes "Ame" with platform box.

Tallest letter box A large measures approx. 6.3” tall x
4.5” wide at base x 1.75” deep.
Other letter box heights are approx. 5.75" tall.

Companion designs enhance the patriotic display
(click for tutorial link for each):
Truck Treat Box Narrow with Bunting (leave back off)
Tag Patchwork Star [reduced at 80%]
Ensemble can be completed as shown by covering
a mounting base that is approx. 3" wide x 25.5" long.
(This ensembled is recommended for paper crafters with
some dimensional project
experience.
Requires 12x12 cutting capacity and stock,
approx. 10-11 sheets for letter boxes and platform.)
Part 1 tutorial will explain the boxes shown here:

ASSEMBLY: 1. Prepare to cut and organize the many shapes
for this large ensemble by understanding how boxing strips
are identified.
A) Each letter consists of a LID which fits snugly and
conceals the BASE.
B) Each LID or BASE will have 2-4 boxing strips
that connect to edges of the large letter shape.
NOTE that letter 'I' is a simpler box without strips.
C) Boxing strips will join end to end. Symbols cut into
end tabs/flanges and the nearest tab of the strip
to be joined. Here, the small single circles or punch holes
show that these two strips will join up during assembly.
D) LID boxing strips have single symbol
shapes and BASE strips have double symbols.

to indicate which letter (LTR) it belongs to.
 F) To assist with knowing suggested position to begin

attaching the boxing strip to letter shape, a tiny
numeral symbol '1' is included at the end of one
of the strips near the cut out symbol.
 G) For efficient cutting and use of cardstock 12x12 sheets,

consider opening both Part 1 and Part 2 into a Cameo
die cutter screen job, copying and pasting to get both parts
together onto one screen, then moving and arranging
onto the virtual cutting mat as closely as possible.
Once one mat-load is arranged, group the cutting mat
assembly, and move it to one side, then
continue until all shapes are arranged and grouped.
Repeat the arranging step until all shapes are included.
This print screen of the sample project in progress
shows the 9 full mat loads plus part of a 10th.
(Assuming use of Cameo system and one card stock
paper color for all face letters and boxing strips.)

2. Cut the offset accent letter fronts, and other
decoration shapes.
TUTORIAL NOTE: Some of the letter boxes have
similar assembly processes. In those cases, specifics
may be shown and explained in detail for one letter box,
then differences more briefly explained for others.
A+ (LARGE) LETTER BOX
3. Separate the A+ letter box shapes. Also . . .

. . . become familiar with the symbols that will assist
in correct boxing strip placement.
NOTE that in the strips layout above, the shortest
strip is for the interior triangular opening where 'X'
and 'XX' symbols show end-to-end joint.

4. Prepare the boxing strips by bending top tabs/flanges (LIDS)
or bottom tabs/flanges (BASES) back along perforation lines.
Also bend back or forward strip segments at vertical
perforation lines. It may be helpful to arrange the strips
around the letter face shape to re-bend at segment
lines into correct shape required, as shown here for A+ LID.

5. To begin A+ LID, compare the image below
to the symbols illustration above to see that
the '1' position on letter face and the '1' symbol
in the boxing margin is where assembly will start.


6. Apply glue, then position the flange behind
the A+ edge, adjust so that perforation bend edge
is as precisely along letter face edge as possible
and that the segment (defined by lead cut end and
first cross perf) are aligned exactly along the cut edge,
and attach in place.

7. Continue in the same manner to bend each successive
strip flange into position to attach to letter face edge . . .

. . . taking care that bends align at corners as precisely
as possible at each segment.

As assembly progresses, NOTE that it may be helpful
to place the work face down on flat work surface and
apply fingertip pressure to backside of seam to
ensure complete connection prior to proceeding.

8. Complete the remaining segment attachment
of the first strip, then . . .

. . . locate the next strip, verify that the symbols
for the in-place strip and the added strip match . . .

flange to align precisely at perf line, with ends of edge
aligned precisely, and attach securely in place.
 9. Continue the positioning and attaching steps

to position and join the next strip segments.
NOTE that when the last one or two segments
remain to position and join, it may be best to
apply adhesive to them and to final end flange then
position and attach in one step.
 10. Prepare the interior A+ opening boxing strip by

bending top edge flanges back, end flange forward.

Form the strip into a triangular "tube" to bring
the end flange to underlap the lead straight edge
(flange will be behind edge) and complete seam.

NOTE it may be helpful to insert fingertips into tube
behind seam to apply pressure. Another flat narrow
pressing tool may also be inserted to provide a firm
surface to apply pressure against.

11. Apply adhesive to the top flanges, then . . .

. . . position to the backside of assembly so that . . .

. . . perf edges align at letter face edges of opening
(this may be best seen from front).

Once in position, reverse the work again and
apply fingertip pressure from the backside along tabs.

12. Prepare the letter face accent shape for A+ by
positioning and attaching the stars top overlay onto
the A base accent shape. Then . . .

. . . positioning the first stripes array with sprue
connector exactly under the stars edge, with
inner stripes cut edges aligned at A opening
cut edge as indicated by pointing finger. Also
NOTE that the straight end edges of bottom two
stripes align at cut edges, and the sprue connector
falls beyond the A outer side edge; attach in place.

Position the second stripes array in similar manner
with top curvy edge abutting stars overlay,
and inner stripes edges aligned at A inward edges,
and sprue falling beyond A outer edges,
and attach in place.

To assist with liquid glued-up assemblies here
and throughout, consider pressing under a heavy
flat shape, such as this large book possibly with
something else heavy on top, until completely
dried - for several hours or overnight.
This minimizes curling or warping.

Finally, use hand scissors to trim away the excess
sprue at stripe array edges.

NOTE that trimming is more easily done while cutting
with the backside facing the scissors 'operator'.

Here is the completed accent letter face.

13. Position and attach the accent A+ letter face onto
the front of the LID box, adjust so that there is
an even narrow margin all around.

14. Repeat the LID assembly process for BASE
to attach double-symbol boxing strips to reversed
letter face shape. NOTE that BASES often have
mirror image strips arrangement.
15. To finish letter box assembly, the LID is placed
over the BASE (BASE is inserted inside LID)
and the two are pushed fully together.

For A+ box (and others with similar inner openings)
this will involve 'fiddling' as the two are fit together
to make sure that LID triangle tube boxing fits inside
the BASE triangle tube boxing. Use a tool such as
a fingernail file or papercraft spatula to help direct walls
into position to allow remainder of box to slide together.

Push fully together, then . . .

. . . apply glue between LID and BASE walls
all around to secure the two assemblies together.
(A quick grab glue such as Fabri-Tack is recommended.

Immediately apply hand pressure all around to
push LID walls fully into place to BASE walls.

PLATFORM BOX FOR 'm' & 'e'
16. Platform box (designed to raise these two
lower case letters higher to be seen behind Classic Truck
Box addition) is assembled in a different fashion from
letter boxes. Here the shapes are shown (backside
cover shape is not included here).

Prepare the main box hull shape by bending back on
all perforations for panels, end panels and tabs or flanges.
Identify the front panel for stars overlay placement later.

17. Position and attach the contrast underlay shape
behind the stars face plate. Press under a flat weight.

18. Form the hull shape into a box by bending
the long panels and end panels back to align.
Position and attach front, back & top panel ends to hull
end panel tabs - back panel remains unattached
until further along.

19. Prepare the supporting 'strut' strip by bending in
accordion fashion, with tabs bent forward.

20. Apply glue to the underside of tabs, then insert
into the box tray, spread or condense strut bends
to allow it to fit within the interior volume end to end
and side to side, then press tabs to attach in place.

21. Bend wall tabs inward to perpendicular, and
apply adhesive to tab upward surfaces. Bend
the bottom panel down into position, adjust and
attach edges in place to tabs.

Use fingerholes of back panel to reach in behind
long flange to secure seam.

22. Use double-sided tape style adhesive added
to underside of back panel cover shape, then position
and attach (slightly offset edges) in place to conceal
fingertip holes.

E LETTER BOX
23. The lower case 'e' box is assembled with face plate
shapes that are more like 'C' shapes, with a cross 'bridge'
separately-assembled box that fits into opening in LID
inner boxing strip, and joins to end segment.
Here are the shapes for the E box.

24. This illustration shows where the boxing strip
symbols will configure, and where the #1 strip end
will begin the LID (left) and BASE assembly.

25. For 'e' and other letter boxes with curves, boxing
strip edges will include multiple cuts (either straight cut
lines or wedges) for the areas requiring curves.
Other markings will include single dash guide marks
near tab perforations to show where the segments
of the strip will align with letter face edge sections.
(NOTE to keep boxing smoother, segment divisions
will NOT include perforation lines as there are with
angled segments. Single dash marks replace these.)

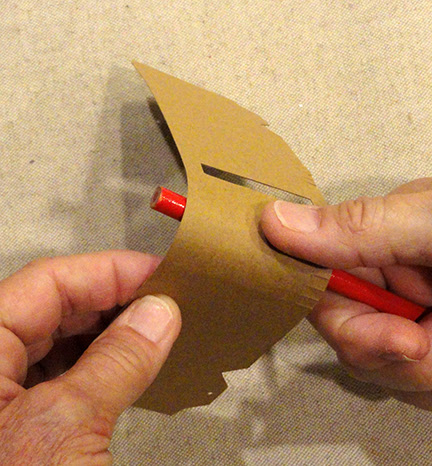
26. Shape the curved areas of strips ONLY by using
a rod-shaped tool such as the round pencil shaft,
or a dowel, to draw the strip across the rod and add
curl. NOTE that some curves are "tighter" (have narrower
radius) and will require a narrower curl (such as the 'm').

Curved shape can be added curling toward you or away.
27. Bend back the strip as needed where straight
segments have separating perforation lines.
It may be helpful to arrange the boxing strip around
the letter face to visualize where the straight and
curved portions will fit. (This is #1 boxing strips that
falls at inward edge of 'e' face.)

28. Begin at lower end to attach end cap segment,
then proceed to position the bottom long straight segment.
Continue to position curved section around tight inward
curve, then mid straight segment, etc.

of strip with corresponding edge sections, using
single dash guide marks to assist to make any
adjustments possible for precise alignment.

As usual, invert the work to apply fingertip pressure
along seam tabs for secure connections.

29. Complete the upper end cap seam of first strip.

30. The upper/outer boxing strip includes an end
extension, indicated here, that will assist with
attaching and camouflaging the bridge box.

Begin attachment of this strip by allowing the flange
extension to fall beyond the corner, then align
the first curve edge tab to fit into the corner to
begin attachment of strip.

Previous boxing perf bend.
Continue to position and attach the remainder of
the outer boxing strip in the same manner, curving
to match letter shape edge, using single dash guide marks.
overlapping and joining final end edge over end flange.

31. Prepare the bridge box by bending back on all
perforation lines, except the non-closing end has
longest tabs bent forward.
32. Form the bridge into a tube to overlap the straight
edge across the rounded-corner flange to perf line,
and joining seam there.

The seam can be secured by pressing the box flat
and apply fingertip pressure along edge.

33. Close the right end of the box by bending side tabs
inward, long tab downward, applying adhesive and
folding all inside the tube end to glue in place.

34. The insertion edge is shown in this pre-assembly
configuration. At the bottom of the bridge tube box,
there are short tabs that will bend inward,
as previously mentioned. Those tabs . . .

. . . will overlap and attach to the narrow wall
at the back edge next to the cut out window of
LID boxing.
Working quickly, begin to insert and attach bridge by
applying adhesive to that narrow wall, shown here.

Also apply quick grab glue to the arch end panel
shown here. (Bridge is shown here partially in place
but it really isn't there yet).

Next, insert the tab (non-closed) end of bridge box
into the rectangular window opening of LID boxing
(narrow bridge tabs are toward back).
[NOTE that this preliminary version does NOT
show the boxing extension that will glue to bridge end,
but . . .

. . . this one does.] Push bridge inward only
until perf lines of tabs is EVEN with letter box walls.
Reverse the LID to view the interior, ben bridge side
and end tabs so they can connect with interior
surfaces of adjacent walls, and secure in place.

Finally, align and attach bridge to top arch end wall,
and also to flange extension from step 30.
Hold all in place until secure.
35. Position and attach the offset 'e' letter front overlay
(view in second image in step 37).

36. Complete the BASE box in similar manner to LID,
except BASE does not include window opening
for bridge.
37. To close the box into its block form, fit the LID over
the BASE, working to ease the closed LID upper arch area
(including the bridge across bottom of the 'D' hollow)
within the opened arch area of the BASE, then . . .

. . . push the components fully together.
Add glue between the walls as with other letter boxes.

M LETTER BOX
38. Here are the shapes for m letter box.

Here is the layout illustration to show where
boxing strip symbols will fall during assembly,
and where the first strip's #1 segment will
be attached.

39. Begin by positioning and attaching the lead long
straight edge in place in manner described for A
and other letter boxes.

Next bend at two following straight edge segments
to align and secure in place.
40. Apply adhesive to the narrow multi tabs curved
segment, then position in place at first top-of-m
position, adjust curve to align as precisely as possible,
and apply fingertip pressure to secure.

41. Repeat for the second top curve, either by bending
boxing strip away/above top of letter shape,
or downward to expose letter backside, then position
as for first arch, adjust and secure in place.

42. Position and add the next strip at tab end,
checking for matching symbols cut out. Then continue
to position and attach next two straight edge segments.

43. Add the next strip, then . . .

. . . apply glue to the two straight long segments
as well as the short tight curved area tabs.
Swing these into position to align in sequence . . .

. . . along inner edges between middle and back "leg",
adjust and attach in place.

44. Repeat for the last strip which includes the second
arch (follow immediately-previous steps). As the final
bottom end segment is prepared to attach, also add
adhesive to the joining tab, then swing into position,
adjust and secure in place.

45. Complete the 'm' BASE in similar but reversed
manner. Attach accent 'm' to LID front. Position
and insert the LID and BASE together . . .

. . . then push together fully. Apply quick-grab
adhesive between walls to fully attach together,
paying particular attention to inside arch curves.

The tutorial assembly steps for the remaining letter boxes
are found in Part 2 where you can find it by clicking link.
No comments:
Post a Comment