
Two hole-punched, notch edge panels with
micro-narrow offset outer edges are cut
micro-narrow offset outer edges are cut
(from 65 lb. weight white cardstock)
then layered and glued together for strength.
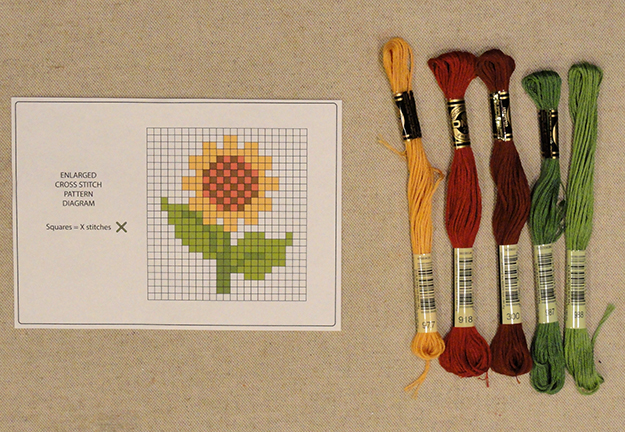
Cross-stitches are added
following the included chart.
Completed sunflower panel is mounted onto
square
accent panel, then onto scallop edge card front.
Smaller square card base with
top fold is attached, centered,
to backside of scallop card front.
Measures
approx. 5” x 5” when fully assembled.

ASSEMBLY: 1. Identify and cut the shapes:
A top-fold card base (slightly smaller than scallop front)
B scallop front panel (5x5)
C accent front panel overlay
D needle-holes stitching panel back layer
E needle-holes stitching panel offset front layer
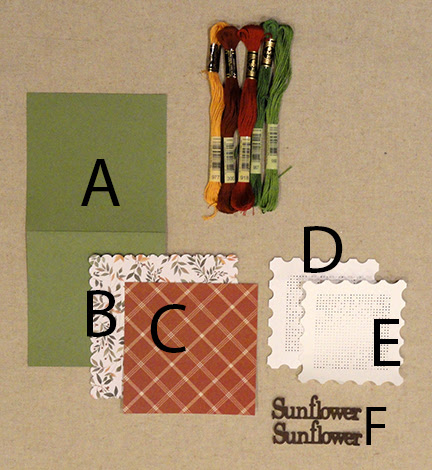
the stitching diagram, and obtain/select embroidery
floss. For the sample project,
these DMC colors were used:
977 golden yellow for petals
918 rust & 300 rusty brown for center checker stitches
987 medium green for stem & veins
703 bright green for leaves
Stitching will also require a blunt tapestry needle.

2. Once the stitching panels are cut out, use
a paperclip "tool" with outer bend straightened to
poke through each of the stitched holes to make sure
that the cut out circle "crumbs" are no longer in the hole and
obscuring the spaces not stitched or impeding stitching.

Then, apply adhesive and layer the slightly offset edge
top layer onto the front of the larger back layer and . . .

. . .align carefully so that ALL the holes match up.

One way to help with alignment is to use the tool
to poke through at corner holes (and other random
locations across panel) to make sure holes of
both layers are aligned.
 Immediately press under a flat heavy object

and allow to dry completely, for several hours
or over night.


3. Prepare to stitch by cutting a length of 6-ply floss
approx. 30-36" long (shorter for smaller areas),
and separating one of the plies.
(These prep images are from a different project where
TWO strands or plies are used to stitch; use two if
you wish to have even more floss coverage of panels
knowing that the needle insertion into holes will be tighter.)

A) Line up the ends of both plies and straighten
the plies so that they are without twists.

B) Fold the ply in half to line up the four ends, then
crease the loop end to create a half-way loop.
Thread the loop through the needle's eye, then . . .

. . . pull the loop through, leaving approx. 5-6" cut ends tail.
The loop becomes the long "end", with 2 plies
together which will form cross stitches.
. . . pull the loop through, leaving approx. 5-6" cut ends tail.
The loop becomes the long "end", with 4 plies
together which will form cross stitches.

4. Review the following diagram to fully understand
how the cross stitches are formed uniformly
with RIGHT SLANT stitches made across the row first,
then the return half of the run completing
the LEFT SLANT stitches.

4. NOTE that the stitching panel is one row taller
than it is wide - so you will want to ensure that
the glued up panel is oriented with tall direction
running north/south once stitching begins.

Refer to the Stitching Chart, to locate the bottom-most
stem cross stitches. The left one is where
the first stitch will be made, after which the work
will progress upward through the design.

5. Visualize the 'X' of the first stitch, then insert the needle
UP from backside through the top left hole of the FOUR
that will create the 'X". Pull needle and thread through
leaving approx. 3-4" of loop "tail" still on backside.

6. Insert the needle into the bottom right hole . . .

. . . then pass the needle through the loop . . .

. . . and cinch the thread up firmly on the back.
This is the "tie on" step.

7. Continue the X stitch pattern in the next pair of
diagonal holes . . .

. . . then continue across to complete
the RIGHT SLANT stitches
across the first (bottom) row of chart . . .

. . . then return back across to complete
the LEFT SLANT stitches.
8. Move stitching up to complete the next row,
and so forth, planning ahead then working to
stitch into the right vein extension stitches when
most convenient to do that, avoiding a "jump"
across to reach them with backside "floating"
floss that is any longer than absolutely necessary.

9. Continue in the same manner to move to and complete
rows. When floss length on needle gets close to being
too short to continue, pause in mid stitch when needle
is pulled through to backside, then slip the needle under
the adjacent 4-5 stitches. Pull the needle fully through,
then remove needle and trim the excess floss close
to the stitching it crossed under.
This is "tying off".

10. Work to complete the remainder of design,
tying on the indicated floss length color in same
manner as described previously, and off when
that color block is completed until all stitching
has been applied.

11. Prepare the card base assembly by folding
the card base at top-fold perforation line (NOTE
the card is square so it can be re-oriented as
side-fold card if desired).
12. Apply adhesive to the edges of folded base front panel.
Position and attach the scallop edge front panel
onto base front . . .

. . . reversing the assembly with scallop panel
face down so that folded card base can be CENTERED
on the backside of it.

13. Position, centered, and attach accent panel
onto scallop front panel.

14. Position and attach stitched panel, centered,
onto front of assembly.

15. Layer and attach the two (or more) 'Sunflower"
word cuts, taking care to align all cut edges,
and press flat under weight until thoroughly dried.

16. Position and attach at the left lower area.

Here is the completed card.

No comments:
Post a Comment