
top handle card stock wrap enclosing a 7/16" dowel
cut to required length, with holder insert to hold
two 8 oz. mason style jam or jelly
jars
for special presentation gifting.

Dress up the tray with optional offset
round corner
accent overlays and add-on carrier handles made sturdy
by layering
and gluing multiple shapes.
Tray measures approx. 6.375” wide x 3.5” tall
x
3.125” deep; carrier handle measures
approx. 6.5” tall.

Jars insert can also
fit the tray of
“Box with Lid for Recipes”, to create a box
with lid to enclose
jars pair.
Requires 12x12 cutting capacity and stock.
ASSEMBLY: 1. Identify and cut the shapes for
the base "tray" of the box:
A main hull shape + C end add-on wall
B (2) and D (2) add-on fold-over interior walls
E (2) front/back offset accents & F (2) end offset accents
G bottom platform (4-5 shapes to stack and glue together)

H multiple layer front/back interior thickness build up
I multiple layer end interior thickness build up

handle uprights and cross grip:
J insert main shape K insert center support
L uprights 2 sets
(sample has accent-colored front & back,
with 4 "core" layers)
M dowel wrap tube N tube connected tabs (2)


 4. Begin assembly by stacking and gluing up the components


3. To test your card stock for hull of base and lid
to determine how many thicknesses to cut to insert
between outer and inner walls, use the slot test shape
and strips.

Stack 5 strips of textured cardstock (suggested) weight
and see if they fit through slot. Gluing strips together
will give an even more accurate calculations.
Design was created based on using 5 strips.
If your paper uses 6, or 4, adjust the cutting quantity
instructions included in the cut file.

that require this, in order to have them drying while other
assembly continues.
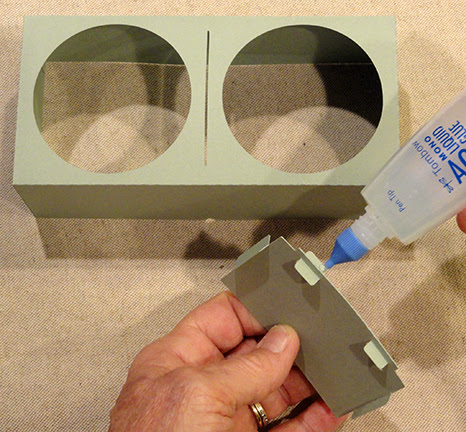
A) prepare to glue up the base interior wall thicknesses
for front/back and end walls, which can be identified
with the cut-in star shape, which is near the TOP edge.

Apply glue to one face, then layer two shapes together,
taking care to line up all cut edges as precisely as
possible. Continue to apply glue and stack wall shapes until
the target quantity is glued up (5 is the target for sample).

Immediately place the glued stack under a heavy flat weight
such as this thick book volume, with a heavy weight
set on top, and let the shape be pressed until it is
completely dried. This will require several hours or
preferably over night, to prevent or minimize curling
or warping of shaped glued with liquid adhesive.
NOTE that some cardstocks shrink and warp more
than others.

5. Prepare to stack the base platform layers by
first identifying the corner guide marks that will assist
to position and attach the bottom of hull base later.

Then, layer and stack the platform rectangles
precisely and glue together. Stack until completely dry.

6. Layer and glue together the accent front and back
plus core shapes into a stack, then repeat
for second upright. Press under heavy flat weight
until completely dry.

7. Prepare the base hull main and add-on shapes by
bending back on all perforation lines for panels
and long tabs, taking particular care . . .

. . . where the "rim" closely-spaced perforation lines
are at tops of front, back and end walls.

To understand why these "double" lines are included,
this is the spacing that will accept the interior wall
thickness to make the box sturdy. In this image,
the build-up thickness is shown as it will later
be tucked into the space between walls.

8. Complete the hull main shape by positioning
the add-on end wall to the correct position shown here,
underlapping end wall tab at the center section of
main hull shape (tab will be on the inside of base).

9. Position and attach the front, back and end wall
offset accents. NOTE: for the sample, double-sided
"dry" adhesive tape was used instead of liquid glue
which has a tendency to warp or curl.

10. Position and attach the front, back and end wall
interior shapes at long tabs.

11. Once the interior wall build-up stacks are completely
dry, hull assembly can be completed.
Apply glue to one face (inward face) of stack,
leaving the edges free of glue a generous 1/4" in,
as indicated in this image by added dashed lines.

Position over the backside of the hull main end wall
shape, between the bottom perforation (where end wall
attaches to bottom panel) and the double line perforations.
Adjust side to side, then "test" fold the inward wall into
place, and further assist stack to be in correct alignment
by using a thickened straight edge such as this acrylic
ruler to push against the double perforation rim area.

12. Bend interior hull wall back to apply glue to exposed
face of stack, then return inward wall layer into place
and adhere.

13. Repeat the process for the front & back walls
and interior thickness stack, placing and gluing stack
behind outer wall between side tabs, then . . .

. . . bending wrap-over wall into place so that . . .

. . . top of stack settles snuggly against the narrow rim
margin, assisting with thick straight edge.
But leave inner wall extension flat and free at this stage.

14. Join corner seams by tucking side long tabs of
front or back wall behind thickness stack of end walls
will follow the similar steps for the LID shown here:

Wrap inner portion of wall over front or back wall so
that this wall overlaps adjacent rim with miter
edge on top.

Attach to inner surface.
Repeat for second end.

15. Prepare insert liner by identifying the double "bite"
cut outs on floor and wall shapes (included to avoid
confusion, if necessary), then . . .

. . . bend back on all perforations for walls,
top flanges, and edge long tabs.

16. Join the liner hull at both side seams.

17. Apply glue to backside of top rim flanges,
then bend to inside of liner and glue in place.

NOTE that the liner's symmetry will allow it to be
flattened so that fingertip pressure can be applied
along surfaces where flanges are joining.
Press with heavy flat objects until dry.

18. Reconfigure the box to its cubic form, then bend
the bottom mitered long tabs inward.

19. Apply glue to inward face of bottom flanges, then
insert the floor panel and press down into place so
that edges fit into wall/tab bends.

Apply fingertip pressure around edges to join.

20. Prepare the jars insert by bending back on all
perforation lines for panels and side long tabs.

21. Bend walls in and join corner seams.

22. Prepare the center divider by bending back
on center perforation, forward along side tabs,
and center inner tabs.

23. Apply glue to one of the wall panels backside,
then press the walls together to join into a doubled layer,
taking care that the integrated tabs remain unglued.

24. Apply glue to upward face of four top tabs, and . . .
. . . to the backside of the four side tabs.

Position and insert center support into interior of
insert hull and insert center top flange through hull
top panel slot . . .

. . . then reach in through jar holes to attach tabs
to underside of top panel.

On the inside, align the support with the center notch
cut into the bottom side of edge then press tabs to
attach to side wall. Repeat for opposite side.

25. Insert the jars insert into the liner and . . .

. . . push inward until . . .

. . . it rests on the bottom. If desired, apply glue
between walls.

26. Fit the liner into the base box and push down fully.
Apply glue between the walls to attach in place.
Use flat weights inside box with one side face down
to help keep walls together until adhered.
Then shift to glue and weight the second side, etc.

Take note of the corner guide marks on
platform thickened shape, then . . .

. . . apply quick grab glue such as Fabri-Tack to
underside of base box, fit onto platform with corners
at guide marks, and attach in place.

27. Dry fit an upright on side of tote hull by fitting
bottom notches on platform, then take note where
the hull wall hits on upright backside. Remove,
and apply quick grab glue such as Fabri-Tac on
upright backside and faces around notches where
it can adhere, then refit and glue in place.
Repeat for the opposite side upright.

28. Prepare the post wrap shape by bending back on
all perforations for long facets and side tab,
end "caps" and tabs.
Form the shape into a tube to bring the straight side edge
to overlap the opposite long tab to perforation line
then glue seam.
(Before final gluing of seam, it may be well to check
the fit around your 7/16" dowel stock.)

NOTE that the symmetry of the tube will allow
it to be flattened on work surface and fingertip
pressure applied along seam until secure.

29. When tube seam is dry, bend end wedge
tabs of one end inward, bend cap down,
adjust so that cap edges and tab perforations
line up, then glue in place.

30. Insert dowel stock into tube and push until end
is snug against glued end cap. Bend open end cap
back and mark the required cut length on dowel.
Remove dowel and cut to size, losing the marked line.
Sand cut edges lightly if desired.

Re-insert dowel length into tube and push in
fully.

Bend end wedge tabs inward, apply glue, then
bend cap into position, adjust and glue cap.

30. Insert post through one upright . . .

. . . then across span and through opposite upright.
Center the post so that approx. 1/4" extends
on each side.

31. Prepare the connection tabs by bending back
on vertical perforations, bending tabs forward.
Apply glue to all of backside, then position on inside
of upright, just below post, so that it is centered on
the bottom-most three post faces, with rounded
tabs touching and attaching to backside of upright.
Repeat for second upright positioning.

32. The tote is now ready to fill with mason jars.
If desired, cut circles to decorate the tops of 8 oz.
jars, under the rings.

Here is the completed and filled tote.

No comments:
Post a Comment