
Front
card includes stitching hole cutouts at ornament
contour outlines. When no. 5
“perle cotton”
(or 6-ply embroidery floss) horizontal stitches
are added, the
simple contour sections appears.
A6 top-fold card measures approx. 4.63” tall x
6.25” wide.
Above the stitched design, the ornament “collar” shape
is attached,
with a double layer arch banner
can convey festive sentiment: be joyful!
(use print & cut procedures).
Final
touch is the optional hook
that barely loops over the banner top.
ASSEMBLY: 1. Identify and cut the shapes:
A card front panel with stitching holes
B card front underlayer panel with stitching holes
C stitching buffer (back) layer
D card base with top-fold perforation
E ornament "collar"
F print & cut banner front with printed "be joyful"
and banner base layer
G center accent circle
NOT SHOWN: top ornament hook shape
Also shown: no. 5 perle cotton "thread"
Model colors: DMC deep red and burgundy red (915)

paper clip end to punch through each cut stitching
hole to make sure each is open. Remove "chad" crumbs
from both front layer and duplicate reinforcing layer.
 3. Apply glue to backside of front panel, layer together

with reinforcement panel and join together.
Immediately double check holes alignment by
inserting tool into random holes across design.
Press the assembly under a heavy flat weight on
flat work surface until completely dry, to help prevent
warping or curling. Drying may require several hours
or overnight.


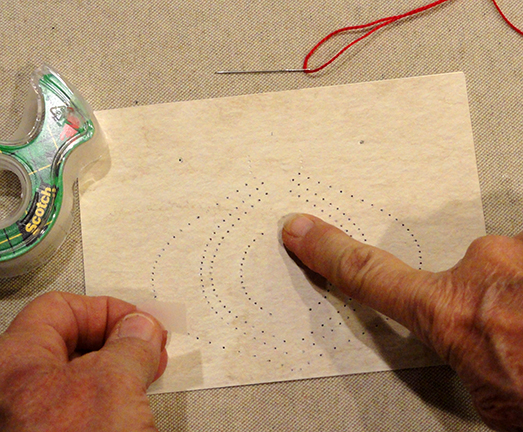
4. Cut a length of DMC no. 5 perle cotton
selected color for inner contours. Thread onto
a blunt tapestry needle. Locate a good starting position
such as the top-most long stitch as selected for
this tutorial. Select a convenient space where . . .

. . . thread can be attached on the backside of panel
such as the area indicated by pointing finger here.
On backside in selected space, attach tail end of
perle cotton "thread" using a small piece of cello tape.
This is the "anchor on" step.

5. Insert needle UP through top section hole on
one side and pull thread through until tape anchor
stops it.
6. Move across panel and insert needle DOWN
through opposite hole on same "level".

Pull thread through to complete first top straight stitch.

6. ON BACKSIDE, move needle down one hole
immediately below downward hole just previously
stitched, insert needle UP through that hole.
Move across to hole opposite, just below beginning
hole, to complete second long stitch.
(Refer to Step 9 second image to see backside
as stitching progresses.)

7. Repeat the long stitch process to complete
6 stitches, as shown here.

8. For 7th long stitch, insert needle UP through
outer hole, then across to first hole on same level,
to complete a shorter, "half" stitch which begins
the inward definition contour around center circle space.

9. Continue in same fashion to complete the shorter
stitches down the side contour.

On the backside, the stitches are short, moving
down to the next level, instead of across panel.

10. When the side contour stitching holes are all
stitched (15), change back to long stitches at
the bottom below the circle space, to complete
5 long stitches across.

11. When the "thread" on the needle begins to run out,
insert needle DOWN to backside in regular sequence . . .

. . . then remove needle. Trim tail to 1/2" or so,
then . . .

. . . secure on the backside of front panel with
a small piece of cello tape. This is the "tie-off" process.

12. Load needle again with matching color, then
continue to complete the straight stitches of
the inner contour with circle blank.
(NOTE that for the model, the tying-on for second load
was done toward top of second contour side,
then shorter side stitches were added working down.)
13. Tie off when stitches for threaded color are done.

14. Load second color for outer contours, following
the same process as before to tie on and complete
top two long stitches across full design.

Work down one side to complete shorter stitches until . . .

. . . stitching reaches the bottom, then complete
three stitches across the full design.
Next, work up the second side, tying off and on
new needle-load load as needed.
Tie off when complete.

15. Apply glue to backside of buffer layer, then
position on backside of stitching panel, with
panel outer edges precisely aligned.

Stitching will
be centered inside window cut out.

15. Use Print & Cut procedures to print and cut out
the banner front panel. (Or use blank shape to
hand-pen or stamp selected words.)
16. Position front arc onto banner base where edges
align, and attach in place.

17. Position and attach the accent shapes:
top hook, collar, center circle, arch banner.

18. Fold card base on perforation.
Position and attach front panel assembly onto front
with narrow offset margin all around.

Here is the completed card, with optional hook accent
shape in place, bottom end tucked under collar.

No comments:
Post a Comment