
A pair of miniature ensembles scaled to fit small-spaces for
Christmas decorating, and perfectly suited for
“Pyramid 3D Tree With Niche”.

Delicate layered fawn silhouette and two-layer
evergreen silhouette
combine to build a smaller-scale vignette
for winter or
Christmas setting.
Fawn measures approx. 1.85” wide x 2.5” tall
when assembled;
be sure to use a sharp (new) blade.
Tree measures approx. 3”
wide x 4.2” tall.
Miniaturized
candy cane (4” tall x 1.625” wide at hook)
is formed as hexagon tube, teams
with two miniature
“package” boxes for a Christmas setting.
(Small scale of
cane assembly best suited
for experienced paper crafters.)
Packages measures
approx. 1.25” wide x 1.25” deep
x 1.5” tall and .85” wide x .85” deep x .85”
tall.
NOTE: Mini Cane and Packages ensemble will be
described first, with Fawn and Tree ensemble assembly
following, in Step 21.
ASSEMBLY: 1. Identify and cut the shapes:
A mini candy cane hook portion
B mini candy cane shaft portion
C large package base
D large package lid
E large package "ribbon" strip
F small package main shape
G small package finger window cover

back on all perforations for panel segments,
end caps, side tabs and mini wedge tabs along
each segment angled seam edge.
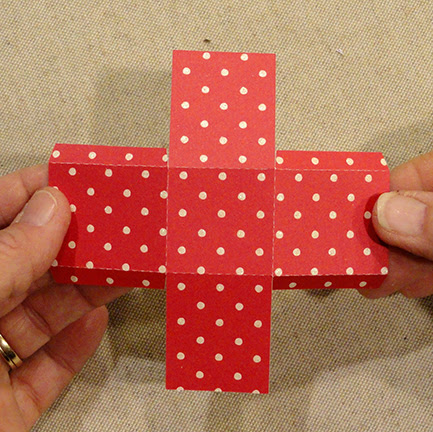
 3. Form the shaft shape into a tube to overlap

straight side edge across opposite long tab to
perforation line, adjust top to bottom, then glue seam.
 NOTE that the shape can be flattened on work surface

to apply fingertip pressure until secure. Once the seam
is glued and secure, "pop" the shaft back to its tube form.
 4. Each segment (8) of the hook has a straight short edge

that will connect across the body to overlap the opposite
tab to perf line, and be glued in place
 Like the shaft tube, the hook shape can be flattened

to get the segments to overlap and secure the 8 seams.
Once the seam is glued and secure, "pop" the shaft
back to its tube form.

the "cap" end, first tucking in the inward tabs so they
will slip inside the adjacent tube. Apply glue to the tabs
and the small wedge tabs near the "spine" segments.
 Pivot the straight edge being-added inner arch portion

to overlap the adjacent tab to perf line, creating
the slight angle that will compound with other segments
to create the hook arch. Other straight edges should also
line up with tab perf lines. Hold this multiple-part seam
until secure. One way to accomplish this is to insert
a standard pencil shaft or equivalent wood dowel into the
first tube segment - and a bit farther in - to provide
a press-against surface to help hold the seam 'til secure.
 6. Continue the process to repeat Step 5 for

the remaining tube segments, until all 8 are joined
and the hook is formed.
 7. Push hook inward tabs together slightly,

apply glue, then insert into the top open shaft end,
and push in until straight shaft end edge aligns
snugly to hook tab perf lines. Adjust if needed
to make sure shaft and hook are lined up
properly, then hold in place until secure.
 Use the pencil or dowel inserted to provide

a press-against form to help secure seam.
 8. At hook tip and . . .
 . . . shaft end, tuck tabs inward, apply glue, and


bend end "cap" hex extension into place, adjust
and hold in place until secure.

 10. Bend tabs in, side walls up to align and join

9. Prepare the large box base shape by bending back
on all perf lines.
corner seams.
 11. Prepare lid by bending back on all perf lines.
 12. Bend tabs in, side walls into place to align and


join four corner seams; upper flange edges will
remained unattached.

inward to attach to backside of adjacent wall.
 14. Apply glue to backside of ribbon strip, then center

across lid. Hold in place, and crease strip at corner
angle ridge edge and rim bottom edge, and attach
tip ends on inside of lid.
 15. Place lid onto top of base - fit should be snug.
 16. Prepare smaller package by bending back on


all perforation lines.
 17. Form the center segments into a tube to

wrap straight bottom end edge over top tab to
perforation line and join seam.
 18. Bend top and bottom tabs in at perpendicular

angle, apply glue, then bend end walls into place,
adjust, and join in place. Finger access hole on back
panel will assist in joining final edge seams.
 19. Apply glue to edges of "cover" square, then

position over opening, center, and attach.
 20. Arrange as desired, or reproduce the cluster

as shown here, to fit into the Pyramid Tree display.
(Glue packages together, tie twine to shaft, then
position and attach where cane touches box edges.


Here is the ensemble in the niche of
pyramid tree.

21. Assemble fawn deer silhouette by darkening
ear extensions of base shape, then overlaying
front shape so that corresponding edges align
(front and back legs remain single layers).
Adjust as needed, then secure in place.

On backside, add a dab of glue to eye contrast
inset, then position and attach eye contrast circle.

22. Prepare the three tree shapes by bending forward
at vertical center perforation line.
23. Begin with the silhouette that has a "1" cut
near bottom next to perf line, folded in half with
backside upward. Position and carefully align the left side of
second (no number cut on) silhouette so that edges
align as precisely as possible, and glue in place
on backside of first shape.

24. Repeat the process one more time so that
second half of center shape aligns with left backside
of third tree shape ("3" cut near bottom center).

25. Finish the ensemble by positioning
fawn assembly so that tree branch extensions
can attach to fawn backside to support it
in standing position.

If desired, position inside the niche of Pyramid Tree,
keeping tree mostly upright (NOT tucked back along
the niche's center back seam), and attach bottom
and near-top tree branches (backsides).

Here are the two vignettes on platform of niche:

No comments:
Post a Comment