Showing posts with label sun hat. Show all posts

Monday, June 7, 2021

Gardener Hat 3D Miniature

Stylized straw hat has flipped-up back brim, two-part hat band, 
brim rim contrast, eight-part wedge crown with straw cutout overlays. 
Use as summer-time decor, hang on a miniature peg rack, 
place in a summer shadow box, embellish a gift package. 

Specially sized as decorative element for 
BLOOM 3D Letter Box Ensemble. 

Measures approx. 4.125” long x 4” wide x 1.5” tall.  

ASSEMBLY: 1. Identify and cut the shapes:
A hat brim   B back rim accent
C front rim accent
D crown wedges (8)  E crown wedge overlays (8)
F top button assembly: 3-4 rings; 3-4 circles
G back brim underside overlays
H band (2)  I flower decoration

2. Prepare the brim shape by carefully disconnecting
the outer edges at the four gusset/dart shaping cuts.
Also bend the wedge tabs back slightly at perforation
lines near the dart cut lines.
3. Form each of the four darts along the brim back edge
by bringing the straight edge to overlap the wedge tab
to perforation line, and glue in place.
This shaping creates the up-flip along back of brim.
4. Position and attach the front brim rim accent along
the front of the brim shape. NOTE that the outer curved
edges should align, and that the ends should extend
to the first "dart" seamline on each side.
5. Prepare the back brim rim accent shape by
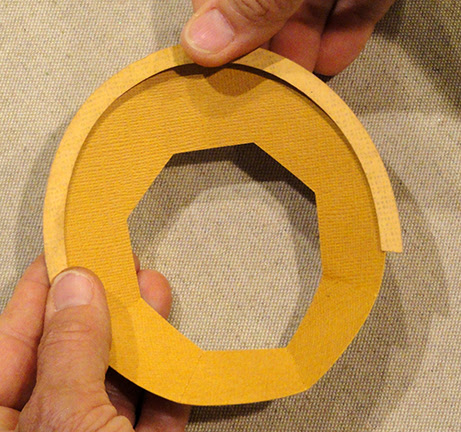
adding some gentle upward curl to the two ends
using a small diameter rod tool such as this crochet hook.
Also, bend the ends upward slightly at the short perf cuts.
Then position and glue the back rim accent
onto the back edge of brim in similar manner as front
brim rim accent was positioned and attached.
6. Prepare each of the 8 crown wedges by bending back
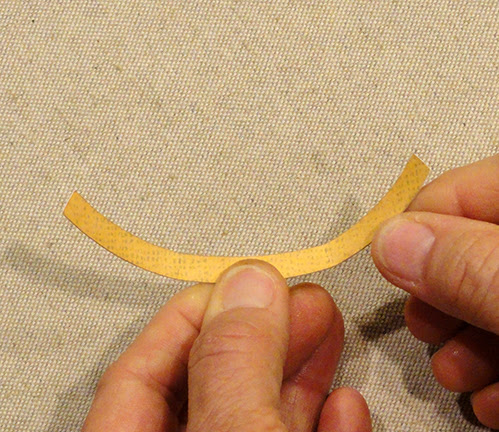
on side edge tabs and along upper 4 horizontal perf lines,
and bending forward at bottom edge tab perf line.
7. Begin crown assembly by aligning two wedges with
middle segments lined up, straight side edge (left wedge here)
overlapping corresponding tab (right wedge) to perf line,
adjusting for top and bottom alignment, then gluing the seam
segment.
8. Bend the other seam segments inward slightly to
align straight edge along corresponding perforation line,
and gluing segment seams.
9. Continue to assemble the first half dome by positioning
and adding two more wedges in similar fashion.
10. Prepare the second half dome in similar manner
using remaining 4 dome wedges.
11. Position the two half domes edges together
to adjust and align the side seams as was done with
steps 7-9, working from center top seams downward
along sides (or any order that seems to work best).
NOTE that the pointy top may need to be compressed
downward slightly to assist edges to align completely
as gluing of these seams proceeds.
12. Prepare the two hat band shapes by bending
back on the short perforation lines.
13. Position the hat bands along the bottom of the crown dome
so that it is centered within the lower segment,
aligning the vertical perforations. Glue first band
in position, but . . . 
. . . leaving the straight end unattached until
the second band tab end can be tucked under it
to complete the seam as it is positioned and attached.
NOTE that as the bands are added, the SIDE wedges
of crown will be established by the positions of
the punch holes where brads or decorative studs
will be placed.
14. Prepare the wedge overlays by bending back
along horizontal perforation lines,
15. Position and attach each overlay onto crown,
aligning perforation bends, and maintaining offset
at side edges. (Lower edge may abut to band edge.)
16. Orient the crown assembly over the brim assembly
so that the side wedges are AT side positions, then . . .
. . . insert bottom tabs downward through crown opening.
On underside, bend each crown tab back, adjust
to be centered side to side, then and glue in place
to brim underside.
17. Prepare the top button by stacking the ring shapes
together and gluing, and the round shapes and gluing.
Finally, position the round stack on top of the ring stack
and glue in place to complete the button.
(NOTE that the ring opening accommodates the tip of
the crown at the underside of button.)
18. Position and attach the button assembly at center
top of crown.
19. Prepare the flower by adding downward curl to
each of the petals using a narrow rod-like tool such
as the crochet hook handle shown.
20. Layer the larger and smaller flower centers
and attach to the center of the petals shape.
21. Position and attach the leaf and then the flower
onto the upper side of the crown, slightly toward
the back, as shown, or as desired.
22. Prepare the crown back underside of the end shapes
of the under-crown "masking" pieces by adding some 
backward curl to the curved, pointy ends so that 
they will conform easily to the flip transition shaping
of the crown.
23. Position and attach the under brim shapes
to the corresponding areas or segments
(to hide the seams and tabs).
Here is the completed gardener hat.

Monday, May 21, 2018

Summer Fun Ornaments for 3D Tree Display

A dozen small-scale ornaments to carry
the celebration through the summer months
as they are hung in rows on the arms of
the 3D Ornament Tree Display.
Mix and match favorites in varied color combinations,
or make one of each to fill the 12 spots on the tree.
Ornaments can also double as gift tags,
invitations for warm weather events,
scrapbook pages (omit the offset base with punch holes).
Decorate the top of the Ornament Tree with
the half-flower (shown above) or the sunburst finial, 
or with no decoration.
(See the tutorial for Tree design Here.)
Following is a description of each of the ornament designs
to help understand how to assemble them.
Follow THIS LINK (see Step 4) to learn more about
attaching twine hanger to ornaments.

BUTTERFLY ORNAMENT
1. Layer or assemble eye pupils onto eye whites; 
antennae partial head under mail long body shape.
2. Layer bottom wing lobe accent over interior shape.
3. Position and attach upper wing main shape to full body shape, 
interior shapes and dots.
4. Position and attach lower wing accents onto body
assembly under upper wing.
5. Layer and attach body over center
of wing assembly matching edges that should align.
6. Attach butterfly assembly onto ornament base
with offset margins at edges as shown.

WATERMELLON DISC ORNAMENT
1. Layer contrast circle under smallest
circle with seed cutouts.
2. Layer circles bottom to top:
 largest (dark green rind)
next lighter green (rind interior)
next transitional flesh (pink)
smallest/top (bright red)
3. Position watermelon disc onto
scalloped ornament base and attach.


SUNFLOWER WITH LEAF ORNAMENT
1. Position and attach leaf overlay onto leaf base shape.
2. Position and attach the two petal shapes so that
the petals offset to fill in gaps all around.
3. Layer and attach the contrast circle under
the flower center circle.
4. Attach the leaf unit to the ornament base
with even offset margins at outer edges, then
attach flower overlapping leaf,
then center of flower.
ICE CREAM BAR ON A STICK
1. Position and attach contrast show-thru
sprinkler shape under  the "chocolate" overlay
top shape.
2. Position overlay over top of ice cream main shape.
3. Position ice cream assembly onto "stick" shape.
4. Position and attach ice cream/stick assembly
onto ornament base shape with offset margin
even all around.
SUNBURST ORNAMENT
1. Position and attach rays overlay outline shape
onto rays base shape.
2. Position and attach center circle onto rays
assembly, then position and attach to
ornament base with offset margin even all around.

POPSICLE DOUBLE SERVE ORNAMENT
1. Position upper "ice pop" shape onto corresponding
portion of "stick" base shape.
2. Layer the narrow pop shapes (middle violet) 
each onto the left edge
of each main inlay pop shape (darkest violet).
3. Insert the inlay assemblies into
the hollows of the main ice pop shape
and glue in place.
4. Position and attach the ice pop assembly
onto the main ornament base with even offset
margin all around.

PICNIC BASKET ORNAMENT
1. Layer and attach basket shapes:
largest (half octagon) on bottom,
cut diamond shape next,
rectangle side panel with button inlays.
2. Position and attach basket assembly
onto lower portion of whole basket silhouette
with handle.
3. Position and attach basket rim onto assembly.
4. Layer cloth shapes with 'T' marked shape on top,
with upper curved edges matched up,
and attach surfaces that touch.
5. Slot the cloth assembly shape behind
handle and slide down slightly into position
as shown and glue in place.
6. Position basket unit onto ornament main base
and attach with even offset margin all around.
SAND BUCKET AND SHOVEL ORNAMENT
1. Layer handle end and shovel end accents
onto main shovel shape.
2. Layer hinge circle underlay with
star cut out circle.
3. Layer handle overlay onto handle main shape.
4. Layer lower bucket shape over largest bucket
(includes interior reveal at top) shape,
then position and attach bucket rim.
5. Position bucket unit onto ornament base
with offset margin as shown at appropriate edges.
6. Position and attach handle, hinge overlay unit,
shovel.

SUN GLASSES & FLOWERS DISC
1. Position and attach plain circle background
to scalloped ornament main shape,
matching up the punch holes of each.
2. Position and attach contrast "highlight"
underlay behind the punch holes of
glasses (dark) lenses shape.
3. Position and attach the lenses assembly
behind the frame shape.
4. Position lenses unit with right end as viewed
from front positioned between the punch holes of base.
and glue in place.
5. Add upward curl to flower petals if desired.
Position each flower over base punch holes
and glue centers in place.
6. Attach mini brads through flower center holes.

SUN HAT ORNAMENT
1. Position and attach the hat base shape (black)
onto the ornament base with even offset
margin all around.
2. Position and attach the main hat (pink) shape
onto the hat base with even outline margin around.
3. Insert the under-brim shape into hat base "window".
4. Position and attach contrast dots into polkadot openings.
5. Layer hat bands, then position and attach across center
band area.
6. Layer bow end triangles over bow base and attach
in place. Then position bow end, knot over right side of band.
BUMBLEBEE & HEART ORNMENT
Shown above is the correct coloration for the sample,
and also shows the units and layering.
1. Layer front wing over back wing silhouette and attach.
2. Position and attach mouth underlay behind opening
of head shape, and antennae partial head shape
at top behind head. Add antennae tip ellipses.
3. Position bee body base shape (yellow) onto ornament base
with appropriate offset margins even.
4. Position and attach the body (brown) stripe shapes
where the edges align with body shape,
with even parallel spacing.
5. Position and attach wings unit, face/head onto
assembly. Insert eye circles into openings.
6.  Attach heart accent.