Showing posts with label summer. Show all posts

Monday, May 21, 2018

Summer Fun Ornaments for 3D Tree Display

A dozen small-scale ornaments to carry
the celebration through the summer months
as they are hung in rows on the arms of
the 3D Ornament Tree Display.
Mix and match favorites in varied color combinations,
or make one of each to fill the 12 spots on the tree.
Ornaments can also double as gift tags,
invitations for warm weather events,
scrapbook pages (omit the offset base with punch holes).
Decorate the top of the Ornament Tree with
the half-flower (shown above) or the sunburst finial, 
or with no decoration.
(See the tutorial for Tree design Here.)
Following is a description of each of the ornament designs
to help understand how to assemble them.
Follow THIS LINK (see Step 4) to learn more about
attaching twine hanger to ornaments.

BUTTERFLY ORNAMENT
1. Layer or assemble eye pupils onto eye whites; 
antennae partial head under mail long body shape.
2. Layer bottom wing lobe accent over interior shape.
3. Position and attach upper wing main shape to full body shape, 
interior shapes and dots.
4. Position and attach lower wing accents onto body
assembly under upper wing.
5. Layer and attach body over center
of wing assembly matching edges that should align.
6. Attach butterfly assembly onto ornament base
with offset margins at edges as shown.

WATERMELLON DISC ORNAMENT
1. Layer contrast circle under smallest
circle with seed cutouts.
2. Layer circles bottom to top:
 largest (dark green rind)
next lighter green (rind interior)
next transitional flesh (pink)
smallest/top (bright red)
3. Position watermelon disc onto
scalloped ornament base and attach.


SUNFLOWER WITH LEAF ORNAMENT
1. Position and attach leaf overlay onto leaf base shape.
2. Position and attach the two petal shapes so that
the petals offset to fill in gaps all around.
3. Layer and attach the contrast circle under
the flower center circle.
4. Attach the leaf unit to the ornament base
with even offset margins at outer edges, then
attach flower overlapping leaf,
then center of flower.
ICE CREAM BAR ON A STICK
1. Position and attach contrast show-thru
sprinkler shape under  the "chocolate" overlay
top shape.
2. Position overlay over top of ice cream main shape.
3. Position ice cream assembly onto "stick" shape.
4. Position and attach ice cream/stick assembly
onto ornament base shape with offset margin
even all around.
SUNBURST ORNAMENT
1. Position and attach rays overlay outline shape
onto rays base shape.
2. Position and attach center circle onto rays
assembly, then position and attach to
ornament base with offset margin even all around.

POPSICLE DOUBLE SERVE ORNAMENT
1. Position upper "ice pop" shape onto corresponding
portion of "stick" base shape.
2. Layer the narrow pop shapes (middle violet) 
each onto the left edge
of each main inlay pop shape (darkest violet).
3. Insert the inlay assemblies into
the hollows of the main ice pop shape
and glue in place.
4. Position and attach the ice pop assembly
onto the main ornament base with even offset
margin all around.

PICNIC BASKET ORNAMENT
1. Layer and attach basket shapes:
largest (half octagon) on bottom,
cut diamond shape next,
rectangle side panel with button inlays.
2. Position and attach basket assembly
onto lower portion of whole basket silhouette
with handle.
3. Position and attach basket rim onto assembly.
4. Layer cloth shapes with 'T' marked shape on top,
with upper curved edges matched up,
and attach surfaces that touch.
5. Slot the cloth assembly shape behind
handle and slide down slightly into position
as shown and glue in place.
6. Position basket unit onto ornament main base
and attach with even offset margin all around.
SAND BUCKET AND SHOVEL ORNAMENT
1. Layer handle end and shovel end accents
onto main shovel shape.
2. Layer hinge circle underlay with
star cut out circle.
3. Layer handle overlay onto handle main shape.
4. Layer lower bucket shape over largest bucket
(includes interior reveal at top) shape,
then position and attach bucket rim.
5. Position bucket unit onto ornament base
with offset margin as shown at appropriate edges.
6. Position and attach handle, hinge overlay unit,
shovel.

SUN GLASSES & FLOWERS DISC
1. Position and attach plain circle background
to scalloped ornament main shape,
matching up the punch holes of each.
2. Position and attach contrast "highlight"
underlay behind the punch holes of
glasses (dark) lenses shape.
3. Position and attach the lenses assembly
behind the frame shape.
4. Position lenses unit with right end as viewed
from front positioned between the punch holes of base.
and glue in place.
5. Add upward curl to flower petals if desired.
Position each flower over base punch holes
and glue centers in place.
6. Attach mini brads through flower center holes.

SUN HAT ORNAMENT
1. Position and attach the hat base shape (black)
onto the ornament base with even offset
margin all around.
2. Position and attach the main hat (pink) shape
onto the hat base with even outline margin around.
3. Insert the under-brim shape into hat base "window".
4. Position and attach contrast dots into polkadot openings.
5. Layer hat bands, then position and attach across center
band area.
6. Layer bow end triangles over bow base and attach
in place. Then position bow end, knot over right side of band.
BUMBLEBEE & HEART ORNMENT
Shown above is the correct coloration for the sample,
and also shows the units and layering.
1. Layer front wing over back wing silhouette and attach.
2. Position and attach mouth underlay behind opening
of head shape, and antennae partial head shape
at top behind head. Add antennae tip ellipses.
3. Position bee body base shape (yellow) onto ornament base
with appropriate offset margins even.
4. Position and attach the body (brown) stripe shapes
where the edges align with body shape,
with even parallel spacing.
5. Position and attach wings unit, face/head onto
assembly. Insert eye circles into openings.
6.  Attach heart accent.


Sunday, February 9, 2014

Summer: What's Coming Up Kit Chart


This Part 1 (of 3) kit for the wall quilt project titled
"Summer: What's Coming Up"
is available for purchase through
Quilts, Etc. in Sandy, Utah.
(Telephone: 801-255-2666)

Please note the instructions for the Marigold blocks:
Fabrics will be used to make 3 marigold blocks,
each of which uses four machine paper foundation sections.
Two blocks will be made using background 1 and orange 1.
To make this easier, cut the background 1 strip in half lengthwise
to create 2 long and narrow strips. Use one strip for each block.
(Do not cut the orange 1 strip in half. Just use it as construction progresses.)

Kit part 3


The pattern for which this kit was prepared
is available from the shop listed above,
or directly by retail mail order from
hearthsewnpatterns.com .


Saturday, September 7, 2013

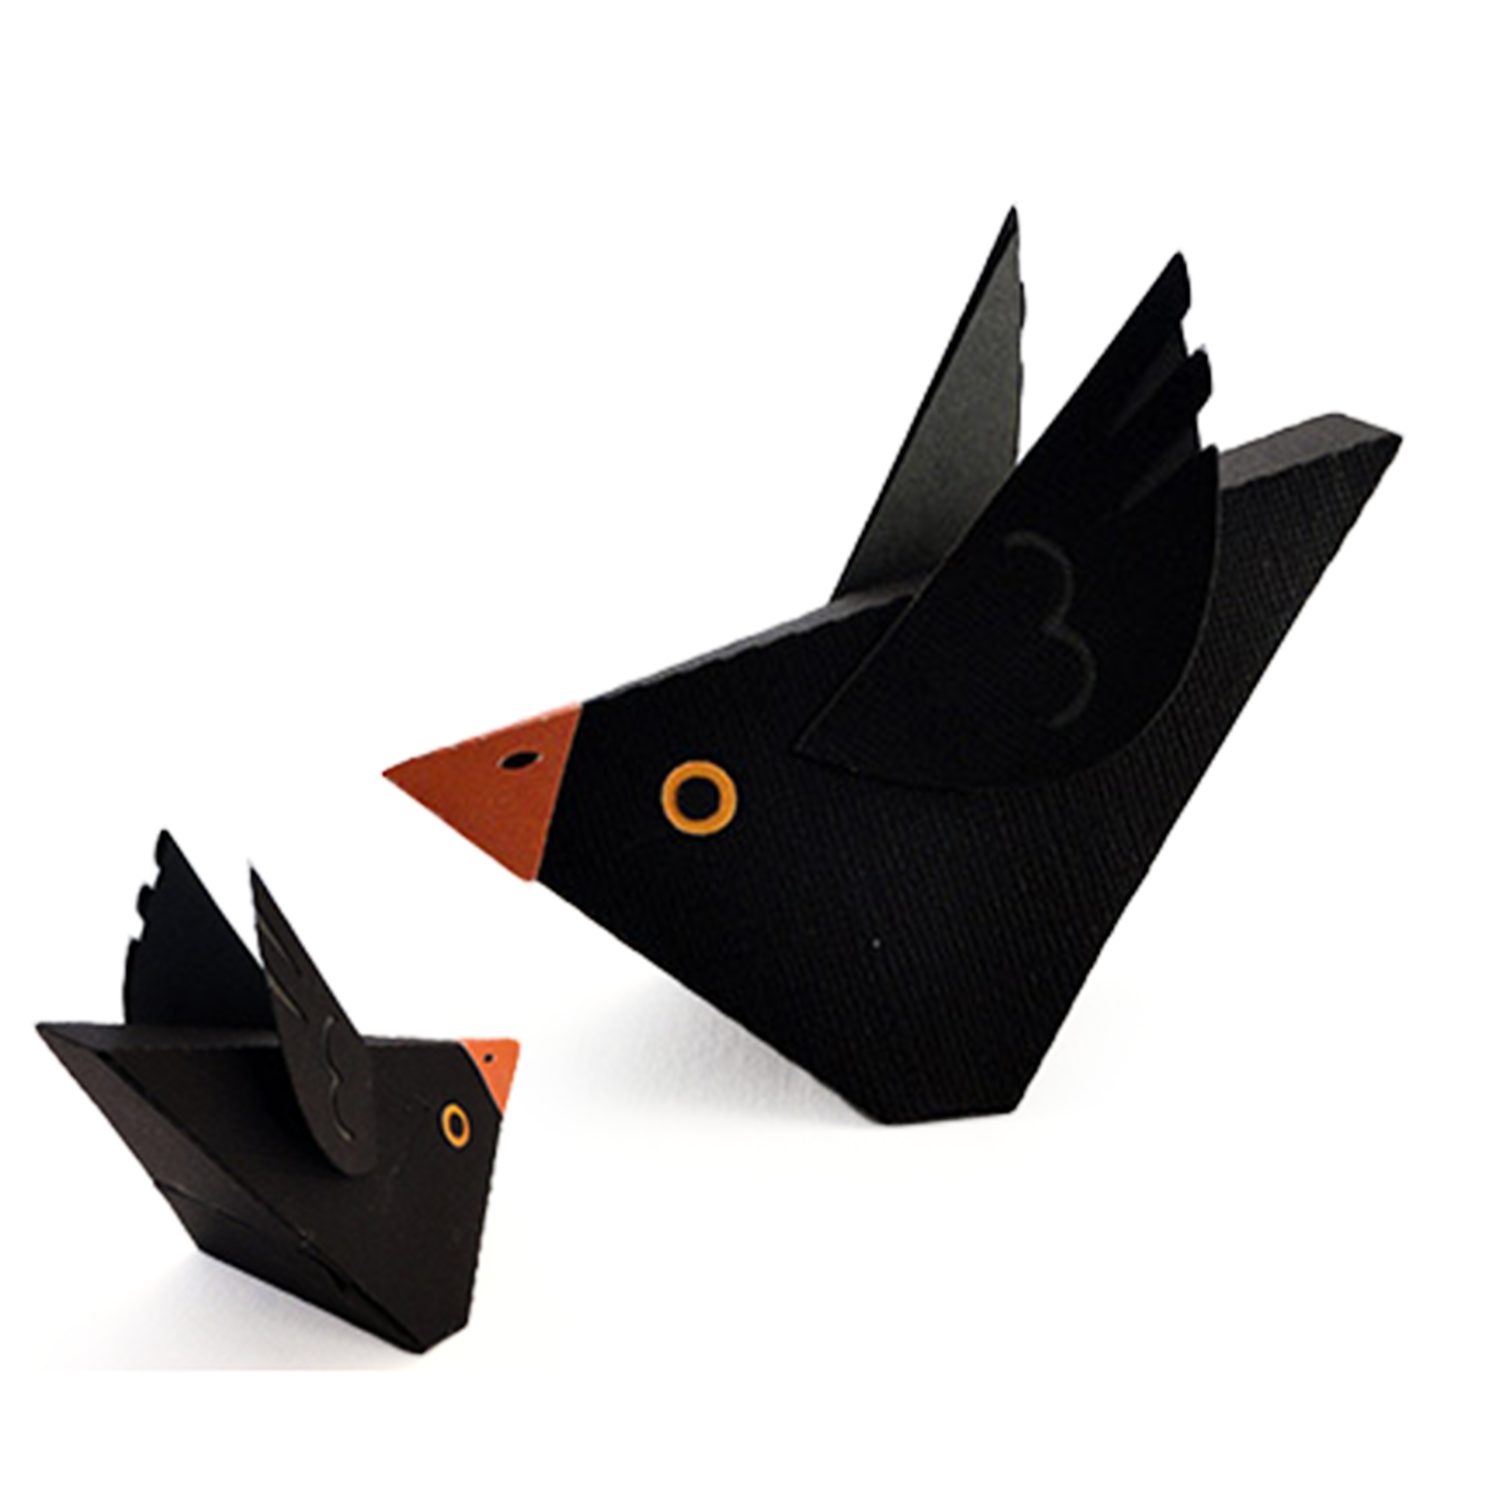
3d Wedgy Crow Tutorial


This little crow doesn't look like the menace that Mr. Scarecrow thinks he is!
Made of card stock, his body is one piece with just the basic additions
of double circle eyes, pyramidal shaped beak, layered wings.
Assemble one to sit on an artificial pumpkin (or even a real one),
place him with other autumn decorations on a shelf,
or pair him up with the 3d scarecrow shelf sitter.
He is made to fit and sit neatly on the scarecrow's "shoulder".

CONSTRUCTION
1. These are the cut pieces that go together to create the 3d crow. NOTE the one-piece body, and the contrast wing base pieces.

(Missing from this layout is the pair of smaller black circle inner eyes.)


2. Begin by folding the body at all the perforations. Fold all the tab and body perforation lines as "mountain" folds (i.e., back-to-back folds).


3. Fold the front  body area into a triangle shape so that the near-eye edge overlaps the front lower body tab. Apply glue to the tab, re-align, and apply pressure until glue is secure.


4. Swing the under-tail section containing the slots down so that tab perforations align with side body lower edges. Apply glue, re-align and hold edges and tabs in place, applying pressure, until the glue is secure.


5. Apply glue to the tabs on each side of the narrow base section. 


6. Reposition base section so bottom center side edges of body align with tab perf edges. Hold in place until glue is secure.


7. For weight and to help the crow sit on his base surface and not fall backwards toward his tail, use strong glue such as Fabri-Tack to securely glue a couple of chunky bolts inside the body cavity on each side, on the base rectangle surface.


8. Apply glue to lower under tail surface, below slots. 


9. Slide tabs into slots and apply pressure to make a good glued bond between the two pieces.


10. Examine beak piece. Note that one of the four triangle sections has a small circle symbol. This triangle surface is the "inside" layer of the base. Apply glue to the front surface in that triangle area.


 11. Fold the shape into a pyramid so that the symbol-containing triangle is under the opposite end triangle shape surface. Hold in place until glue is holding.l


12. Apply glue to the inside surfaces of the beak, then slide in place with the nostril holes at the top and in line with the long narrow front-to-back surface that is the top of the crow.


13. Apply the larger eye circle so that it conceals the cut guide circle in the crow body.
Repeat for the opposite side. Also glue the smaller black inner eye, centered, on the larger eye circle.


14. Glue the wing layers together. Repeat for both wings. Fold the layered wing at the perforation line in a "valley" fold.


 15. Apply glue to the wing underside in the triangle area on the triangle end beyond perforation.

16. Position wing front tip at the tiny triangle guide mark on the body. Repeat for both wings. Tip the wings at a matching angle.


Your FIRST crow is done.
Now that you know how quickly he goes together, you may want to create 
a whole "murder" of crows!

Here is this wedgy crow bird sitting on the shoulder of the scarecrow mantle sitter:


Thursday, August 8, 2013

Sunflower 3d Box Tutorial


For those sunny days from mid summer to fall,
here is a snappy little sunflower 3d box with lid
made from cardstock measuring approx. 4 1/4" x 5" x 1 3/4". 
The design file is available for purchase
from SnapDragon Snippets through the
Silhouette America online store.
Create one to freshen your decor displays,
fill with lemon drops as a gift, 
hold paper clips or other small desktop items.


As shapes are cut, mark the "north" position on the petal rings and centers as they are removed from cutting mat. Also number the 6 individual petals 1-6 from "north" position clockwise around as they are shown in original design download. 
The bottom set of star shapes and boxing strips are for the BASE, and the top set are for the LID (with centering alignment hole). NOTE that the lid and base each have two star shapes cut: one to attach to boxing strip, and the other for top (or bottom) FACE shape to hide construction tabs. 


Begin by folding the boxing shapes at perforations. (See the next two images for specifics.)


For BASE, identify the narrower "curve" sections on the strip (tabs will have 3 wedges). Fold perforations on each side of curve sections as "valley" or face-to-face folds. Fold remaining perfs as "mountain" or back-to-back folds. Then fold the lower edge tabs back (mountain folds).


For LID, repeat the folding prep process. The lid has a set of straight "tabs" at the top edge as shown in this image (actually will be the lower edge of lid boxing when in place). These are the rim reinforcement tabs to strengthen the lid edge, and will be folded back (mountain) to the inside and glued in place.


Add curl to narrow sections.
Use a round pencil shaft placed behind
the base boxing strip then curl just that section slightly as shown.


For the lid strips, first fold back (mountain folds) and rim edge tabs and glue in place. Leave the end narrow tab unfolded (to be folded back after boxing is attached), then repeat the shaping process for the narrow "curl" sections. 


Begin to add first strip to base star shape. Apply adhesive to one curl tab and 2 straight "star point" tabs only. With bottom tabs folded perpendicular to strip, slide the star edge curve edge into the curve of the strip until it is snug. 


Immediately align the star point tabs around the adjacent point, pushing until point edges are snug against perforations.Place on a flat surface and apply pressure BOTH down against star and tabs, and from side to ensure that perforation is snug against curved and straight cut edges of star shape.  


Use a pointed tool (like this knitting needle) to ensure that star point does NOT curl or bend out of place, and to apply pressure to create a good bond of tabs to star all the way to point. Work the three edges and hold until glue is secure.


Repeat this "3 tab" gluing operation until the first strip is in place. This image shows the progress as more tabs are glued in place. NOTE that the tabs are visible on the bottom (outside) of the base star shape.


Apply pressure from the outside of the point and curve to continue to "snug" the star shape edges into the angle of the strip and tab perforations. Pieces should fit together accurately at each step to prevent an accumulation of inaccuracies. 
When one strip is in place, attach the first 3-tab set to appropriate star edges, THEN glue the strip-to-strip tab and strip end; make sure the end edge aligns snuggly against the vertical perforation of the tab. Doing it in this order helps ensure that the boxing perforations end up perpendicular to the base star shape.

Continue until the second strip is completely attached, then join the end tab to the lead edge as shown here. 


This picture shows the tab and lead edge being glued from the outside view of the base box.


Apply glue to all of underside of outer star shape, then position to cover tabs construction. Once adjusted for accurate placement, place face-side down on flat surface and apply pressure until glue is secure.

The base is now completed.


Repeat the boxing strip process for lid. When both strips are in place with end tabs joined, fold the final rim reinforcement tabs inward and glue in place. Attach the top FACE star shape, and the lid is now complete.


Build the sunflower on the six point star shape (shown as green in sample). Compare shapes to layour for "north" positioning, then to attach bottom & second rings of petals, and "solid" flower center. Attach the top center (with punched holes). Here one shape is shown with pencilled "north" arrow to help as it was removed from the cutting mat. "North" on the box lid is a point, shown top center on the largest image at the beginning of this tutorial.


With center shapes in place, glue individual top petals in place over their specific undershapes of the middle section. No. 1 shape is just left of the "north" position, then 2-5 rotate clockwise around the flower. Refer to the photo image of completed flower, next, to see in which positions these petals will be placed.


Here is the completed lid with north point of star at the top center.

Prepare and attach bee layers. Fold wing layer at center, then apply glue to fold ONLY, attach and hold fold in position on body until secure. Attach eyes.


Attach a small foam square to bee underside at front and tail. This image shows prepared bee. Determine your desired position, then remove protector strips from foam squares surface and affix bee in place.


Fit lid over base, and your box is complete!