Elevate table-top display photos with these slotted chunky bases
for wedding, anniversary, special birthday or
other
celebration gatherings.
Best for photos sized 4x6 or 5x7.
(Can hold multiple
prints one behind the other.)
Optional: add washer
weights to
interior bottom panel for better stability.
Dome measures approx. 4” long x 2” tall x 1.25” wide.
(Dome style is most difficult of the three styles.)
Pyramid measures approx. 4” long x 2” tall
x 1.25” wide. Plank measures approx. 3.75” long x 1.875” tall x
1.875” wide.
ASSEMBLY: 1. Identify and cut the shapes
for the selected style being built:
Trapezoid Plank Block:
A main hull with attached front, back & base
B slot liner
C front & back panel overlays (2)
Pyramid Block:
A main hull with base
B separate front, back panels (to attach to A)
C slot liner
D front, back panel overlays
A main hull boxing
B separate front, back panels (to attach to A)
C slot liner
D front, back panel overlays (2; NOTE that
this shape was exchanged for final project)
TRAPEZOID PLANK STYLE
(This style is perhaps the easiest to assembly, so it will
be explained first to assist explanation of the other two styles.)
2. Prepare the main hull shape by bending back on
all perforations for top, side, front & back, base panels
and tab/flanges.
Also prepare the slot insert by bending forward along the two closely-spaced long perforation lines at center,
and back along perforations for tabs and flanges.
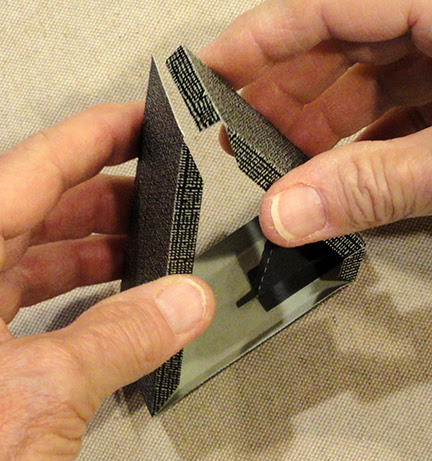
3. Begin by positioning one insert long flange behind the hull's top panel so that the perforation line is
lined up exactly along the straight cut edge of opening.
(This image shows the left straight edge being positioned
along the left perforation line of liner, as indicated
by pointing finger.)
Adjust so that liner is centered along the straight slot edge of TOP panel, then glue in place.
HINT: after the edges are initially joined securely enough,
invert the assembly face down on work surface and
apply fingertip pressure along the flange to help it
adhere completely and evenly.
4. Next, swing the opposite top liner flange into position along the straight cut edge opposite the first that was
glued in place in step 3. Adjust, then glue in place
in similar manner.
5. Prepare to attach the angled end wall panels by applying glue to the face surfaces of the upright tabs
and small slot end tab, then tip the end panel into
position . . .
. . . until the straight slot edges align accurately with liner tab perf lines. Apply glue to glue in place.
6. Bend the front then back panels down into place to glue side edges to flanges from end walls.
Invert the assembly face down to apply pressure along the tab and seam as each is glued.
7. If desired, consider acquiring large metal washers as weight discs to quick-grab or hot melt glue in place
on the inside surface of the bottom panel.
8. Bend the base panel edge flanges at approx.
right angles, apply glue to these, then insert into
position at bottom of block assembly.

Adjust straight edges that overlap tabs so they align
as precisely as possible along flange perforation lines.
Use "finger access" openings to apply pressure along
each of the flange seams until secure.

9. Apply glue to underside edges and center of
front, back panel overlays, then positioning
edge to edge over corresponding front and back
panels, adjusting so edges align as closely as
possible.
This completes the plank block assembly:
PYRAMID STYLE
10. Prepare the pyramid boxing wall (sides, base)
by bending back along all perforation lines for
boxing segments, tabs and flanges.
Also prepare the slot insert as described for plank
box in step 2 above.
11. Position the slot insert behind the top portion of the pyramid . . .
. . . so that the short segment of slot aligns at the short tab perforation line at insert top.
Adjust then glue in place.

Invert the assembly to apply fingertip pressure
to secure the seam.
12. Repeat the positioning and attachment of
the opposite narrow top tab . . .
. . . and top short slot
segment.
13. Apply glue to the face surfaces of
slot insert end tabs. Bend side boxing panels down
into position so that slot straight edges align
with insert tab perforation lines. Adjust and glue
tabs and edges of both angles.
14. (Position and attach bottom panel weights
at this point, if desired.)
Finalize pyramid shaping by bringing the boxing
ends together to overlap the straight base end edge
across the end tab to perforation line.
Adjust and glue the seam.
15. Bend front and back boxing tabs at right angles to walls, apply glue to tab or flange faces.
Position the hollow front (and later back) triangle walls
over the opening, adjust edges, then attach in place.
16. Position and attach front and back wall overlays.
That completes pyramid block assembly.
DOME STYLE
17. Prepare the DOME boxing wall (sides, base)
by bending back along STRAIGHT perforation lines for
boxing segments, tabs and flanges. (Leave tiny curve
edge tabs unbent until later in assembly.)
Also prepare the slot insert by bending forward at
closely-spaced perforation lines at center.
Also bend back each of the narrow curve edge tabs.
panel using a rod tool such as this wooden dowel.
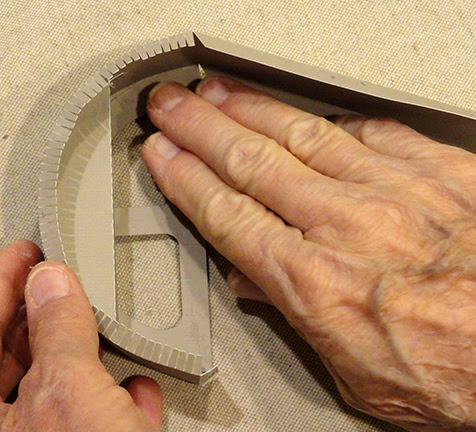
19. As seen from the underside here, the slot insert will be positioned behind the slot top curved wall.
Position the insert so that curved upper edges begin
to correspond to the curved edge of dome boxing.
NOTE that tiny dash marks will show positioning
CENTER of each of the slot edge and insert edge.
Begin with first edge and tabs being attached to
align these dash marks, then adjust and glue
the multi-tabbed edge along slot edge.
NOTE: this may be a difficult seam to align,
but make best attempt to center insert along
slot edges so that end tabs align at slot ends.
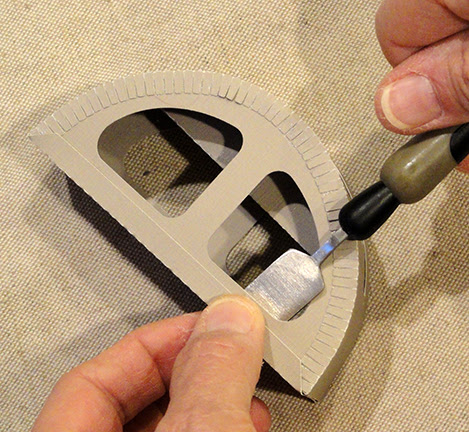
20. Once first curved edges are in place, work on
second curved edge, applying glue to multi tabs,
then swinging/bending it up into position,
with center marks aligned as done previously.

21. Bend dome edge tabs back at right angles.Apply glue to undersides of tabs, then position hollowed front panel behind curved edge tabs,
align ends and centers, then use finger-access
openings to apply pressure along edge.
TAKE CARE that curved edge is pushed snugly into
place at mini tab perforations.
When seams are sufficiently secured in place, invert the assembly face down to apply pressure
all along the curve edge to attach tiny tabs to edge.
22. Repeat for the second dome panel. 23. If desired, position and attach metal washers
in interior base panel. Bend base panel into position
to attach end to side wall tab.
Use finger access openings and spatula tool to assist in attaching bottom seam.
24. Position and attach dome panel overlays.This completes dome block assembly.


 . . . invert and re-direct the top and bottom segments
 4. Fold the "dog ear" corners down and crease.
 5. With all perforation folds prepared,

 . . . taking care that dog ear folds remain tucked under.
 6. Unfold, allow sender to write message inside

 If desired, position and affix a word cut out