
Varied sentiments from two slightly varied
bee-theme card designs:
send congratulations and share the news;
or convey encouragement and support.
Hollow layered rings create the round base of
highly-detailed
card with delicate offset margins
with detailed bee emblem bridging the space.
Script-style
words for “all the buzz”
or "bee-lieving in you" phrases can be positioned
at center bottom using
optional positioning guide shapes.
Back ring base has perforations at two-thirds
of
the way up to allow it to bend away to reveal
arched sentiment plaque.
Card fits into envelope for
6x6 card.
ASSEMBLY: (Bee-lieving design will be
demonstrated in tutorial, with only difference
noted in step 4.)
1. Identify and cut the shapes:
A main base ring
B accent layer #1 C accent layer #2 with punch circles
D honeycomb emblem base and overlay
E base ring back panel (this one with squared bottom)
F sentiment arch for lower interior
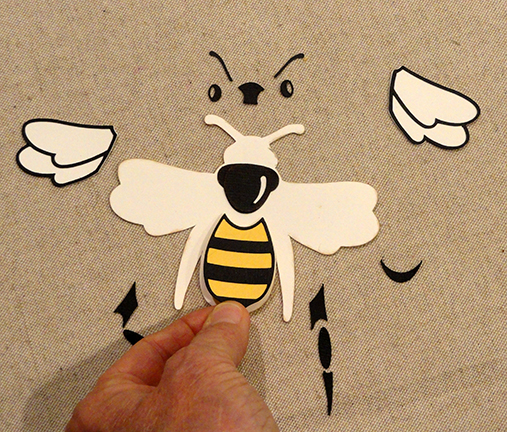
G bee base silhouette (to build on)
H head shapes: center, eyes, antennae
I thorax assembly: base, upper oval & show-thru, arc
J wing delicate overlay outlines K wing bases
L leg shapes (3 each for l & r)
M abdomen and stripes overlay
N word cutouts: "bee-lieving in you"
O optional word positioning guide arch


 . . . word positioning guide can be positioned at
bottom of top ring layer, and temp taped at ends.
(NOTE: for "all the buzz" design, the positioning
guide will be positioned at the bottom of
the layer #1 ring.)
 5. Use fine pencil to lightly trace the letter bottom shaping
onto the top ring. (Some letters positioned to
give an idea of how the welded words fit on guide.)
 6. Remove the guide and discard. Position and
attach words where tracings indicate, hiding trace lines
if possible. Add the 'i' dots and the dash in place, too.


 layer contrast top thorax oval under
main thorax oval, then . . .
 . . . position and attach oval assembly onto
center of main thorax shape.

 . . . body assembly to ensure accurate relative
positions and make adjustments, making sure the
under-thorax arc will fit, then attach these three
center body shapes.
 10. Position the head center shape and attach.
Then position the eyes and antennae.
 11. Position and attach the wing shapes, then . . .
 . . . position and attach the three-part legs.
 12. Position the bee centered, to span the ring center
opening, and on the vertical center.
Adjust up/down so that antennae tips and leg tips
can barely overlap and be attached to inner ring edge,
then attach bee surfaces where they overlap.

 14. Position the emblem at top center, with small
margins extending beyond ring edges at top, bottom,
and attach in place.


 17. Open the lower card portion to reveal
the backside of the main card, then center
and attach the arch-shaped sentiment plaque.


demonstrated in tutorial, with only difference
noted in step 4.)
1. Identify and cut the shapes:
A main base ring
B accent layer #1 C accent layer #2 with punch circles
D honeycomb emblem base and overlay
E base ring back panel (this one with squared bottom)
F sentiment arch for lower interior
G bee base silhouette (to build on)
H head shapes: center, eyes, antennae
I thorax assembly: base, upper oval & show-thru, arc
J wing delicate overlay outlines K wing bases
L leg shapes (3 each for l & r)
M abdomen and stripes overlay
N word cutouts: "bee-lieving in you"
O optional word positioning guide arch

2. Layer the two accent rings with inner edge circle
aligned, and attach together.

3. Attach the punch circle accents.
(NOTE: the "all the buzz" design has more circles.)

4. Prepare to position and attach the words of phrase
by finding vertical center with some kind of guide.
One example, here, is to place ring assembly on
a grid, focusing on a vertical center line being placed
on a center line, then rotating slightly until other elements
help refine the positioning, such as the spacing between
the ring side center edges to adjacent grid lines,
and the lowest punch circle both aligning on
a cross line. Once achieved, retain positioning until . . .

bottom of top ring layer, and temp taped at ends.
(NOTE: for "all the buzz" design, the positioning
guide will be positioned at the bottom of
the layer #1 ring.)

onto the top ring. (Some letters positioned to
give an idea of how the welded words fit on guide.)

attach words where tracings indicate, hiding trace lines
if possible. Add the 'i' dots and the dash in place, too.

7. Position the upper ring assembly onto the base ring,
centering so that there is a slight reveal at inside edge,
and a slightly wider reveal at outer edge, and
attach in place. (If using liquid glue, consider pressing
under a flat weight until glue dries completely to avoid
warping or curling.)

8. Complete some pre-assembly for bee:
layer stripes overlay onto abdomen shape;

main thorax oval, then . . .

center of main thorax shape.

9. Assemble the bee on the base silhouette shape with
tiny offset margins around each and at edges as shown:
dry fit the thorax assembly, and . . .

positions and make adjustments, making sure the
under-thorax arc will fit, then attach these three
center body shapes.
Then position the eyes and antennae.


(If using liquid glue, consider pressing
under a flat weight until glue dries completely to avoid
warping or curling.)

opening, and on the vertical center.
Adjust up/down so that antennae tips and leg tips
can barely overlap and be attached to inner ring edge,
then attach bee surfaces where they overlap.

13. Prepare the honeycomb emblem by layering
the overlay onto offset base, centering, and
attaching in place.

margins extending beyond ring edges at top, bottom,
and attach in place.

15. Prepare the card back base by bending forward
along the horizontal cross perforations on each side.

16.Position the back ring base behind the front
card assembly, with the upper portion centered
and aligned at top, and glue in place the half
above the perforations to form an easel.

the backside of the main card, then center
and attach the arch-shaped sentiment plaque.

Here is the finished card, opened slightly
so it can stand on its own for display.


