
Low-relief
dimensional bee form has shaped wings
and under-body “box”.
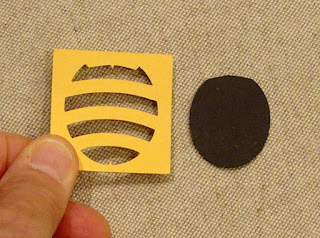
Stripes are added
with ease using an overlay that is
scissor-trimmed to match body overlay
edges.
Triangular body box includes tiny holes (.06” diam.)
at each end that
accept medium gauge wire
to create a “hovering” accent or pick.

Coordinates
well with the “Beehive 3D Box” design.
Measures approx. 2.5” tall x 3.75”
wingspan
x .375” body depth.
ASSEMBLY: 1. Identify and cut the shapes:
A body base B lower body overlay
C stripes trim-to-fit overlay for lower body
D left & right fold-over double wings
(NOTE the sample shows wings cut from
solid white vellum for an opaque look.)
E dimensional body "box"

 Position the overlay, centered over the face side
of body shape, with upper body edge aligned to
abut the drop-down edge in top window.
(This is where the overlay will need to be
when being glued in place, AFTER the next frame.)

 . . . position as shown previously, apply pressure,
and allow to dry.
3. Use hand scissors to trim away the excess
of the stripes overlay. NOTE: this is most easily
accomplished by turning the assembly
face down so that the body edge is more visible.
4. Position the body/stripes assembly over the lower
portion of the body base with edges matched up
and glue in place.


 . . . and push inward until the fold aligns at
the imagined vertical center line. Glue in place
from backside.
 7. Repeat for the second wing . . .


 9. Bend the end triangle panels inward, and
the wedge tabs inward and down as shown.
 10. Bend the sides in to attach to wedge tabs
while at the same time tucking the rounded-corner
long tab inside, matching the end panel angle seam
perforations with the angle end edges of side panels,
and glue all in place.

 11. Position the bottom of the body box
along the center of body base underside,
and glue in place.
This completes the honey bee assembly.

 13. On the end where bee will attach, carefully
wrap around a round pencil shaft or equivalent
so that there are 4-5 even wraps.
Remove pencil.

 . . . out the top end hole.
 16. At top, use needle-nose pliers to bend and
twist a tiny eyelet that will keep the wire end
from slipping back inside the body.
Adjust bee forward to camouflage the eyelet.

 On the inside, before lid is replaced, wrap end
around the Hive post, and quick-grab glue in place.


A body base B lower body overlay
C stripes trim-to-fit overlay for lower body
D left & right fold-over double wings
(NOTE the sample shows wings cut from
solid white vellum for an opaque look.)
E dimensional body "box"

2. Prepare to add stripes to the lower body by
arranging the overlay "window" shape and
the lower body overlay with tops upward.

of body shape, with upper body edge aligned to
abut the drop-down edge in top window.
(This is where the overlay will need to be
when being glued in place, AFTER the next frame.)

Apply glue to the backside of stripes just in
from each side of window openings. Then . . .

and allow to dry.
3. Use hand scissors to trim away the excess
of the stripes overlay. NOTE: this is most easily
accomplished by turning the assembly
face down so that the body edge is more visible.
4. Position the body/stripes assembly over the lower
portion of the body base with edges matched up
and glue in place.

5. Prepare the left and right wing units by folding
along the top layer wing long perforation as
"mountain" fold, and also bending the short
angled perf lines as mountain folds.

Finish by bending on the mid cross perforation
that will place the non-perforated wing layer
on the bottom. Here are the wings with prep folding.

6. Tuck the fold edge into the body slit . . .

the imagined vertical center line. Glue in place
from backside.


. . . abutting the fold edge next to previous wing's edge.

8. Prepare the dimensional body box by bending
back on all perforation lines.

the wedge tabs inward and down as shown.

while at the same time tucking the rounded-corner
long tab inside, matching the end panel angle seam
perforations with the angle end edges of side panels,
and glue all in place.

Here is the completed dimensional body box.

along the center of body base underside,
and glue in place.
This completes the honey bee assembly.

The following steps will illustrate how the honey bee
was prepared to attach to the Hive 3D project.
Adapt what is presented here for your particular needs.
* * * * *
12. Carefully arch bend a section of heavy gauge
silver (or equivalent) wire. This portion of the wire
shaping will allow the bee to "fly" or hover over the project.
On the "pick" end, a portion of the wire should remain
straight.
On the bee end, the wire will be curled (see next frame).

wrap around a round pencil shaft or equivalent
so that there are 4-5 even wraps.
Remove pencil.

14. Determine how much wire length will be
needed or desirable beyond the wraps where
the bee body box will fit, plus .5" or so that will
create the end eyelet "stop". Trim excess with tool.
15. Insert end through bottom hole, through body,
then . . .


twist a tiny eyelet that will keep the wire end
from slipping back inside the body.
Adjust bee forward to camouflage the eyelet.

17. Attach to the Hive by inserting the straight end
through intersection of halves at top (create tiny hole).

around the Hive post, and quick-grab glue in place.

Then replace the lid, and arrange the wire
as it will allow for best bee position.

No comments:
Post a Comment