
Cut and create a sturdy, double-sided walls
lidded box for chocolate candies or
other treats & gifts.
Box base is
taller to include approx. 1/4” reveal
of contrast at bottom when lid is fully closed in
place.

Fill, fit lid in place, then use a length of ribbon
to wrap lengthwise
for even more secure closure.
Includes basic slotted ribbon-slider label
for 7/8”
wide ribbon.
Three other shape tags with welded word cuts
Three other shape tags with welded word cuts
are also available that are designed and sized
for all of these boxes, and can be mixed and matched.

for all of these boxes, and can be mixed and matched.

Boxes in three sizes:
large (8 oz. chocolates) 7” x 4.5” x 1.25”
medium (4 oz. chocolates) 4” x 3.5” x 1.25”
mini 3.5” x 2.75” x 1.25”.
ASSEMBLY: The three box sizes are assembled
in identical fashion. The middle size (4 oz) will be
shown in the tutorial.
1. Identify and cut the shapes:
A box lid B box base
C opt. box base accent shape (reinforcement)
D & E ribbon slider tag and offset base


 4. Bend the wall extension inward and glue in place.
Repeat for all four inner wall extensions.


Repeat for all four lid sides, NOTING that the flange
edges will come together in a miter alignment
at corners, as shown here.
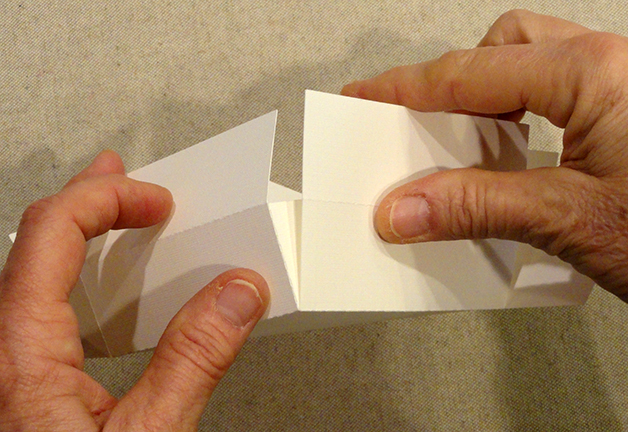
 9. Fit the lid neatly over the base - a snug fit . . .
 . . . until fully closed. NOTE that a margin of
the base remains showing.


 12. To complete the package, once the contents
are in place, position the tag over front of lid,
with ribbon extending around to base backside,
overlap ends, trim to size and secure ends in place.


in identical fashion. The middle size (4 oz) will be
shown in the tutorial.
1. Identify and cut the shapes:
A box lid B box base
C opt. box base accent shape (reinforcement)
D & E ribbon slider tag and offset base

2. Prepare the base shape by bending back on
all perforation lines for panels, walls and tabs.

3. Bend the first two adjacent sides back to form
the base "tray", bringing the straight side edge
to overlap the opposite tab to perforation line,
and glue in place. Repeat for 3 other corner seams.
Repeat for all four inner wall extensions.

5. To reinforce the base and also provide a decorative
accent, position and attach the liner shape in the base.

6. Prepare the lid shape by bending back on all
perforation lines for top panel, walls, tabs and
inner walls, except bend the edge flange tabs
forward.

7. Bend adjacent walls back to align straight edge
over tab perforation as with base corner seam assembly,
and glue in place. Complete all four corner seams.

8. Bend the inner wall extensions inward until
it tucks snugly against backside of outer wall . . .

. . . with the edge flange extending toward lid center,
and glue wall backsides together, and flange in
place to backside of top panel.

Repeat for all four lid sides, NOTING that the flange
edges will come together in a miter alignment
at corners, as shown here.


the base remains showing.

10. Layer the ribbon slider tag top layer onto
the offset base, taking care to align the slot openings
as precisely as possible, and glue together.

11. Thread the end of the ribbon length downward
through the first side slot, then across back,
then upward through second side slot.
Adjust ribbon length so that slider is approx. centered.

are in place, position the tag over front of lid,
with ribbon extending around to base backside,
overlap ends, trim to size and secure ends in place.

Here is the completed 4 oz. size box.

Here are the three box sizes.

No comments:
Post a Comment