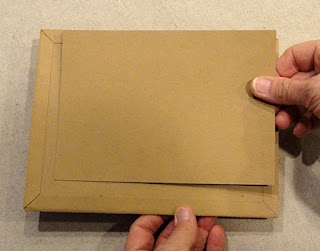
Dimensional
frame with mitered corners has
wrap-around top, bottom and side components to
provide
low-relief edge in front of rectangular center panel.
Two narrow offset
accent panels inside frame provide base
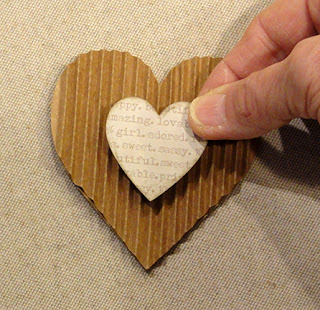
for two hearts: larger layers-thickened
heart with jute twine
added to edge, and smaller dimensional “corrugated”
(pleated)
heart with center smaller accent heart on top.
Additional embellishment
includes a dimensional rolled
flower on arched stem, fine jute twine bow,
optional
print & cut letter tiles to spell out ‘BLOOM’ or ‘LOVE’.
This framed hearts
ensemble can be a fun and
unique decoration, or add a sentiment panel
(included)
for the backside to give as a card that can be
displayed by the
recipient.
Frame measures 8” wide x 6” tall when completed.
ASSEMBLY: 1. Identify and cut the shapes:
A main center panel (2 layers; sample is composed
of beige print paper on front, kraft card stock on back)
B bottom layer accent: burlap mounted on paper
C top layer accent: sample has torn edge with distressed edge
D frame backside "fill-in" panel (should match A back color)
E frame members for top, bottom (2)
F frame members for sides (2)
G large heart face (cream newsprint) plus build-up (8)
H medium heart base build up for thickness (4-5)
I pleated heart J small accent heart
K rolled flower with bottom glue-to circle
L stem/leaves base
M separate stem, separate contrast leaves
NOT SHOWN: letter tiles for "BLOOM"
2. Complete the stacked layers build up so they can be drying:
A) layer the large hearts into a stack (including the contrast
front heart, if your project includes this), taking care
to match all cut edges as precisely as possible.
B) Place the glued-up stack on a flat surface and press under a flat heavy object such as this thick book
(possibly with something else heavy placed on top) and
leave until completely dry. This may require several hours
or overnight, and helps reduce or avoid warping or
curling of the stack when using liquid glue.
(Repeat the pressing process for any stacked or layered
and glued-up shapes.)
C) Layer and glue together the medium heart "base" shapes into a stack. Press under a flat heavy weight.
D) layer the two accent rectangle panels, centered, and glue together. If using liquid glue, press til dry.
E) layer the main rectangle panels with edges aligned;
press until dry.
F) Layer separate stem with leaves and glue together . . .. . . then position and attach the separate leaves. Press under heavy weight until dry.
3. Prepare the frame members by bending on all
perforation lines as shown in the labeled photo:
V = valley fold M = mountain fold.
(It may be helpful to read through Step 7 to get
an overall understanding of how the frame sections have
"accordion" layers that bend to fill the low relief depth
of frame between front face and back face segments.)
NOTE that there are two pairs of closely-spaced
perforation lines that create the "low relief" frame edge
at the inward edge (next to the rectangle center panel)
and at the outer frame edge (as the frame wraps to back).
4. Compress them together so that they "stack" behind the first panel that is next to the second pair
of closely-spaced perforation lines.
5. Place the frame member face down on work surface
with accordion layers stacked . . .

. . . and use a bone folder to firmly crease the stacked
accordion edges.
6. Working quickly, apply glue between the accordion
segments on both front surface and back surface,
then press along the length until glue grabs.
Repeat for all 4 frame members.
As each member is prepared to this point, press under
heavy flat weight temporarily.

7. Apply glue to the bottom segment face of
the accordion stack, and also the narrow inward
segment, and behind the FRAME FACE segment,
then . . .
. . . wrap the frame face segments around the stack
so that the inward narrow segment falls snugly
at the side depth of the stack;
adjust all along length so that the narrow segment
wraps neatly and snugly.
Continue to wrap so that the face segment attaches
neatly all along the top of the accordion segment.
Apply pressure all along for a consistent and smooth
attachment. Immediately press under flat weight
and leave to dry for several hours.
Repeat for remaining frame members.
NOTE: the BACK FACE remains unattached until
subsequent steps.
9. Once frame members are dried, begin the final
frame assembly. Test the first (top) frame member
to understand how it attaches. Position the member
around the top edge of the main panel with face panel
toward the rectangle panel's front surface, and
panel and frame ends aligned.
Remove, apply glue to underneath surfaces, then
reposition and press firmly to attach in place.
Apply pressure all along frame until securely attached.
10. Position the first side frame member in similarmanner, centered, and so that the miter corner edge . . .
. . . will wrap and fit snugly against the miter edge layer of the top frame. NOTE that the side frame's stacked
edges will fall next to the top frame's stacked edge.
Attach in place.
11. Repeat for the second side member on opposite
center panel edge.
12. Finally, prepare, position and attach the bottom frame member, taking care to arrange interconnection
at corners as previously described.
13. Position and attach the "filler" back panel in between the frame edges on assembly backside.
(Suggestion: use dry adhesive tape instead of liquid.)
14. If desired, apply adhesive (such as Fabri-Tack quick-grab glue being used here) to the thickened
edge of the large heart, then add thick jute twine
to edge, beginning at the "valley" at center top.
Work in sections, to continue to add all around the heart, trimming to length when perimeter
is completed, then tucking the ends together neatly
to be held in place with glue.
15. Prepare the rolled flower by first rolling the spiral shape. Use the narrow tip of a tweezers tool to grab
and hold the inner end, then twirling the tweezers to
wrap the strip onto the tweezers, angling the wrapping . . .
. . . so that the bottom spiral edge stacks on top
of the previously-wrapped edge. Continue until
the strip is completely wound onto the tweezers,
then release to remove tool.

16. If possible, add a little bit of outward curl to
the final several petals - those with deeper cut shape
between petals.
17. Apply glue to the face bottom edge for the first
couple of inches, beginning at inward tip. Then
re-roll the center, allowing the spiral to attach
somewhat loosely. Use the tweezer tool if helpful.
18. Continue to wrap until completely re-coiled,adding glue forward for a few petals ahead of roll,
then attach final tip in place. NOTE that the bottom
circular size of the rolled flower should roughly
match the separate base circle.
19. Apply glue to the bottom of the coil, then position and attach the circle in place. Once dry, use scissors
to trim away any of the base circle that extends
undesirably beyond flower coil.
20. Apply glue to the stem assembly attachment circle, then position and firmly attach flower to cover circle.
21. Position and attach flower assembly to the front of the large circle as shown here, or refer to thumbnail.
22. Prepare the pleated heart front shape by folding. A) First, bend and crease the center perforation line
as a "mountain" fold.
B) Continue to bend and crease along perforation lines toward right (or left) side, alternating the folds as
"valley", then "mountain", etc., until . . .
. . . the final "valley" bend is completed at side edge.C) Repeat step B to complete the folding and creasing across to the opposite side.
23. Prepare to position and attach the pleated heart to the front of the medium heart base stack.
First, apply a zigzag bead of quick-grab glue down the center of heart, with approx. 1/4" coverage at center
- this will hold the center two "valley" ridges.
Once the center ridges are firmly attached, bend the first half back out of the way to apply glue across
the remainder of the heart panel. Also add glue to
the pleated heart end curved segment underside . . .
. . . then re-position the pleated half over the base, taking care to align the side curved segment with
the base's edge. Work quickly to adjust the ridges
to be even across the half, using fingertips or tweezers
of other handy, appropriate tool as needed.
24. Once the first half is secured, repeat Step 23
for the opposite, second pleated half.
25. Position and attach the small accent heart in the center of the pleated heart assembly.
FINISHING 26. Position and attach the accent center panels onto
the frame's center panel. Use dry adhesive tape if possible.
27. Position and attach the large heart assembly, then position - overlapped - the medium heart
assembly and attach in place.
Optional embellishments: Prepare a refined jute bow and attach to edge
of large heart, if desired.
Finish the ensemble by adding the letter tiles
as shown above medium heart.


 5. If using the optional oval sentiment panel,
 . . . on the interior accent panel, behind the wider
 6. Assemble the shamrock disc by centering
  7. Close the card by bending the side flaps inward
 8. With a narrow length of ribbon (approx. 8-9" long)

 . . . cinch the loop down as flat as possible
 10. Add embellishments as desired, such as