
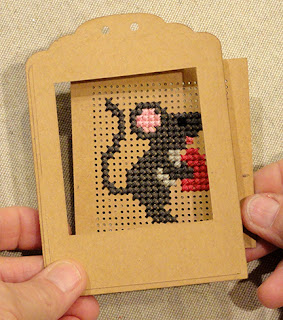
Layered tag with pair of top ribbon holes includes window
behind which cross-stitched panel is centered.
Stitched design
of mouse with heart can convey Valentine,
sympathy, friendship or other
occasions.
Stitching design is included as part of the file download.
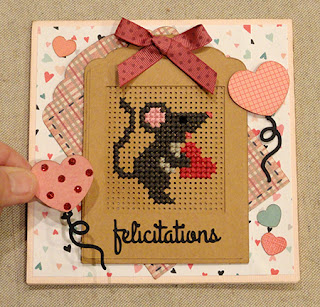
Second faux
stitch tag shape provides contrast accent,
rotated and attached to 5.25”x5.25”
card base with
offset accent card front panel.
Welded word shapes “felicitations”
(or alternatively “celebrate”)
can be placed in the tag front lower margin,
or
use some other strip tag or label panel (not included)
to hand pen or stamp for
a customized message.
Completed card shown here includes shapes from
“Heart Balloons Small Set” separate cut file download.
ASSEMBLY: 1. Identify and cut the shapes
A main card base B accent front panel
C frame tag base D tag frame bottom layer
E tag frame top layer F "felicitations" sentiment
G needle punch hole panel (2 to glue together for strength)
H & I accent tag front panel and contrast back panel
J printed stitching chart

If desired, also identify and cut out the shapes
to add balloon hearts, strings, and mini hearts
to the card front as embellishments.

2. Prepare the needle hole punched shapes by
poking through any holes where the "crumbs" or
chads didn't fall or rub out after cutting was complete.
Use a bent-straight paper clip or the blunt tapestry
needle with which cross stitching will be completed.

Also become familiar with the cut 'T' symbol that
indicates the TOP of the panel, centers of side panels
and bottom panel, as well as . . .

. . . locating the tiny "extra" out-of-grid hole that will
allow the half-stitches where the nose is added.

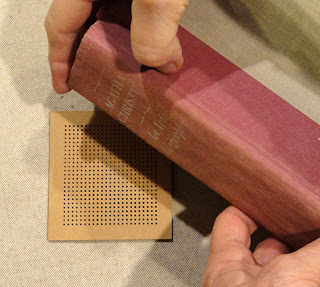
3. Layer and glue together the two needle hole panels,
taking care that both are oriented with 'T' at top,
and that edges and ALL hole cut outs align
as precisely as possible.

Immediately press the glued-up panels on a flat work
surface, with a heavy flat form such as this thick book
placed on top - possibly with something else heavy placed
on top of the book - and allow the panels to dry completely.
This may require several hours or overnight, and will
prevent warping or curling.
4. Assemble materials and equipment to complete
the cross stitching, including the size 24-26 blunt tapestry
needles, and selected floss. For this design, you will need:
dark gray for mouse body, med. gray for tummy,
black for eye, deep rose or red for heart, med. pale pink for
inner ear, brighter pink for nose, mouth.

5. Prepare the tag frame layers by positioning front
and bottom FRAME layers and gluing together,
taking care that frame opening edges align precisely.
Then press under a heavy flat weight as described
above, until completely dried.

6. Layer the contrast tag panel behind the accent tag,
so that it highlights the faux stitching cut outs,
and glue together. Press under flat weight until dry.

Also, position and attach the front accent panel onto
the folded card base, with even offset margin all around.
If using liquid adhesive, press flat until dried.

STITCHING INSTRUCTIONS
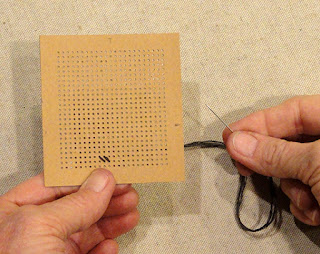
7. Cut a 24-30" length of 6-strand floss, then separate
two strands then lay them together . . .

. . . fold the lengths in half and thread the four ends
(or alternately the loops) through eye of a blunt tip darning
needle size 24/26 (recommended). Pull the ends
part-way down - the loops will remain as the long end
and will be used to "tie on".

8. Study this diagram to understand how to form
cross stitches for uniform appearance and tension.
NOTE that the RIGHT SLANT stitches are generally
placed across the row first, followed by the LEFT SLANT
stitches placed coming back across the row.

it on-screen). Recommended stitching position will be at
the "front" end of the bottom row that is part of the mouse's foot.
That hole will be third hole UP from bottom, and
second hole LEFT of the center mark row hole
(as indicated by the red arrow here).

A. Insert the loaded needle UP from backside
through the top left hole of the FOUR holes
that will create the first 'X". Pull needle and thread through
leaving approx. 3-4" of loop "tail" still on backside.

B. Insert the needle into the bottom right hole of first 'X' . . .

. . . and pull through until front thread is flush with surface,
and short loop remains on the backside of the panel.
Pass the needle through the loop . . .

. . . and cinch the thread up firmly on the back.
This completes the "tie on" step.

10. Continue by inserting the needle in the next top
row hole - to begin the next X's left slant stitch.
Work across the bottom row, according to the number
of stitches shown on the design chart. Then . . .

. . . work the RIGHT slant stitches back across
the bottom row to complete the four stitches.

11. Move up to the next row on the chart, locate
the target hole for the first (left end) X stitch, then
add stitches to complete that row.

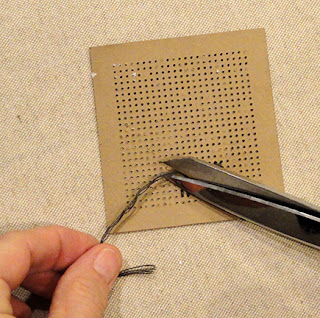
12. Continue in the same manner to begin and complete
rows. When floss length on needle gets close to being
too short to continue, pause in mid stitch when needle
is pulled through to backside, then slip the needle under
the adjacent 4-5 stitches. Pull the needle fully through, then . . .

. . . remove needle and trim the excess floss close
to the stitching it crossed under.
This is "tying off".
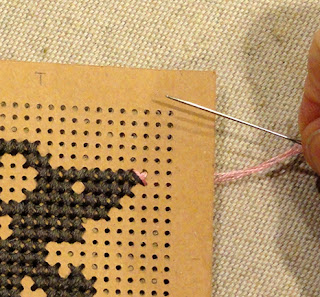
13. As the mouse stitching proceeds to the nose tip,
the X stitching will change to complete two "triangular"
half stitches, using the tiny hole identified in Step 2 above,
near the end. In the regular sequence, the final gray RIGHT SLANT
stitch is "paused", and the needle is inserted UP
through the extra tiny hole that falls in the center of
the four holes that would hold the nose's X.

The "half" LEFT SLANT stitch is completed, then . . .

. . . complete the final RIGHT SLANT stitch which crosses
over the extra tiny needle hole.

Finally, return to routine to complete the remaining
body stitching.
14. As the other stitching areas are completed,
the "half" stitch for the nose is completed in similar
manner as the body "half" stitch described above.
Floss is tied on, either as the LEFT SLANT half stitch that
includes the extra tiny hole, or as the RIGHT SLANT full stitch.
Then whichever of these two stitches which remains
is completed, as shown.
Then, modify the tying off step as follows:
A) on backside, slide full needle under adjacent stitches
as shown in Step 12 above, but DO NOT cut ALL plies.
Instead, unthread two plies (two plies remain in the needle eye),
and carefully trim the two unthreaded plies.
B) with the remaining two plies, insert the needle through
top right of the nose's X holes.
C) move needle left to the adjacent hole straight across
the X's "box" to complete a horizontal straight stitch.
D) repeat again to form a vertical straight stitch along
the front of the nose. Then complete tying off.
NOTE: these straight stitches across top and side
will help emphasize the nose. Similar outline straight
stitches should be completed around the "eye" X cross stitch
and "mouth" X cross stitch on all four sides.

15. Complete the design by tying on for each color block
area: tummy, inner ear, eye, mouth, heart. Then tie off
in the usual manner.

16. Position and attach the completed cross stitch panel
behind the glued-up tag frame layers, taking care
that there is an equal margin around edge holes
and frame opening.
17. Position and attach tag assembly onto tag base.

18. Position - centered - the selected sentiment
word cut out under the frame opening.

19. On card front panel, position and attach accent tag
as shown, on angle. Then, position the stitched tag,
with narrow ribbon tied bow, centered on card front,
overlapping the accent tag, and attach in place.

20. If embellishing with the heart balloon elements,
first position the bottom tip of heart over the string's
top attached oval . . .

. . . with the "knot" shape below oval remaining visible,
and glue together.

21. Position and attach the left looping and right looping
string hearts around tags, as well as the tiny hearts,
and attach in place as shown.
No comments:
Post a Comment