Tuesday, May 30, 2023

Fancy Folds Quilt Card Dream Big

Four quilt-inspired squares have perforated corner folds, 
each decorated with matched-color offset accent triangles, 
open slightly to reveal second accent color square beneath. 
Folded squares are mounted edge to edge inside 
the front panel’s large window. 
Below, rectangular panel with window repeat 
smaller rectangles of accent colors, 
with “DREAM” and “big” word cut outs overlaid on top. 
Card measures approx. 5x7 when closed. 
Perfect for graduation, work promotion, achievement, 
friendship, birthday and more. 

ASSEMBLY: 1. Identify and cut the shapes:
A side-fold card base
B front frame overlay
C folded squares (4)
D contrast inside panel for folded squares
(1 each of 4 colors)
E contrast triangle patches 
(4 each of 4 colors)
F lower front rectangle frame panel overlay
G patch inlays (1 each of 4 colors)
H word cut outs "DREAM big"
2. Fold the card base on perforation.
Position and attach the full-size frame overlay
onto card base front with edges and perforation fold
aligned.
3. Prepare each of the 4 folded squares by placing
face down on countertop and bending the four corners
toward center.
4. Open the square to position and attach a contrast
square within the perforation lines, centered.
Repeat for four squares with different contrast squares.
5. Position color-coordinated outer triangles onto
squares folded-in corners, centered with long straight
edge aligned along perforation fold, even offset
margin at right angle edges; attach in place.
Repeat for remaining three folded squares with
coordinated color triangles.
6. Use a bone folded or similar tool to firmly crease
the perforation folds of each folded square.
7. Position the lower rectangle with frame window
over the lower portion of front panel overlay,
with equal side margins, equal top and bottom margins,
then glue in place.
8. Position and attach each of the four color rectangles
snuggly side by side within the window cut out.
9. Position the "big" word and "DREAM" word cut outs
over the colored panels and plain space as shown,
and attach in place.
10. Position and attach the four folded squares
into the front overlay panel window, which will fit
snugly side by side, in two rows.
Here is the completed card.

Quilt Block Card Square and Chains

 
Use solids and small scale floral prints to evoke 
calico patchwork for this traditional quilt block. 
Center overlay, inlays and inset "chain" squares help with assembly. 
A fun card for birthday, get well, friendship, and more. 
Card measures 5x5 when side or top folded closed. 

ASSEMBLY: 1. Identify and cut the shapes:
A card base (this version is top-fold; side fold possible)
B front panel overlay
C center square contrast (shows as edge rectangles)
with corner "chain" squares in this picture
D corner 'L' points (4)
E contrast pointed "trapezoids" (4)
F contrast center square patch
G "chain" squares (12)
2. Fold and crease the card base shape
along perforation. Open flat.
Position and attach the front panel overlay
with even narrow offset margin at all edges.
3. Position "chain" squares into the square cutouts
and glue in place.
4. Prepare the center square patch assembly
by using four "chain" squares placed at corners
to help with center square positioning, then
glue center contrast patch in place. Remove
"chain" squares for later assembly.
5. (NOTE the chain squares should not be in position
on the center patch assembly at this step in assembly;
see Step 8.)
Position and attach square at center of front panel
with corner points aligned at inward points of all four
chain squares.
6. Position the 'L' corner points with inward corner tips
overlapping the center patch assembly as shown,
and inside 'L' edges aligned at chain edges,
and attach in place.
7. Position the "trapezoid" patches at center sides
between 'L' points.
8. Position and attach final 4 "chain" squares over
the inward right angles of the 'L' corner points.
Here is the completed patchwork card.


Sunday, May 21, 2023

Layered Half Circles Cards 5x7

Coordinate 4 prints and solids for this sophisticated 
(or playful) card. Assemble half circles on front panel 
of top-fold card, tuck “print and cut” phrase strip 
(Happy Father's Day, Grandpa we love you, 
Congratulations, Grad) under whole circle, 
then mount accent shape (mini bowtie, mustache 
or grad cap). Plain phrase strip included for stamping 
a different sentiment, if desired. 
Card measures approx. 5” tall x 7” wide when closed. 

NOTE that the three card designs featured here are
very similar in assembly, with only slight changes
between print & cut sentiment strips and
decoration shapes placed on the whole circles.
The "Grandpa" bowtie card will be described.
ASSEMBLY: 1. Identify and cut the shapes:
A card base with top fold perforation
B card front with "arrow" (upward) and cross perf
guide marks
C lower left half circles array
D upper right half circles array
E whole circle
F accent shape: 3D bowtie, knot shape
G print & cut sentiment phrase strip
2. Assemble the lower left half circles array
by positioning and attaching each successively-smaller
shape on top of the stack, with ALL top straight edges
aligned precisely, and with left-most "corners"
also aligned.
Here are the assembled left half circles unit
with whole circle (here shown as faux stitched option).
3. Repeat the process for the upper right half circles
unit.
4. Identify and end marks and the centerline perforation
on the front accent panel.
(Also NOTE that the arrow cut out mark should be 'up'.)
5. First position and attach the lower left unit
with upper straight edge along the dash guide line,
with the left tip aligned at (to barely cover) 
the left end guide mark. 
6. Next, position and attach the upper right unit
with bottom right-most tip at (barely cover) right
end guide mark, with straight edge along dash line
or abutted with lower circles straight edge.
7. Position the phrase strip so that cross perf line/
circle units straight edges are centered beneath,
with left end approx. 1/4" in from right front panel edge.
8. Position and attach whole circle accent as shown.
9. Position and attach front panel assembly over
front of folded card base with even margins all around.
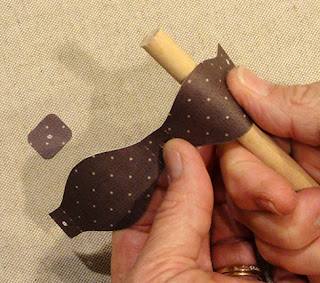
10. For 3D bowtie decoration, first add some back
curl to the main shape only at the center of
the "loop" portion where the bulge edges are widest.
11. Gently bend (to avoid folding) loop ends inward
to position ends one on top of the other, with punch
holes aligned, and glue ends securely in place.
12. On front side, position "knot" shape over center
with holes aligned, and attach in place.
NOTE that the "knot" shape was designed to go
lengthwise across the tie front, but it works
both ways.
13. If using the "knot" shape with the punch hole,
insert a mini brad through all holes layers and
bend prongs to secure. Or position and attach
a stud over hole.
14. For the Happy Father's Day card, follow
assembly steps 2-9, then position and attach
the mustache shape over circle a shown.
15. For the Congratulations, Grad card, follow
assembly steps 2-9, then position and attach
the mortar board two shapes over circle a shown.

Saturday, May 20, 2023

Comical Fish Easel Card 6x7

Overlay details on shaped card base deliver pizzazz 
to this stylized fish card. 
Lift lower front edge of bottom fin and prop against 
the half-oval stacked “stop” which is glued 
in place at guide marks for display. 
Stamp an appropriate message onto the interior 
sentiment strip (or on the small fish silhouette sentiment panel) 
to customize this whimsical card. 
Optional “You’re a keeper” print & cut mini fish label 
is included. A coordinated, sized-to-fit envelope is 
also available as separate design. 
Card measures approx. 6” tall x 7” wide when closed. 
Requires 12x12 card stock and cutting capacity 
for largest card base shapes. 

ASSEMBLY: 1. Identify and cut the shapes:
A main card base with 2 folds to create easel
B card front fish shape
C card backside fish shape
D stop shapes (3-5 to stack and glue together)
E body decoration base with upper and lower
edge trim shapes
F head overlay with 2 back edge trim shapes,
and swirl smile
G eye patch base with eye base, accent, pupil
H upper fin base with spikes overlay, bottom trim
I belly overlay
J lower fin base with spikes overlay, bottom trim
K horizontal cross-body trim
L tail base with spikes overlay, end trim
M body side fin with spikes overlay, trim
N optional sentiment label
O optional gold fish sentiment label
(shown as print & cut option with phrase)
2. Prepare the card base shape by bending on
perforation lines as shown: upper bend as "mountain"
and short bend as "valley". NOTE that shape is shown
with FACE side toward viewer.
3. Position card FRONT whole fish shape over front
(upper) fold of card base so that top half edges align,
and glue together only upward halves that line up.
This will allow the easel action.
4. Turn the card over, so front is face down,
and position, attach the backsides together.
This will create the "whole" fish shape and provide
reinforcement and strength for easel action.
5. Prepare the "stop" by stacking and attaching
the 3 to 5 shapes on top of each other with cut edges
as precisely aligned as possible.
Press under a heavy weight until dry.
6. Locate on the "inside" body face
the dash cross line and vertical end lines
that will serve as positioning guides for the stop.
Position the stop top straight edge below the cross
line, with ends of stop even with end marks,
and glue in place.
7. Assemble the head accent:
a) "gill" trim shapes at back curve edge, and
slightly forward with narrow space in between;
b) layer the eye ring on top of eye base and attach;
c) position and attach the pupil oval inside ring
center, with punch holes aligned;
d) position the eye unit over patch shape with
punch holes aligned, also align rounded edges
and "nub" tiny edge shaping near top left,
and attach;
e) position patch unit over head with punch holes
aligned, back edges conforming with gill trim edges . . .
. . . so that when the smile shape is positioned,
the swirl is parallel with patch shaped edge
as indicated, and glue all in place.
Press the glued-together head unit under a heavy
weight and allow to dry completely.
8. Prepare the other assemblies for fins, belly,
and tail as is shown here with separate shapes . . .
. . . and then with overlayed spikes and trim
glued into place.
9. Assemble the fish body unit by positioning
and attaching head unit at front with edges aligned;
belly along bottom edge, abutted behind head;
tail unit at end with trim edge abutted to belly end;
body accent trim shapes along edges,
abutted at ends to head or tail.
10. Position and attach body fin behind head assembly
with cross-body trim between fin and tail edge
where ends best allow abutted fit.
11. With card base closed so that whole fish shape
is evident, position and attach the body assembly
onto front, with even offset margins around face end,
lower back body and tail.
12. Position upper and lower fins with curved edges
abutted at body edges, offset margins even,
and attach in place.
13. To employ the easel action, lift front lower fin
bottom edge slightly upward and back to position
straight lower edge at stop inward straight edge.
14. As desired, position the sentiment panel
centered along lower body edge, below stop.
If preferred, use the gold fish shape, or the print & cut
variation.
15. To close the card, lift edge away from stop
and flatten.
In this configuration, the card will fit into
the companion fish cut out flap envelope
which is also available as a separate design download.