
Fun decoration for Independence Day
(also summer, Christmas and more).
Twelve
sided dimensional pail has star insets near rim,
with handle that can swing up
or rest in down position.
(Brackets can hold handle in desired position
when
glued to hull, as desired.)
Overlapping rim edge segments, and base “plug”
style
insert at bottom provide sturdiness,
so that bucket can display paper or
dried flowers,
light-weight wrapped treats such as rice puff balls, etc.

Pail
measures approx. 7” tall excluding handle
x 6” diameter; 9.4375” tall with
handle upright.
(Requires 12x12 card stock and cutting capacity.)
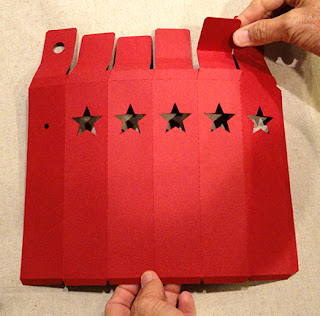
ASSEMBLY: 1. Identify and cut the shapes:
A main hull shape with bend-over rim (2)
B star inset (10)
C handle end (inward) bracket (2)
D hull wall interior wall reinforcements (12)
E slot and tab test shapes
F handle shape, including divided sets (6-7*)
*determined by E test slot and tabs
NOTE: model project uses 3 whole shapes,
2 pair long/short, 2 pair central to equal 7 layers
G hull floor interior (with 'I' cut identification)
H hull floor exterior
I bottom 'plug' insert upper shape
J bottom 'plug' insert lower shape (hollow)
K bottom 'plug' boxing strip (2)


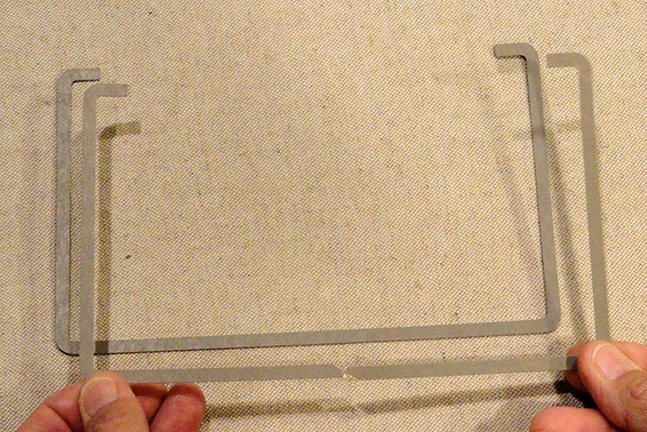
2. To determine how many handle ends will properly
and snugly fit into the hull side handle openings
and brackets: A) stack the tabs on top of each other;

B) insert end into slot;

C) add or subtract tabs so that stack fits easily
but fully into slot. Remember that a slight increase
will happen with handle layers are glued together.
Use the final quantity of tabs as quantity
to cut and assemble.

3. Prepare the handle assembly (stack) first so that
it can be pressed and allowed to dry thoroughly.
Begin with a 'whole' handle shape as the center layer.
Position and attach divided or paired partial shapes
onto the whole shape, align cut edges as precisely
as possible. Make sure that 'seam' position of partial shapes
is alternated and does not align through stack.
Here is the long/short divided option.
 Here is the central divided option.

a heavy flat object such as a heavy book volume,
or planed wood plank such as the one shown here.
Add other weight objects on top if desired to ensure
that handle remains flattened until completely dry.
This may require several hours or overnight,
and will help minimize warping or curling.
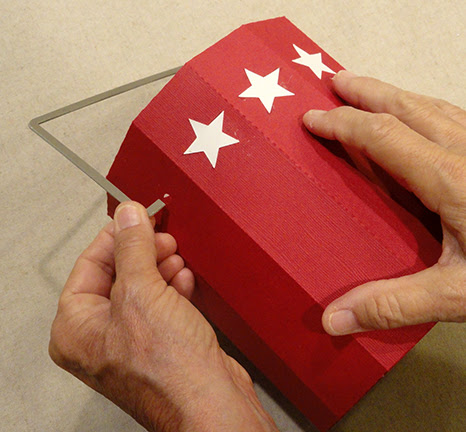
 5. Prepare the hull shapes by bending back on ALL

perforation lines for side walls, top rim pair,
bottom; and forward for the top-most perf line
as shown.
 NOTE that the rim includes a wedge extension that

will slide under the adjacent angle edge when . . .

. . . hull is formed. It includes a short guide mark
which may be mistaken as a perf cut -
DO NOT bend.

edge can overlap long side tab to perf line on
right side, adjust top and bottom for alignment,
then glue seam. Allow to dry thoroughly.
 7. Beginning on the side tab end,

prepare the rim fold sequence by placing hull
face down on work surface. Bend the upper extension
back on rim pair perforations . . .


. . . then use a right angle object such as the wood
block shown that can be abutted to the rim portion
to ensure that rim is perpendicular to hull walls.

Hold angled portion of extension in place (making
sure it stays flat and a straight slope). Lift the bottom
portion slightly to apply adhesive around "tab shape"
edges (avoid where star cut out opening will be)
to join it to backside of hull wall - centering
side edges evenly between hull wall perforations.

8. Position and attach a wall reinforcement strip
below the end of glued tab, abutted snugly at
end edge, and centered between wall segment
edge perforations.

9. On hull front, position a star inlay into the cutout
so that it seats fully to be flat with hull surface . . .

. . . then turn the hull over and apply
pressure behind where star was added.
10. Repeat steps 7-9 across the whole hull
assembly, EXCEPT leave the final top extension
flat and unattached until later in process.

11. Bend the hull bottom tabs outward to allow
the hull to stand better on work surface, then . . .

At section ends, add a dab of glue on the wedge
tab, between cut end and guide cut mark. Then . . .

. . . tuck the wedge tab point under the adjacent
angle edge (use a spatula tool to help direct point)
and push in until over edge aligns at guide mark cut.
Hold in place as additional rim seams are completed,
as much as possible.
(Further adjustment can be done later).

12. Position hull final edges to join second side seam.
Once positioned, place the seam area face down
on flat work surface to apply fingertip pressure
inside hull along full seam length until secure.

13. At rim edge, add glue dab as done previously
for final wedge in sequence (as in step 11).

14. Above side seam, add glue to rim tab, then . . .

. . . wrap the extension to the inside of hull and
repeat the rim and block process for perpendicular
position, then attach the end segment in place
on hull wall inside surface.

Add the final interior wall reinforcement strip
following previous process.

15. Tip the hull to upright position, then use
the bottom exterior floor shape as GUIDE to
make final adjustment to rim edge, pushing or
squashing to align with floor shape as closely
as possible. To hold position until glued rim tabs
are dried and secure, place a moderately heavy
weight, such as a thick book, flat on top of hull
(with or without floor shape in place).

16. Prepare the bottom insert boxing strips by
bending back on all perforation lines for wall segments,
top, bottom and end tabs.

17. Join the strips into on length by overlapping
straight end edge over opposite tab, then . . .

. . . form the strip into a ring to join second seam.

18. Bend bottom tabs inward to form ledge,
apply glue to each, then insert hollow bottom floor
shape into ring, rotate until the straight edges align
exactly with boxing segments tab perforations.
Apply fingertip pressure all around on each
segment until they are secure.

19. Repeat step 18 to apply glue to top set of tabs,
then insert top shape into ring. Turn assembly over . . .

. . . then reach through hollow opening to apply
pressure along each segment until all are secure.

20. Invert hull, (and also at insert bottom edges -
not shown here).
Place insert into hull bottom . . .

. . . place interior floor 'I' shape into hull so that
it will align and attach to bottom of insert.
apply glue to hull tabs. Bend tabs inward.

Invert hull to reach inside and push both insert and
interior floor shape slowly down into position to
seat and attach to bottom tabs.
NOTE that the tight fit of insert and floor shape
inside hull make it necessary to keep them
more or less horizontal as it moves downward.

On bottom, apply pressure as possible to join tabs
to interior floor shape.

21. Apply adhesive (quick-grab Fabri-Tack used
here) to bottom rim edge, then position and attach
bottom floor shape to cover tabs.
To help secure in place, invert hull and place
book on top of rim as previously done, until dry.

22. Prepare handle brackets by bending narrow
center tabs back into open position.

NOTE that this may be easier if using a blade tool
such as the spatula tip shown here.

23. Flex the handle assembly to insert first end
into side hole, then . . .

. . . second end into opposite hole. Push ends
inward to center the handle on hull.
24. Apply glue to backside of narrow tabs
of bracket. Then . . .

. . . slide bracket "slot" - backside toward hull wall -
over the handle end.

Slide bracket to be flat against wall.
Repeat for opposite handle end.

NOTE: if desirable to have handle secured in
particular position such as upright, the round
part of bracket can be glued to hull wall, once
desired position is fixed.

Here is the completed project:


