Just released and available from SnapDragon Snippets through
the Silhouette America online store is this "31 halloween panel" design.
To demonstrate how this graphic panel with sawtooth borders can be used
to create a pillow using heat transfer textured vinyl
cut on my Silhouette Cameo, scroll through this post.
Here is my finished pillow, starring in an autumn vignette.

I have had requests for a tutorial regarding the best way to
stitch a decorator pillow. So that tutorial information is included here, too.
PART 1 will cover heat transfer vinyl prep for the front panel.
PART 2 will cover the pillow construction, including putting a fringe style trim in the seam,
PART 1 will cover heat transfer vinyl prep for the front panel.
PART 2 will cover the pillow construction, including putting a fringe style trim in the seam,
and how to install a pillow zipper the easy way.
 |
| Reversed artwork on the Designer Screen. Note that an "accidental" extra square frame that may have been left on the artwork when submitted has been deleted before cutting. |
PART 1: HEAT TRANSFER DESIGN
Step 1. Prepare the artwork in Silhouette Studio, and then REVERSE THE IMAGE to cut from heat transfer vinyl. Before doing this, you must decide on your pillow and pillow front finished size, and scale the artwork if necessary. The cut file was prepared to be as big as it could be to cut on the 12x12 large capacity cutting mat. This size is approx. 11.5" x 11.5" at the outer edges of the sawtooth and corner post borders. With pillow fabric border spaces of 1.25" added to each edge, this size would work as is for a 14x14 square pillow, a non-standard size. If you want wider pillow fabric borders around each edge, scale the artwork smaller to suit. For instance, if you want 2" fabric borders, scale the artwork (lock ratio) to 87%.

Step 2. Cut the heat transfer vinyl to a useable size. Silhouette's heat transfer material is available in 9" x 36" rolls. The pillow panel artwork can be separated to fit on this size material, that is, cut the center number and graphics as one cut and apply to panel, then reconfigure the sawtooth border and corner square shapes and cut as a separate job. This tutorial will show how to use this "adjustable size" setup to lay out the pillow you have decided on. Cut the piece(s) you need for the size shapes you are working with.
NOTE that I am using a Siser vinyl product that comes in 15" width.
Step 3. Place and press vinyl onto a cutting sheet that has good tackiness to hold the stiff plastic that holds the vinyl in place during the cutting process. Make sure you follow the heat transfer instructions to make sure you are placing the carrier plastic side DOWN on the mat, with the vinyl material that can be cut FACE UP.
Step 4. Adjust the cutting tool settings, complete a test cut, make adjustments if necessary, then send the cutting job to the cutting tool. If you are new to this process, I recommend finding and viewing a Silhouette America online video that will provide additional information and help you feel more confident for your success in this process.
Step 5, Remove the entire transfer assembly from the cutting mat. Then use your weeding tool and your fingers to remove all the unnecessary parts of the cut vinyl. Take care that the design elements are not damaged or torn during this process. This photo shows pulling the large pieces by hand. What is not shown is how helpful it is to have the Silhouette weeding hook tool (or something similar) to get the edges separated from the adhesive carrier sheet so that the rest of the work can be done with fingers and hand.
Step 6. Also prepare and cut the borders and corner posts. As you can see on this screen shot from Silhouette Designer Studio, I have taken one of the borders in the file, oriented it to horizontal, used the replicate tool to copy it for a total of 4 borders, then separated them so that I can cut them apart from the transfer carrier sheet to position and fuse them to my pillow front. I also did this with the corner post squares.
Step 7. Mark the fabric pillow front panel. Use a square ruler or equivalent, and a temporary marking tool like wash out or air soluable dissappearing marker to mark the seamlines. EXAMPLE: if this pillow will be 14x14, mark that size square with TEMPORARY marker. Make sure you draw your seamlines with enough space around to add the 1/2" side and top seam allow. and the 3/4" bottom seam allow.
Step 8. Use rotary tools to cut out the panel ADDING SEAM ALLOWANCES BEYOND MARKED LINES. (If rotary cutting equip. is not available, use a ruler to mark the cutting lines, then scissor cut.) For this method of construction, add 1/2" seam allow. to sides and top, and 3/4" to bottom (for zipper application).
Use the cut top panel as a pattern to cut an identical shape for the pillow back.
Step 9, Loca teby measuring and mark the vinyl transfer panel center. I used masking tape pieces that I made ink marks on after measuring in from both sides to find the center. Find the fabric panel center in a similar manner. Position vinyl over fabric FRONT, align centers, and square up.
Step 10. Without shifting anything, take the assembly to your ironing surface. Most heat transfer products recommend a hard surface (sometimes padded iron boards will NOT work for this). I have layered a thicker cotton fabric several times to make an iron pad over a wood utility table for this. Set and heat the iron according to your product directions (usually involves removing water and preventing steam from iron). Cover the vinyl with a Teflon pressing sheet if available (the Applique Pressing Sheet works well for this), or a layer or two of white cotton fabric. Apply iron heat with recommended pressure and time, the move iron until the complete cut shape is adhered properly.
Step 11. Peel as "hot" or "cold" according to your product directions. I have found that this must be a careful process. If any parts did not fuse correctly, you must re-position the carrier sheet, re-cover with pressing sheet, and re-apply pressure and heat to that area.
Step 12. Prepare to position and fuse the borders. Mark an outer "baseline" for the borders and posts by measuring the fabric border distance inside the marked seamline which you determined when you made your pillow plan notations . Referring to Step 1, for this project, I am measuring 2" in, then drawing the line with straight edge tool and temp marker.
Step 12. Prepare to position and fuse the borders. Mark an outer "baseline" for the borders and posts by measuring the fabric border distance inside the marked seamline which you determined when you made your pillow plan notations . Referring to Step 1, for this project, I am measuring 2" in, then drawing the line with straight edge tool and temp marker.
Step 13. Position a separated corner square so that the VINYL (not the carrier plastic edges) line up with both lines that converge at the corner. Once one is positioned, use press cloth, iron heat and pressure to fuse it in place.
TAKE CARE NOT TO TOUCH PREVIOUSLY PLACED VINYL WITH HOT IRON DURING THIS PROCESS -
EVEN WHEN COVERED WITH A PRESSING CLOTH.
Step 14. According to hot or cold peel requirements, peel the carrier layer away. Repeat the corner square positioning for all corners.
Position a sawtooth section with base edge along marked temp line, center side to side between the corner squares, the fuse in place in same manner following the same precautions. Repeat for all border sections.
Step 15. Here is the completed fused vinyl panel.
PART 2: PILLOW CONSTRUCTION
Step 2. Add fringe at the seamline of the pillow FRONT. If you are not using trim or covered welt cord, etc., you can skip foward to Step 5 below.
Begin at center bottom edge, position "seamline" of trim edge along the 3/4" seamline there, and stitch in place to first corner.
Step 3. At the corner, stop and leave needle inserted at the spot where the bottom and side seamlines cross. Bottom seam allow. is 3/4" and side seam allow. is 1/2". Pivot pillow top and trim to continue up the side edge. You will probably need to snip the trim slightly at the pivot point to allow it to be re-directed. Take care not to clip too far into the "seam allowance" of the trim.
Continue up the side with BASTING stitching, repeat the corner pivot and clip, continue across the top, repeat corner process, continue down second side and pivot at last corner.
Step 4. As you reach the center bottom where the trim attachment was begun, make a neat "splice" or transition between beginning and end. For this style ribbon loop trim, this involves un-doing a loop at the beginning so that an end is pulled down to be caught outside the seam, and un-doing a loop at the ending and pulling down outside the seam, too. At far right in this image, you can see the clipped ends pulled free. Trim should be arranged to meet exactly, or even slightly overlap. Other trims will require different strategies for an attractive joint.
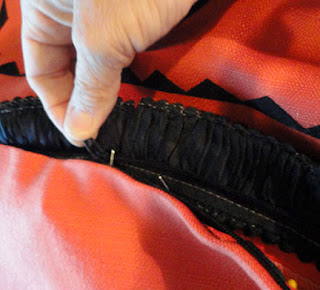
Step 5. Measure in from corners on bottom of pillow front edge the amount for the seam at each side of the zipper. For most pillows it will be around 2 1/2" - 3". Mark the position with a straight pin. Mark a position in from BOTH corners.
Step 6. Measure and fold back 3/4" seam allowance on the bottom edge of the BACK pillow panel. Layer bottom edges of both panels, back behind front, align corners, then remove and re-pin through both layers at the same spot. Add another pin near the corner to secure layers.
Step 7. Sew the first partial seam from the corner (backstitch) to the pin (backstitch twice). Make sure that this stitching is exactly ON (or within and next to) previous basting from trim placement.
Remove from machine, then repeat the operation for the other end's partial seam.
Reinforcing the stitching at the zipper opening on each side with double backstitching will help keep the seam from pulling out during the stress of inserting the pillow form.
ZIPPER APPLICATION
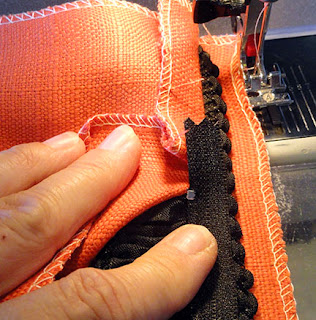
 Step 8. Open the zipper. Lay the pillow opening with the backside of the pillow front down on work surface. Seam edges are to the right as shown.
Position the zipper: 1) face down, 2) teeth inward, 3) metal stop just below end of top partial seam, 4) weave guidelines of zipper tape at the seamline where trim was stitched in place.
Step 9. Begin stitching at the top of the twill tape, stitching along the guideline which is positioned as you go exactly over the trim seamline.
Sew to the tape end (or if using an over-long zipper, to a point approx. 1/2" beyond beginning of partial seam on opposite end.

Step 10. Close the zipper.

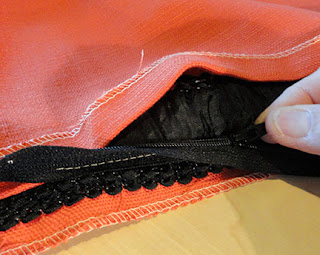
Step 11. Straighten and adjust the pillow back seam allowance that corresponds to the free zipper tape. Adjust and pin the ends of tape to the fabric single layer, then . . .
. . . flex the fabric and zipper tape to straighten and adjust "fullness" out so the two edges line up nicely. Pin centers, then pin at several intermediate positions between center and each end.

Step 12. Find the pull tab and open the zipper completely for the length of the opening.
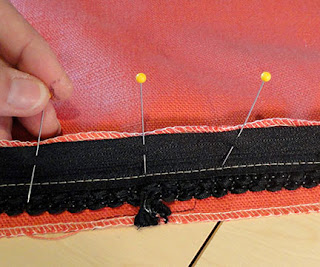
Step 13. Fold the pillow back edge along the previously-pressed crease. Flex pinned zipper and panel edges slightly, then re-pin the tape and two fabric layers while adjusting the zipper teeth to be a consistent margin from the fold edge. To determine this margin, move the outer zipper tape edge to line up with the fabric edge. This will create a zipper overlap that will help the zipper hide when finished. Pin all along the zipper and edge.
Step 14. Prepare and insert a bobbin loaded with clear monofilament poly thread (or thread matched to fabric as alternative.)
Step 15. With pillow at the machine positioned to begin at the top/tab end, presser foot up, insert needle at the weave guideline of tape, then draw the bobbin thread up to the top. Pull the loop through completely, hold ends together.
Lower foot, and begin stitching, completing a backstitch lock to secure. Note that the stitching should start approx. 1/2" beyond end of pillow opening. Also, stitching is a straight and parallel to zipper, never pivoting to angle across zipper, neither at the start nor at the finish of this stitching line.
Step 16. Continue to sew along the tape and through layers, following the weave guide . . .
. . . until you reach the end of the tape. Backstitch as at the beginning, clip threads and remove from the machine.
Step 17. Turn the pillow over to inspect the zipper stitching and test the zipper to close.
Here you can see how well the invisible thread blends into the pillow, and also that the stitching remains parallel to the opening, not crossing at the ends as some conventional applications may involve.
FINISHING CONSTRUCTION
Step 18. Replace regular thread in bobbin. Open zipper. Layer front and back right sides together and align sides and top edges. Pin edges well. Begin stitching and end of partial zipper seam at bottom corner. Stitch exactly ON (or just inside) the trim basting seam. Remove pins as you go, adjusting seam as necessary to maintain aligned edges.
Step 19. Continue stitching by pivoting at corners. Before proceeding along next side, you may need to insert finger between layers to tuck fringe or trim back inside and out of the way of the coming stitching.
At the end of this seam, after stitching along 3 sides and around 2 corners, pivot around final corner and complete stitching over end of opposite partial zipper seam.

Step 20. Turn pillow face side out. Insert fingers into corners to turn these completely.
Close zipper.
Step 21. Work edges fully out by pressing and smoothing the fabric edges flat while tugging trim out to full view.
Your pillow is complete.
Position a sawtooth section with base edge along marked temp line, center side to side between the corner squares, the fuse in place in same manner following the same precautions. Repeat for all border sections.
Step 15. Here is the completed fused vinyl panel.
PART 2: PILLOW CONSTRUCTION
Step 1. Finish the edges of the fabric front and back pillow panels. If serging is possible, it is the best option. If not, use a wide zigzag on a regular sewing machine. Since this may be a pillow that has an insert that you are using for a different pillow the rest of the year, you may be inserting and removing it over and over. Finishing the edges will keep the pillow in best condition over time.
Step 2. Add fringe at the seamline of the pillow FRONT. If you are not using trim or covered welt cord, etc., you can skip foward to Step 5 below.
Begin at center bottom edge, position "seamline" of trim edge along the 3/4" seamline there, and stitch in place to first corner.
Step 3. At the corner, stop and leave needle inserted at the spot where the bottom and side seamlines cross. Bottom seam allow. is 3/4" and side seam allow. is 1/2". Pivot pillow top and trim to continue up the side edge. You will probably need to snip the trim slightly at the pivot point to allow it to be re-directed. Take care not to clip too far into the "seam allowance" of the trim.
Continue up the side with BASTING stitching, repeat the corner pivot and clip, continue across the top, repeat corner process, continue down second side and pivot at last corner.
Step 4. As you reach the center bottom where the trim attachment was begun, make a neat "splice" or transition between beginning and end. For this style ribbon loop trim, this involves un-doing a loop at the beginning so that an end is pulled down to be caught outside the seam, and un-doing a loop at the ending and pulling down outside the seam, too. At far right in this image, you can see the clipped ends pulled free. Trim should be arranged to meet exactly, or even slightly overlap. Other trims will require different strategies for an attractive joint.
Step 5. Measure in from corners on bottom of pillow front edge the amount for the seam at each side of the zipper. For most pillows it will be around 2 1/2" - 3". Mark the position with a straight pin. Mark a position in from BOTH corners.
Step 6. Measure and fold back 3/4" seam allowance on the bottom edge of the BACK pillow panel. Layer bottom edges of both panels, back behind front, align corners, then remove and re-pin through both layers at the same spot. Add another pin near the corner to secure layers.
Step 7. Sew the first partial seam from the corner (backstitch) to the pin (backstitch twice). Make sure that this stitching is exactly ON (or within and next to) previous basting from trim placement.
Remove from machine, then repeat the operation for the other end's partial seam.
Reinforcing the stitching at the zipper opening on each side with double backstitching will help keep the seam from pulling out during the stress of inserting the pillow form.
 Step 8. Open the zipper. Lay the pillow opening with the backside of the pillow front down on work surface. Seam edges are to the right as shown.
Position the zipper: 1) face down, 2) teeth inward, 3) metal stop just below end of top partial seam, 4) weave guidelines of zipper tape at the seamline where trim was stitched in place.
Step 9. Begin stitching at the top of the twill tape, stitching along the guideline which is positioned as you go exactly over the trim seamline.
Sew to the tape end (or if using an over-long zipper, to a point approx. 1/2" beyond beginning of partial seam on opposite end.

Step 10. Close the zipper.

Step 11. Straighten and adjust the pillow back seam allowance that corresponds to the free zipper tape. Adjust and pin the ends of tape to the fabric single layer, then . . .
. . . flex the fabric and zipper tape to straighten and adjust "fullness" out so the two edges line up nicely. Pin centers, then pin at several intermediate positions between center and each end.

Step 12. Find the pull tab and open the zipper completely for the length of the opening.
Step 13. Fold the pillow back edge along the previously-pressed crease. Flex pinned zipper and panel edges slightly, then re-pin the tape and two fabric layers while adjusting the zipper teeth to be a consistent margin from the fold edge. To determine this margin, move the outer zipper tape edge to line up with the fabric edge. This will create a zipper overlap that will help the zipper hide when finished. Pin all along the zipper and edge.
Step 14. Prepare and insert a bobbin loaded with clear monofilament poly thread (or thread matched to fabric as alternative.)
Step 15. With pillow at the machine positioned to begin at the top/tab end, presser foot up, insert needle at the weave guideline of tape, then draw the bobbin thread up to the top. Pull the loop through completely, hold ends together.
Lower foot, and begin stitching, completing a backstitch lock to secure. Note that the stitching should start approx. 1/2" beyond end of pillow opening. Also, stitching is a straight and parallel to zipper, never pivoting to angle across zipper, neither at the start nor at the finish of this stitching line.
Step 16. Continue to sew along the tape and through layers, following the weave guide . . .
. . . until you reach the end of the tape. Backstitch as at the beginning, clip threads and remove from the machine.
Step 17. Turn the pillow over to inspect the zipper stitching and test the zipper to close.
Here you can see how well the invisible thread blends into the pillow, and also that the stitching remains parallel to the opening, not crossing at the ends as some conventional applications may involve.
FINISHING CONSTRUCTION
Step 18. Replace regular thread in bobbin. Open zipper. Layer front and back right sides together and align sides and top edges. Pin edges well. Begin stitching and end of partial zipper seam at bottom corner. Stitch exactly ON (or just inside) the trim basting seam. Remove pins as you go, adjusting seam as necessary to maintain aligned edges.
Step 19. Continue stitching by pivoting at corners. Before proceeding along next side, you may need to insert finger between layers to tuck fringe or trim back inside and out of the way of the coming stitching.
At the end of this seam, after stitching along 3 sides and around 2 corners, pivot around final corner and complete stitching over end of opposite partial zipper seam.

Step 20. Turn pillow face side out. Insert fingers into corners to turn these completely.
Close zipper.
Step 21. Work edges fully out by pressing and smoothing the fabric edges flat while tugging trim out to full view.
Your pillow is complete.
Here again is the finished pillow.
Hope yours turns out to your satisfaction!


No comments:
Post a Comment