
So cute, why wouldn't you invite him home for dinner?
The latest in the canister wrap series,
this vampire boy is upside down
(typical for a bat, after all)
with his "lid" on the bottom.
Create the modified octagon canister from card stock
(or use a stripped and emptied Crystal Light container)
to wrap, adorn and embellish.
Use as a table or shelf decoration,
or fill as a gift box.
Cut file now available for purchase and download
through SnapDragon Snippets at the Silhouette America
online store, and more.

ASSEMBLY:
1. Identify and cut the shapes:
A canister body
B canister body opening rings and top lid
C canister base (pants portion)
D canister base flange inserts (8 total)
E canister base bottom lid
F pants wrap for canister base
G shirt front with sash
H head/face shape
I dimensional nose
J eye depth rings
K layered eyes (black & white layers)
L fangs
M mouth liner for contrast that shows thru
N bow tie and front knot shape
O upper collars (extra black shape eliminated)
P hand and thumb shapes
Q bat body, head and head liner for eyes contrast
R hair shape (NOTE this was modified for final cut file)
S cape shapes left and right
 2. See the canister assembly steps by following this link for the Scarecrow canister wrap, steps 2-6 or 7, then return to view the rest of the Vampire Boy assembly.
3. Complete the Vampire canister base (pants) in a similar fashion to the canister body, except the top rim has simple tabs that fold back and are glued in place on the inside, and bottom lid tabs are simply folded into the center to accept the bottom lid.
Fold top rim (shown here at the bottom of image) tabs in and glue in place.

4. Position and glue the bottom lid over tabs.
It may be helpful to attach the longer front and back tabs to lid first, then adjust the remaining edges between before attaching.

5. Prepare the base flanges by folding the top tabs inward and gluing flat.
NOTE the punched symbols and letter 'S' on the three different flange shapes. These indicate where the tabs are inserted in the next step.
Star = wider front and back sections.
S = sides
o = angled sides

6. Apply adhesive to the lower portion of the flanges (the portion that will align with the base sides below the rim level). Insert the appropriate flange behind the base edge, center within the section side to side, then apply pressure until fully attached.
The portion of the flanges that extend beyond the rim will eventually insert into the canister body to help hold the base in place.

7. Fold the pants decor wrap slightly inward on all perforations. Apply adhesive, align over base front perforations, top & bottom edges even, and glue in place.

8. Complete pre-assembly of the shirt front and sash with decorative brad (or stud, jewel, etc.)
NOTE: these shapes were slightly modified in the finished cut file, so that the sash lines up with the bottom and left side shirt front edges when the stud punch holes line up. You can see this alignment in the image next to Step 18.
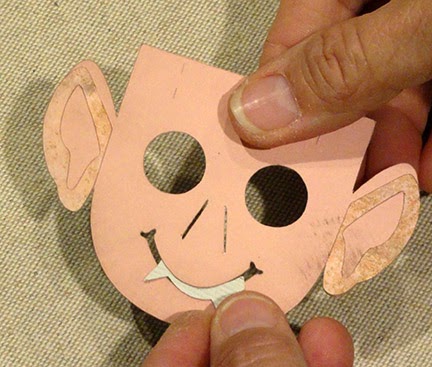
9. Pre-assemble the face shape in the next few steps.
Position and attach the over-ears shapes.
Slide fangs shape, face up, between mouth edges, align curved edges of fang and upper mouth, center, and attach.

10. Position and attach the mouth contrast color liner behind the lower portion of the head. Take care that lower edges are aligned so that the nose slots remain fully exposed.

11. Fold the nose shape at center, and fold side tabs outward.
Insert tabs into face slots, push fully in. On backside, glue tabs in place, folded toward ears.

12. To give this drac jr. his "hollow-eyed" look, add dimension to the eye sockets by gluing two depth rings behind the head with eye and ring inner edges lined up exactly.

13. Prepare the eye by layering the white/punch top layer over the contrast whole black layer.
14. Position each eye shape behind the face, with outer edges aligned with depth ring outer edges. Take care to orient the eyeballs the way you want them to look from the front during the attachment process.

NOTE that I gave his complexion some "alive" color, by pinky-tip rubbing powder blush in the cheek areas until there was enough for my "taste". It is easiest to do this before it is attached to the canister in step 15.
15. Bend the head upper edge perforations back slightly. Center the head over the canister body front, with top edges of each aligned, then attach head to canister and shirt front where the surfaces touch.

16. Add some curl to the collar tips of both the upper (added-on) collar shape and the cape collar tips.

17. Glue the left & right upper collars to their respective cape shapes, so that a margin of the cape collar edge shows below the upper collar, as shown here.
 18. To attach each side cape to the canister body, apply adhesive to the center front edges only (most of the cape will extend away from the canister), then tuck the collar up under the chin/cheeks so that approx. 1/4" or so of cape bottom tip extends below canister edge.
(NOTE that the right cape shown on left of this image originally included a shaped edge to accommodate the hand, but this has been changed in the final cut file so that left and right cape shapes are the same.)
 19. Assemble the bow tie by adding some curl to the bow portion middles, folding side ends in to center and attaching, then wrapping the self-knot over and gluing in place. Attach the front knot over the top.
15. Bend the head upper edge perforations back slightly. Center the head over the canister body front, with top edges of each aligned, then attach head to canister and shirt front where the surfaces touch.
16. Add some curl to the collar tips of both the upper (added-on) collar shape and the cape collar tips.
17. Glue the left & right upper collars to their respective cape shapes, so that a margin of the cape collar edge shows below the upper collar, as shown here.
(NOTE that the right cape shown on left of this image originally included a shaped edge to accommodate the hand, but this has been changed in the final cut file so that left and right cape shapes are the same.)
20. Assemble the bat by attaching head contrast eyes liner to back of head shape, then attaching head to body.
21. Assemble hand with thumb on top.
22. Attach bow tie (use dimensional foam square or equivalent recommended). Attach hand and bat.

23. Assemble the hair shape by folding all perforations inward. Fold hair lid shape down and attach to corresponding tabs.

24. Slide the hair lid over the top of the canister, taking care to allow sideburns to slide in front of ears. Push down into place.

25. Attach the back tab, and also apply glue to side hair extensions where they will touch the canister body to secure the hair in place.
26. (not shown) Slide the base/pants flanges inside of the bottom open end of canister body and push in to complete the project.
Now look who's ready
for a little nocturnal activity!


Thank u so much for more canister characters! They are so much fun to put together and display! Can't wait for some more Thanksgiving and Christmas ones...(hint, hint) Pilgrims and Indians, Mr and Mrs Claus and an Elf?
ReplyDeleteGreat ideas. I will design and get them posted as quickly as I am able. Thanks for expressing your interest. That really helps to give them priority on my list!
ReplyDelete