
Classic student foot gear makes a return
with
this sneaker-shaped card
with lacing holes and medallion details.
For extra realism, select the shape for the shoe's upper
that
includes needle-holes for thread or twine lacing.
Fits into a 5x7 envelope.

ASSEMBLY:
1. Identify and cut the shapes:
A front card base shape
B back card base shape with top attach tab
C shoe main silhouette/tongue shape
D shoe upper (this one has needle holes)
E toe piece
F sole with top trim and mid trim stripes
G medallion and scallop circle (2 of 3)

2. Prepare the "upper" shape if you wish to include the real lacings. Thread the smallest darning needle possible with large enough eye to accept the stitching material you have selected.
The model here used a 20" length of cream perle cotton. Softer style twines would work, as work embroidery floss, string, etc.
On the backside of the upper shape, anchor the tail end near the top hole of the "inner" line of poke-holes.

3. Insert the needle and twine through the top hole of the "inner" line of poke holes, and push the needle through to the front of the shape.
Draw the thread through until the anchor stops it snug.

4. Insert the needle into the second hole to create the first stitch, push the needle through to the backside and draw the twine all the way through to the backside (here and throughout as stitches are completed).

5. Continue the insertion of the needle and twine into the next hole (push to front side) and then the next (push to back side) . . .

and so forth to create the line of stitch-space-stitching.

6. Proceed with stitching until the final insertion of the needle on the inner line of stitching is completed, and the needle/twine is drawn through on the backside of the shape.
Without cutting the twine, insert the needle and twine up from the backside of the shape in the bottom-most hole on the edge stitching line.
Continue the stitching in the same fashion up the front edge until all holes have been laced . . .

. . . and the needle has pulled the twine to the backside of the shape.
7. Trim excess twine leaving approx. 1" tail.

8. Anchor the final tail end on the backside, as was done with the lead tail.

9. Position and attach the "upper" onto the main shoe base silhouette (which includes the tongue that will remain exposed).

10. Prepare the scallop "logo" medallion by layering and attaching shapes. Three shapes are included in the design cut file.
For the model, a printed circle design was selected from a specialty cardstock paper that fit inside the scallop medallion, and fussy-cut by hand. (The mid-size circle was omitted.)

11. Position and attach the remaining decorative shapes, including the sole with upper strip aligned at top, mid sole strip centered, and toe shape.

12. Select your lacing material, cut a 12" length or so, and anchor on the backside near a top (or bottom) hole.
The model uses scrunch "silk" ribbon.

13. Insert the needle through the backside of the lace up hole, push to the front side, and draw the ribbon through to the front.
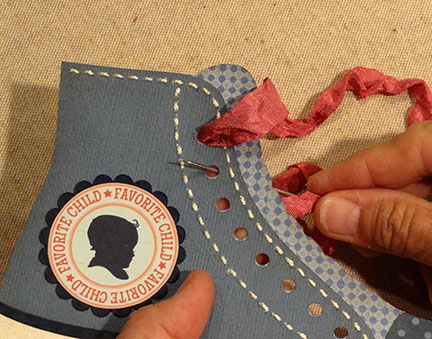
14. Draw the ribbon over and around the tongue edge of the assembled shapes in "whipstitch" fashion to insert the needle into the second hole, again from back to front, as shown.

15. Continue to complete the straight-across stitches, lining up the "loop" that wraps across the edge in the subtle scallop indentations along the lead edge.

16. When the lacing is completed, direct the needle and ribbon around the edge to the backside as if completing a final stitch. Trim excess leaving approx. 1" tail.

17. Anchor the tail end to the backside of the front assembly.

18. Apply adhesive to the backside of the shoe assembly, then position, centered, onto the front card base (slight offset all around) and attach in place.

19. Prepare the card back base by bending the top attachment tab forward, applying adhesive to the area above the perforation line.
Position on the back of the front assembly/front card base, taking care to line up the cut edges as exactly as possible.

Here is the completed card.
What a fantastic card! I know this one is going to be a huge hit!
ReplyDeleteGreat tutorial, thanks. Love the sneaker!
ReplyDeleteVery creative with this card. I love the way you stitched it.
ReplyDeletethank you so much for this awesome sneaker. I got it from the sil store and had a great fun first go but have been quite sick so didn't get to give it is full fun treatment but I will definitely be giving it another go very soon. Here is a link to my first go. Huge thanks again, it really sheered me up when I needed it xxxxx http://www.loopylousloopythoughts.blogspot.co.uk/2015/09/sorry-bug-sneaked-in-on-you.html
ReplyDelete