THIS DESIGN HAS BEEN PULLED FROM
SILHOUETTE AMERICA ONLINE STORE,
AND SNAPDRAGON SNIPPETS,
and will no longer be available to purchase
and download.
This tutorial will remain in place,
for those who may have purchased and
downloaded the design before it
was removed.

Large and elaborate paper craft model
can recreate the fantasy of a fairy tale princess
for party centerpiece, or make-believe fun.
Back panel includes a trap door and oversize letter slot
to accept Valentine cards or wedding gift envelopes.
Model measures approx. 15.5" tall x 13.5" wide x 12.75" deep.
Requires 12x12 cutting capacity.
Construction involves preparing components
(square tall towers, front corner octagon towers,
angle nooks, crenelated battlements, front portico) which are
attached in sequence to four main castle walls panels.
(Not a beginner's project.)
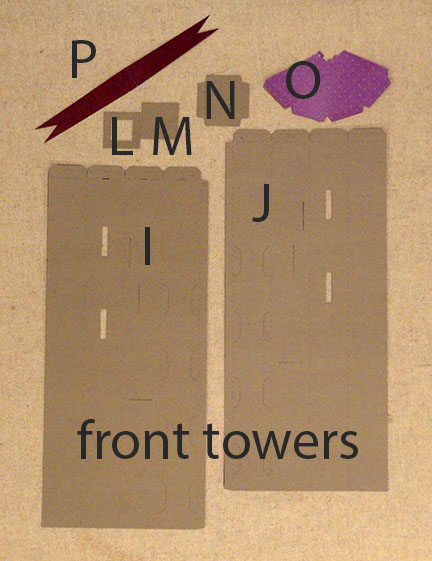
ASSEMBLY: 1. Identify and cut the shapes:
A castle front panel (1)
shown with upper window overlay (3)
and bottom window overlay group (3)
and optional window contrast shapes (3 each)
 B castle right panel (1)
C castle left panel (1)


 Q angle tower main shape (2)
R angle tower clover window frame build up (6)
S clover window contrast liner (2)
T tower jewel stone "build up" (12)
U angle tower roof (2)

 X corner tower main shape (2) with window trim (2 sets)
Y1 and Y2 corner tower roof rim trim (2 each)
Z corner tower roof (2)

 BB battlement main shape (4)
CC battlement contrast rim trim (4)
Not shown: build up crenelation shapes (12)
DD battlement build up strips for backside (24)
EE spout surround (60)
FF spout tube (20)
A castle front panel (1)
shown with upper window overlay (3)
and bottom window overlay group (3)
and optional window contrast shapes (3 each)

C castle left panel (1)

D castle back panel (1) with trap door and letter slot
E trap door overlay contrast (1)
F trap door portcullis overlay (1)
G trap door hinge perforation reinforcement (1)
H circle wrap fasteners (4)

I tall tower FRONT Left (2)
J tall tower FRONT Right (2)
(Not shown: tall tower BACK generic (4)
L tower top opening platform (8)
M tower top opening reinforcement square (8)
N tower bottom opening reinformement (8)
O tower cone roof (8)
P pennant flags (8)
R angle tower clover window frame build up (6)
S clover window contrast liner (2)
T tower jewel stone "build up" (12)
U angle tower roof (2)

V portico main shape (1) with contrast arch rim (1)
W portico roof rim (1)
Not shown: rim support build up (2)

Y1 and Y2 corner tower roof rim trim (2 each)
Z corner tower roof (2)

AA castle roof with overlay (1 each)
Not shown: floor panel with side flanges

CC battlement contrast rim trim (4)
Not shown: build up crenelation shapes (12)
DD battlement build up strips for backside (24)
EE spout surround (60)
FF spout tube (20)

MAIN CASTLE WALLS STRUCTURE
2. Identify the main walls by locating the "L", "R", "F" and "B"
cut letters in the shapes. These notations are intended to help
position them correctly, as seen from above the castle structure,
with the FRONT of the castle at the top
refer to the line drawing following the next image).
Prepare the mail castle walls for LEFT, FRONT,
RIGHT by attaching the window trim shapes
around the upper "gothic" and lower "roman" arch windows.
3. Join the three main walls by overlapping the straight
left side edge over the adjoining right side edge tab.

This line drawing should help position
the main walls for the castle structure,
along with the tall square tower structures
as they are prepared and attached.
NOTE that LEFT and RIGHT tall towers
are paired to attach (eventually) to the FRONT panel,
with a RIGHT tower on the forward edge of the LEFT panel,
and a LEFT tower on the forward edge of the RIGHT.
These "left" and "right" tall towers are part of the
"angled wall" structures, with unique slots to accept tabs.
The four tall towers on the back of the castle
(do not include the angled wall slots)
can be used in any of the positions noted.

4. Prepare the BACK castle wall by layering the trap door
(portcullis) base shape with the "bars" shape.
Center and attach it to the back trap door ONLY of the BACK panel,
just above the perforated "hinge" line.
5. Bend the hinge reinforcement shape forward
on the perforation line. Position the fold/line centered
and exactly along the perf line of the wall, and glue in place
where it overlaps the wall and the trap door accent shapes.
6. Layer a pair of circle closures and glue together.
Position and attach one unit (only glue tiny margin
around cut hole to allow for twine wrapping)
over the punch on the wall shape.
7. Cut a length (approx. 8 or 9 inches long)
and thread one end through the door punch hole,
then secure a generous 1/4" tail on the backside.
Knot the free end to keep it from unraveling.

and secure by attaching a small eyelet/rivet through all.
Also attach a rivet through the wall circle closure unit.

This is how the closure and trap door
should look when completed.

FRONT TALL TOWERS
9. Identify the tall towers by locating the
cut "L" or "R" in the side tabs near the top.

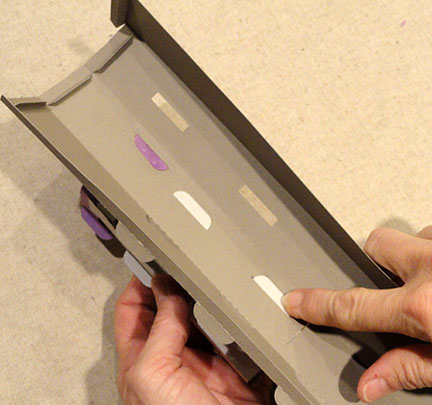
10. Prepare the towers by bending back on the
vertical long perforation lines, also
bending the tabs outward.
Bend the top perforation lines for tabs/flanges
as shown, forward for perf line nearest to top edge,
back for second perforation lines.
NOTE: this image shows a front tower shape.

lines for the three sections ONLY nearest to the
long side that has the tab/flange.
Press to the backside and apply pressure until secured.
(The final tab will be glued later.)

straight edge to the opposite tab perforation line
to secure the side seam.
13. Apply glue and attach the remaining tab/flange
in position, as was done for others in Step 11.
(Shown here is the BACK tower.
FRONT towers are assembled differently.)

top opening of the tower perpendicular and toward
the tower center. Apply glue to the "ledge" that these
tabs now create, and position a hollow square
reinforcement shape into the opening . . .

(or you may need to use a flat tool like a spatula)
to secure the four sides to the reinforcement.

15. Apply glue to the reinforcement shape,
then insert a full square (with flag stick anchor punch)
on top and secure.

bend forward the bottom square side flanges,
apply glue to the flange backsides,
then insert into the bottom of the tower "tube"
until flange cut edges line up with tower edges.
Apply pressure each seam to secure in place.

ANGLE TOWER ASSEMBLY
17. Prepare the build up for the clover window
by layering and gluing together as precisely as
possible three identical build up shapes.

18. Prepare the main angle wall shape by bending
back on all vertical perforations (except the back side flange
and the door lines should be bent forward - valley fold),
also along top, bottom and side tabs, etc.
19.Position and glue the clover window build up
behind the clover window cutout opening,
matching inside edges as exactly as possible,
attaching build up to the backside of the wall.

shape on the backside of the build up shape,
lining up the outside edges.
(Complete both angle wall units.)

21. Prepare the jewel "post" build up by layering
the 6 square shapes as carefully as possible
so that edges match up exactly.
22. Position the post on 45 degree (on point) angle,
between the top of the doors and bottom
of the window, and glue in place.
Repeat for both angle walls.

23. To join the back seam, bring the lower portion
of the side edges toward the center back, forming
a tube, to overlap the straight edge (on left of photo)
to the tab flange perforation line, and glue in place.
24. Complete the top portion of the seam by
pushing the newly joined seam toward the backside
of the angle wall (door/clover window panel)
to allow the top section tab and edge to
come together to overlap and join.
When the seams are completed, the lower portion
should continue to form a right angle inward
at angle wall center back, while at the same time
the much shorter top portion runs parallel to
the wall front.

25. Prepare the angle tower roof unit by bending
slotted floor forward, adjacent tabs forward,
bending front and back walls (front and back) back.
26. Apply adhesive under where the front wall
inner and outer will touch then press together to join.
(Leave the back wall that is similar to this un-joined
until a later point in assembly.)

to match the floor (trapezoid shape) angle, with
tabs under floor, back bending across back of floor,
with end tab tucked under the opposite side.
Glue the tabs under their adjacent floor
or opposite wall edges.

(except that the back fold-down wall
should NOT be attached in place at this point.)

by fitting the tab through the slot, and sliding it
downward until it seats against the front top straight edge.
NOTE that the side wall tabs will fit on the outside
of the roof unit.
(Also NOTE that in this image, the back fold-down
roof section is shown already folded down,
which it should not be at this point.)
Once you see where the two components will touch,
remove roof unit, apply adhesive, then re-position
and apply pressure or hold in place until secure.

29. Fold the back ridge section down
over the extension of the angle wall,
and glue in place.

ANGLE TOWER TO FRONT TALL TOWERS
30. Attach the angle tower unit to the left and right
front wall shapes by inserting the side tabs
into the corresponding slots, lower slots for angle side
walls, upper slots for roof portion.

to the side and glue in place.
32. Align and attach the back tabs of
left tall tower into the corresponding slots on left side
of front castle wall . . .

back and glue in place.
(NOTE: this image shows tabs pressed inward.
These can be pressed in either direction
according to whichever seems easiest.)

33. With tower back tabs attached,malign and join the front
long side seam (it may require the use of a long tool to provide
a "press-against" surface to secure the center part of the seam),
and also complete the top rim fold down and gluing.

34. Complete: A) attachment of the other tower that is
part of this angle tower assembly;
B) attachment of the other angle tower assembly;
C) top reinforcement "frame" and whole square (see Step 15)
and bottom tower reinforcement (see Step 16).

BACK TOWERS TO CASTLE STRUCTURE
35. Position and attach the four back tall towers
in a similar fashion, by inserting tabs into
slots, bending back on inside, and gluing in place.

36. Apply glue and insert the Angle Tower roof
"floor" masking trapezoid shape.

CORNER TOWERS
37. Prepare the corner tower shapes by gluing
the window grilles over the openings.
Also bend back on vertical perforations, bottom flanges,
side and top tabs. Glue the bottom rim flanges
in place on backside of shape.

should look.

of the corner tower, bend toward center, and
glue in place. (Complete for two towers.)

39. Prepare the roof trim shape by attaching the short
and long portions at the seamline,
overlapping straight edge to corresponding
tab perf line.

40. Bend trim shape in half the long direction,
and bend back flange/tab outward as shown.
Apply adhesive to the shorter shaped portion only,
then attach the two portions where they touch.

the roof section, lining up the flanges with the
angle edges and roof end. Glue in place.

CORNER TOWERS TO CASTLE STRUCTURE
42. Position the corner tower by sliding the
castle structure tall towers and main structure
corner into the matching openings on the roof
of the corner tower . . .

. . . and adjusting until
angle tower bottom tabs fit into the roof slots.

into the corresponding slots in castle main structure,
Bend all tabs back on insides of structures
and glue in place.

ROOF STRUCTURE
43. Prepare the roof panel by centering and attaching
the roof overlay accent.
44. Position the roof panel between tall towers
and insert castle wall top tabs into corresponding slots.
NOTE that the roof corners should slide under the
angle tower back wall
Also bend the close-to-corner tabs toward center . . .

. . . then glue the tabs in place.
NOTE it may be helpful to use a small press-against
surface such as the wooden block shown
to reach inside the castle structure and position
behind the area where the tabs are being
pressed and glued into place.

BATTLEMENT STRUCTURES
45. Prepare the battlement shapes by attaching
the top rim accent shapes.
46. Prepare 20 spout tube shapes by bending on
perforations to form a tube, overlapping the
straight edge over the tiny tab, and gluing in place.
Bend back end tabs outward.

47. Insert each spout tube from backside
completely into openings . . .

. . . then glue tabs in place on backside.

48. Layer (build up) the spout collars by gluing
three of the rounded square shapes into a stack,
matching all edges as precisely as possible.
Insert over a spout tube, and glue in place to front.

49. Bend the side tabs back.
This is how the battlement shape should look
when completed.

50. Prepare each of 4 backside large build up shapes
by gluing three shapes into a stack, matching
all edges as exactly as possible.
51. Position on the backside of the battlement
assembly centered between the side tabs,
and with top cutout edges lined up exactly.

52. Prepare each of 4 shorter build up by stacking and
gluing together 6 strips with edges aligned precisely.
53. Position and attach to the bottom of the larger
build up shape, with bottom and side edges
aligned precisely.

ATTACHING BATTLEMENT STRUCTURES
54. Apply adhesive to the side tabs, and along
the bottom of the build up area.
(NOTE: quick grab glue such as Fabri-Tac
is a good choice here.)

towers, positioning the ledge on the roof edge . . .


PORTICO ASSEMBLY
56. Prepare the portico wall by attaching the
arch accent shape to the front around arch opening.
Bend the tabs back, also bend the top vertical perf line
forward, the second perf line back.

the larger "roof" area free as shown.

by accordion folding the strips, then gluing together
all surfaces that touch, to form a stack.

58. Position each stack on the front side of the
arch panel, approx. a generous 1/4" in from each side,
and glue in place.

corner towers, inserting the back tabs into the
castle structure slots, bending back on the inside
and gluing in place.
Also bend the back side slots and front side
tabs back and glue to the structures
where they touch.

60. Prepare the portico rim by bending the front
and back flanges back as shown.

of trim, and to the tops and fronts of the
reinforcement stacks. Position the trim, centered,
over the top of the portico ridge, and hold in place
until secure.

62. Prepare the cone roof shapes by bending
back on all perforation lines.
Form the shape into a cone to overlap the
straight side edge to the opposite side tab flange
and glue in place.

63. Fold the top platform down and glue in place
over tiny tabs. Fold the bottom flanges to the
interior of the cone and glue in place.

64. Prepare the pennant flag shapes by adding
some curl to the center area where perforation
lines indicate. This will assist with the "wrap"
around the flag stick. Then . . .
around the flag stick. Then . . .

at the top and glue in place, then glue the backsides
of the pennant halves together.
In the model, the inner pennants use
4.5" long cut skewer sticks, and outer use 3.5" long,
cut to retain the pointed end.
(Sticks were also painted with acryllic paint.)

65. Finish the pennants by adding the "waving in wind"
curl: add curl forward in the area next to the stick,
and add curl backward near the points.

66. Add "quick grab" adhesive such as Fabri Tac
shown here at the anchor hole in the tower platform,
and also around the edges where the cone folded
flange edges will rest. Working quickly, place the
cone in position, flexing slightly if necessary to fit it
onto the top of the tower . . .

. . . then insert the bottom end of flag stick through
cone top hole (this may require some twisting with
pressure to open the hole to fit your skewer side),
through the cone interior, to rest the point in the
platform hole. Turn flagstick NOW to orient as desired.

FLOOR OPTIONS
67. OPTIONAL: for added strength if the castle will be
used as a Valentine deposit box for school, for instance,
it can be made to be sturdier by sliding the bottomless
castle hull over a seam-taped 8x8x8 corrugated cardboard box.
(Ours was purchased at a UPS store.)

to mark the location of the trap door opening,
and the depository slot, then remove box and
neatly cut away the areas marked.
You will also want to use the optional window liners
so that it is NOT the cardboard box that is seen
through the window openings.

68. If you DO NOT use the box insert, cut and prepare
the floor/bottom panel by bending the edge flanges upward
to perpendicular. NOTE that the back flange has a
straight top edge, but the sides and fronts have a slightly
shaped center where the window frames will align.
Take particular care when folding near these narrower
flanges to avoid tearing into the flange.
To position, apply adhesive to the face surface of flanges,
then orient with back edge at trap door (back),
then tuck all flanges inside the castle wall edges to
glue in place.
Reach one hand through open trap door to assist.

Here, again, is the completed castle, as seen from
the side front . . .

. . . and from the side back.

Esse molde não pertence à Monica? Ela disponibiliza free e vcs estão vendendo?
ReplyDeleteIf you have seen a similar design for sale or for free, please understand that the image for that design was available to view and be inspired by on the internet. As the cut file designer for this version, I used that "inspiration" to prepare this different, specially sized and engineered cut file to suit our needs and offer to downloading customers. If you can get their version for free, you may prefer to do that. This version is a cut file, sized to fit over (optional) a corrugated cardboard 8x8x8 box for sturdiness. It also has a separate floor. Different, but similar. You choose the one that suits your needs best!!
DeleteAbsolutely LOVE it!!!!
ReplyDeleteIs this now the complete instructions ?
Also do you have it in print format?
Text descriptions of steps will be added within a day or so. Sorry for the delay. Only available as a cut file.
DeleteYou are so talented Jodi!! I know it took you forever to create and your hard work paid off! love love love!
ReplyDeleteThe owner of the castle project design that was the direct inspiration for this design (from images that are available in the public media, and therefore, in my opinion, fair game as inspiration) has contacted Silhouette America and required them to pull it from their online store. To stay consistent, this design has also been pulled from the SnapDragonSnippets.com store. We apologize to any who may have wished to create this different cut file version, but who will now not be able to (unless the file was already downloaded). One option is to do the online search to find the "free" download for the larger castle (Monica designs?)
ReplyDeleteThis comment has been removed by a blog administrator.
ReplyDeleteThis comment has been removed by the author.
ReplyDeleteHi, I don't have the solid roof piece in my cutting files and do you have written construction
ReplyDeleteDid you purchase from Silhouette America (it should be in one of the two files required for the project)? If you purchased from SnapDragon Snippets, it was a separate "free" file. Contact me for the roof shape if the latter was the case (hearthsewnpatterns[at]yahoo[dot]com)
DeleteHi, I bought the files from Silouette
Delete