
Keepsake
box has hinged lid attached at "back"
left side wall panel, with
"front" right side shaped flap
that wraps and
"latches" over a miniature hex nub.
Magnet attraction closure option
includes magnets
on flap (rare-earth used for this sample) and 1/2" metal
washers attached on front wall underside.
Engineered wall construction for durability durable.
Build up layering provides strength and weight to lid.
Offset accents on walls offer options for decorating.
Measures approx. 6" x 6" x 2".
 Companion designs include:

"Keyhole Plate" design that fits flap
shape and hex nub;
"Handle 3D With Bracket End" for optional
"top" wall panel embellishment;
"Memories Mini Album";
and "Key Victorian Dimensional" as side embellishment.

Here is another view of decorated version:
includes case 3d handle on top,
layered fancy key plate on the flap,
Victorian dimensional key on the opposite side.

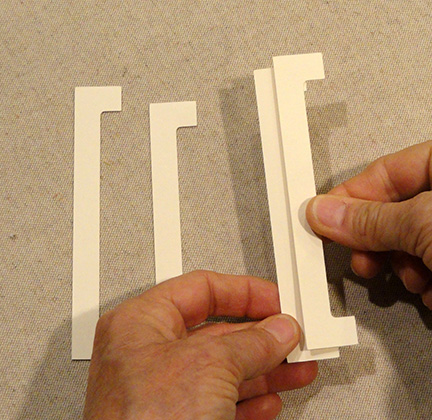
ASSEMBLY: 1. Identify and cut the shapes:
For the TRAY portion assembly, A-F, N & O
A box base
B "front" (right side) wall with accent overlay
C magnet placement guide panel
D "back" (left side) wall with accent overlay
(NOTE that the accent overlay actually
is attached to the back panel of the LID
E "top" (side wall) with accent overlay
F "bottom" (side wall) with accent overlay
G lid main shape
H flap add-on with accent overlay
I center lid overlay J flap underside build up (4)
K flap underside cover
L lid underside guide build ups (3-4 left; 3-4 right)
M lid build up (2-3) N bottom cover
O rim accent shapes (2 straight, 2 miter)
P hex nub (also key plate - separate file)


 5. Position the magnet underlay positioning guide
on the backside of the outer wall portion
of the front wall (shown above in step 4).
The panel should be centered top to bottom,
and side to side.
 6. Position and attach the metal (magnetic attractor)
washers in the circle cutouts.

 8. Form the nub into a tube to overlap the straight
edge end over the side tab opposite.
 NOTE that it may be helpful to form this tube
over a 1/4" diameter wood dowel.


 26. Position and attach the center lid accent shape.
NOTE that because of the "wrap" allowance around
the box tray portion walls, the central portion is
wider (back side to flap side) than it is tall (bottom
side to top side), so this shape needs to be
oriented correctly - long direction toward flap.


 31. Position and attach the under flap
build up shape by aligning the matching edges
with the main flap. Take dare to line up the latch
hole so that the closure will work properly.
 32. Position and glue in place the metal
washers that will attract the magnet inside the front
wall.

 34. Position the lid so that the "back" hinge end
is lined up with the left side tray panel, with
the bend of the lid seated at the top of the wall.


 35. Layer the shapes as shown,
left to right, onto the contrast base,
one by one, flattening with weight
during drying process to help it stay flat.

 Position one bolt stack in each of the circle
positions, and glue in place.


 This view shows the Victorian key
hanging from a metal chain on the "back"
side, with a glimpse of the stitched handle
with brackets on the top, ribbon cluster
tied to it.
A tag cut from printed paper was also
attached to the opposite end of handle.
Metal feet were attached to bottom.

For the TRAY portion assembly, A-F, N & O
A box base
B "front" (right side) wall with accent overlay
C magnet placement guide panel
D "back" (left side) wall with accent overlay
(NOTE that the accent overlay actually
is attached to the back panel of the LID
E "top" (side wall) with accent overlay
F "bottom" (side wall) with accent overlay
G lid main shape
H flap add-on with accent overlay
I center lid overlay J flap underside build up (4)
K flap underside cover
L lid underside guide build ups (3-4 left; 3-4 right)
M lid build up (2-3) N bottom cover
O rim accent shapes (2 straight, 2 miter)
P hex nub (also key plate - separate file)

2. Prepare each of the wall sections by bending
back on all panel, tab and flange perforation lines.
3. Position and attach the outer wall overlay
panels on the outer panel portion of each
corresponding wall section.
Shown here: "top" wall and panel which
includes the punch holes to attach
the optional handle with end brackets
(separate file).

4. Identify the "front" side wall by locating
the arrow down triangle cut in the bottom flange.

on the backside of the outer wall portion
of the front wall (shown above in step 4).
The panel should be centered top to bottom,
and side to side.

washers in the circle cutouts.

7. Prepare the nub shape by bending back
on all the panel and "lid" perforations.

edge end over the side tab opposite.

over a 1/4" diameter wood dowel.

9. (If using dowel, move down so that top edge
aligns with bottom of lid hexagon.)
Bend top wall tabs inward, then bend
hexagon lid down into position and glue
in place, taking care to line up hex straight
edges with wall tab perforation edges.
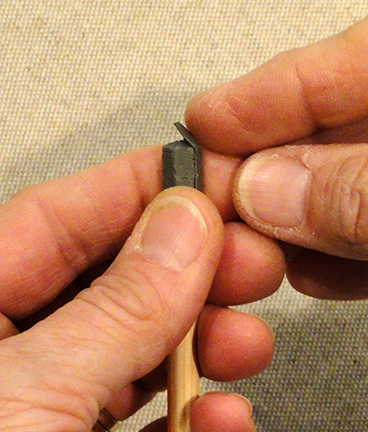
10. If desired, cut a short portion of the 1/4"
wooden dowel that matches the nub tube
height, and insert into the nub tube, glue in place.

11. Insert the nub (back to front) through
the hexagon opening in the front panel,
push through to bottom tab lines.
Bend tabs outward and glue in place on
backside of wall panel.

Here is the front panel with nub exposed.

12. Identify the front edge of the box base square
by locating the tiny 'F' cut.

13. Position and insert the bottom tabs of
front wall into the front slots, push in completely . . .

. . . then bend tabs toward center on
backside of base panel, and glue in place.
14. Repeat this process for the opposite
"back" wall panel.

15. Follow similar process to insert the bottom
tabs of "top" and "bottom" panels into
corresponding edge slots, bend tabs and glue
in same manner as front and back wall panels.

16. Form the walls by bending up two adjacent walls
into perpendicular positions, and insert tabs (top or bottom)
into corresponding slots in adjacent panel (front or back).

Bend tabs outward on the backside of wall panel,
and glue in place.
17. Join all four corner seams in the same manner.

18. Bend and wrap "front" wall section over,
with "rim" area at top of box tray, with bottom
tab flange wrapping around bottom base edge
and glue in place.

NOTE that it may be helpful to use a shaft tool
like the one shown here, inserted in between
the walls and behind the tab flange to provide
a "press-against" surface to help join flange
securely.
19. Repeat for the opposite "back" wall.

20. Repeat the process for the "top" and "bottom"
walls, wrapping the rim portion over the top
of the end of front and back walls, forming
the miter "seam".
(Apply a dab of glue under the miter edge.)

Continue wrapping the wall bottom flange tab
at box base edge, while at the same time
tucking the side long tab behind the adjacent
wall, and glue all tabs in place.

22. Position and attach bottom cover in place
to hide the tab construction.

23. Position and attach the rim accent shapes,
placing straight end strips first, then miter end
strips to overlap straight ends.

24. Bend the flap shape back on the perforation.
Position and attach the flap accent shape
over the flap main shape.
25. Position the main lid straight edge to overlap
the flap assembly to flange tab perforation line,
and glue in place.
IMPORTANT:
Steps 26 thru 33 show the LID assembly,
including joining the add-on flap.
Because paper thickness may affect how the LID
fits onto the TRAY, review the intervening steps,
then complete Steps 31-33 NOW.
SKIP ahead to Step 34 to test how the LID
fits over the TRAY with hinge end wrapped
on left side, FLAP placed in final position
with NUB within hole, then glue together
LID main and FLAP only.
Continue to work on LID alone to
complete Steps 26-30, then attach LID
hinge end panel as instructed in Step 34.

NOTE that because of the "wrap" allowance around
the box tray portion walls, the central portion is
wider (back side to flap side) than it is tall (bottom
side to top side), so this shape needs to be
oriented correctly - long direction toward flap.

27. Prepare the under-flap guide build up shapes
by layering and gluing together one left guide
with 4 shapes for left,
and one for right (interchangeable).
NOTE that when preparing any build up shapes
in this design (or others prepared by SnapDragon
Snippets), it will be helpful to use a flap weight
placed on top of the glued-up stack to help keep
it flat while the glue dries. Here, a fabric-wrapped
cast-off free weight is pressed on top to help
it dry and avoid warping and curling. Many other
household objects can accomplish the same thing.

28. Layer and glue together the three lid build up
shapes, using a heavy flat weight to press the layers
while the glue is drying.

29. Position and attach the under-lid guides
by aligning the outer corner edges with corner
cut marks still visibly on the lid's underside.

30. Layer and glue together the three under-flap
build up shapes, using flat weight to assist
during the drying process.

build up shape by aligning the matching edges
with the main flap. Take dare to line up the latch
hole so that the closure will work properly.

washers that will attract the magnet inside the front
wall.

33. Position and attach the under-flap cover exactly
on top of the under flap build up, concealing
the magnet stack and washer recesses.

is lined up with the left side tray panel, with
the bend of the lid seated at the top of the wall.

It will also be helpful to check that the flap
wraps to allow the nub to fit into the hole opening.
Adjust if necessary, then glue in place securely.

Here is the box in its completed form,
ready to decorate, if desired.

DECORATIVE KEY PLATE
35. Identify and cut the shapes required:
(top) bolt head punch circles (8 x 2)
(l to r) contrast base, main base, inner frame,
outer frame

left to right, onto the contrast base,
one by one, flattening with weight
during drying process to help it stay flat.

36. Stack and attach together 8 punch circles
for two dimensional bolts.

positions, and glue in place.

Here is the completed key plate.

Position the key plate on the box flap
with the open circle centered over
the corresponding hole of the flap.

Embellish the box as you desire.
Shown in this image is the front with printed panel
and cutouts, metal corners, fabric flower, stud swirl
and more.

hanging from a metal chain on the "back"
side, with a glimpse of the stitched handle
with brackets on the top, ribbon cluster
tied to it.
A tag cut from printed paper was also
attached to the opposite end of handle.
Metal feet were attached to bottom.

Wow! This is a beautiful project!!
ReplyDeleteThank you for your kind words.
ReplyDeleteMade this one too. I used Graphic 45's Halloween in Wonderland cause I thought it matched the box, key and lock perfectly. Such an awesome box :-)
ReplyDeleteWould love to see your work. Hope you'll be sharing on the SVG Attic Blog sometime soon (or are you waiting until closer to Halloween?).
Delete