
Detailed folk-style figure of Santa's favorite
lady,
wearing festive dress and lacy pinafore
presenting a swag of gingerbread
men cookies,
on an arched "iced gingerbread" base.
Highly detailed
and including many
small cut shapes which layer onto
face & hands fleshtone base.
Arched base has back panel with
upper perforation
that allows it to hinge back to reveal message space.
Fits
into a 5x7 envelope.
ASSEMBLY:
1. Identify and cut the shapes:
A body silhouette base (shows thru face, hands)
with thumb tiny shapes near hands
B dress trim base C dress main
D card front with zigzag icing trim
E card back base (with perforation near top)
F eye contrast (white) with tiny eyes (blue)
G holly leaves and berries left & right accents for hair
H hair base and hair accent
I face accents: nose overlay, cheeks,
mouth, spectacles
J sleeve overlays left & right
K pinafore overlay with strap zigzag &
berry dot accents
L collar ruff
M buckle, belt, pinafore apron
N shoe assemblies left & right;
buckle, shoe, shoe base (shows thru as heel),
shoe silhouettes (shows thru as hose)
O cookies rope
P gingerbread men cookies:
base, front, eye raisins, icing buttons,
red bowties


 13. Position and attach sleeve shapes
over arm portions of figure assembly.
NOTE: foot/shoe units will not be attached
until figure unit is placed onto card front.


 18. Position foot/shoe units at center
bottom edge of figure, and attach in place.
19. Position and attach the "rope" that will
hold gingerbread men cookies.

 21. Position and attach "thumb" shapes at upper/outer
edges of figure's hands.
22. Position and attach cookies along rope,
centering the first cookie, then positioning
side cookies evenly on left and right.


1. Identify and cut the shapes:
A body silhouette base (shows thru face, hands)
with thumb tiny shapes near hands
B dress trim base C dress main
D card front with zigzag icing trim
E card back base (with perforation near top)
F eye contrast (white) with tiny eyes (blue)
G holly leaves and berries left & right accents for hair
H hair base and hair accent
I face accents: nose overlay, cheeks,
mouth, spectacles
J sleeve overlays left & right
K pinafore overlay with strap zigzag &
berry dot accents
L collar ruff
M buckle, belt, pinafore apron
N shoe assemblies left & right;
buckle, shoe, shoe base (shows thru as heel),
shoe silhouettes (shows thru as hose)
O cookies rope
P gingerbread men cookies:
base, front, eye raisins, icing buttons,
red bowties

2. Position and attach eye contrast strip
behind eye cutouts.

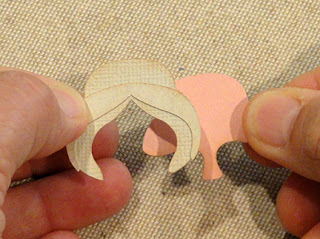
3. Layer hair base and overlay and attach to each other.
Position hair unit over nose overlay, matching
edges that align, and attach surfaces that touch.

4. Position and attach hair/nose unit on body base
as shown, matching portions of head and hair
contours that align.
5. Position and attach dress trim overlay
on body base, matching the edges that align.

6. Assemble the holly & berries hair accents
by first layering the smaller leaf accents onto
the larger silhouette bases, and gluing in place.
Then position and attach double berry base (left)
and finally single berry accents.

7. Position holly hair accents over assembly
where edges indicate, and attach.
Position and attach tiny eyes inside eye cutouts.
Position and attach mouth below nose edge,
cheek circles to each side of nose shape.
8. Position and attach spectacles at nose bridge.

9. Position and attach: pinafore over dress unit,
belt and collar over pinafore or dress where
edges match, "apron" over pinafore skirt
just below belt.

10. Position and attach the dress/pinafore
unit over the body/base unit.

11. Position and attach the pinafore straps
details (zigzag trim, berry dots), belt buckle.

12. Prepare hose/shoes, buckle units as shown:
a) layer shoe (green) shape over heel layer (brown;
b) position shoe/heel unit over hose shape (lt. gray),
then add buckle.
Complete left and right foot/shoe unit.

over arm portions of figure assembly.
NOTE: foot/shoe units will not be attached
until figure unit is placed onto card front.

14. Position and attach zigzag icing onto
card front.

15. Prepare the card back shape by bending
forward the top portion above the perforation.
16. Position card back behind card front,
align all edges, then attach the top "hinge"
portion to front card backside.

17. Position and attach the figure unit
over the card front, matching the head shape
of figure to the head shaping at top of card front.
Make sure figure is straight and perpendicular
to the bottom straight edge of card.

bottom edge of figure, and attach in place.
19. Position and attach the "rope" that will
hold gingerbread men cookies.

20. Prepare three gingerbread men cookies
as shown:
a) center and attach body front onto
body base
b) position and attach raisin eyes,
body buttons, bowtie

edges of figure's hands.
22. Position and attach cookies along rope,
centering the first cookie, then positioning
side cookies evenly on left and right.

Here is the completed card.


This is just beautiful, everything is so detailed. I am in awe of all that you do.a very talented lady
ReplyDeleteVery cute !
ReplyDelete