

Dress up the banquet table (or other events)
with cards that have space below printed name
to add a sentiment.
Includes two styles of place cards: simple top fold,
and wrap-to-back base with
point that tucks
into back slot.
Two styles include print & cut narrow black frame
rectangle or arched rectangle.
Give the cards an "embossed" look,
either by preparing the included "jig"
that will hold the printed card in place
while embossing the frame with stylus tools.
Card face measures approx. 4.25" x 2.75".
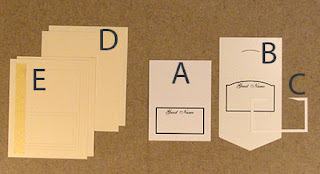
ASSEMBLY: 1. Identify and cut the shapes:
A (printed & cut) simple front-back card, rectangle frame
B (printed & cut) tent latch arched rectangle frame
C "faux" emboss frame for arch printed frame card
D embossing "jig" base (2)
E embossing "jig" frame, interior shapes (2 sets)
NOTE: use a piece of temp tape such as masking
tape shown here to keep the interior shapes together
until needed to be glued inside the frame
(see step 9).
 C. Position the "Print & Cut" blank card
over the printed name, centering the card,
and placing the name squared with the printed frame,
and as high as desired.
Use a lightbox set up (like a window) to help
with alignment, then use temp tape
(masking tape used for this sample)
to secure the card in place.
NOTE: the lower remaining portion of the frame
will be left for sentiments written by guests.


 3. For "real" embossing, skip to step 6.
For "faux" embossing, position the frame cutout
offset evenly around the rectangle (for rect. style)
or evenly around the sides and bottom rectangle
and with appropriate edges matched up
at printed arch edges (for arch style),
and glue in place.
 4. Prepare the tent style card by bending back
on all horizontal perforation lines.
5. Bend the tent style card into shape as shown,
wrapping the bottom back pointed panel
around the back panel lower edge,
tucking the point into the arch slot.
(Also apply a pair of glue dots - one at each
side corner - for added security.)
 Here is the completed tent card style from back . . .


 7. Layer and glue together the two outer frame
shapes (use weight as described in step 6).
 8. Position frame over base, align edges,
and glue frame in place (use weights to flatten).
 9. With interior large rectangle, narrow frame,
and interior small rectangle joined/arranged
with a piece of temp tape (masking tape),
apply adhesive to the edges of:
small interior rectangle
larger rectangle with frame widow cut out
then . . .

 . . . to make sure it is seated snugly.


A (printed & cut) simple front-back card, rectangle frame
B (printed & cut) tent latch arched rectangle frame
C "faux" emboss frame for arch printed frame card
D embossing "jig" base (2)
E embossing "jig" frame, interior shapes (2 sets)
NOTE: use a piece of temp tape such as masking
tape shown here to keep the interior shapes together
until needed to be glued inside the frame
(see step 9).

2. Follow the regular procedures for the Silhouette
Cameo "Print & Cut" card of choice.
(Find a tutorial for this process HERE.)
If you understand how, prepare and position
the "guest names" for each card being cut.
If you do not have understanding or
equipment ability to accomplish
the name preparation with the "Print & Cut" process,
follow these steps:
A. In a regular word processing program such as
Microsoft Word or equivalent, set up the names to be
printed, adjusting selected font and type style, then
audition name(s) by printing in the approximate center
of regular "waste" copy paper sheet.
B. Set up one name in the approximate center of
"carrier" copy paper sheet, and print.

over the printed name, centering the card,
and placing the name squared with the printed frame,
and as high as desired.
Use a lightbox set up (like a window) to help
with alignment, then use temp tape
(masking tape used for this sample)
to secure the card in place.
NOTE: the lower remaining portion of the frame
will be left for sentiments written by guests.

D. Place the carrier with attached card
into the paper tray as if it were a blank sheet,
making sure that the printing will happen on
the side that holds the card.
For this Canon printer, the carrier sheet
is placed face down and top first.

E. Print the name in the same fashion as
was done to produce the carrier sheet.
Shown here is the carrier sheet as it landed
in the "out" tray of the printer.
The place card is now ready to emboss
or attach "faux" embossed frame.

For "faux" embossing, position the frame cutout
offset evenly around the rectangle (for rect. style)
or evenly around the sides and bottom rectangle
and with appropriate edges matched up
at printed arch edges (for arch style),
and glue in place.

on all horizontal perforation lines.
5. Bend the tent style card into shape as shown,
wrapping the bottom back pointed panel
around the back panel lower edge,
tucking the point into the arch slot.
(Also apply a pair of glue dots - one at each
side corner - for added security.)


. . . and as viewed from front.

EMBOSSING TUTORIAL
6. Layer and glue together the two base rectangles.
NOTE: use a large flat weight such as heavy book
volumes to help keep the layered shapes flat
during liquid adhesive curing/drying time.

shapes (use weight as described in step 6).

and glue frame in place (use weights to flatten).

and interior small rectangle joined/arranged
with a piece of temp tape (masking tape),
apply adhesive to the edges of:
small interior rectangle
larger rectangle with frame widow cut out
then . . .

. . . position interior unit inside frame and
apply pressure . . .

Use blade tool to lift the small frame,
and remove.
(This is the area that will be pressed down
as embossed detail.)

10. Position printed and cut card face down
inside the jig frame.

11. Use a rounded tip stylus to press down the area
within the frame area to cause paper to round
downward and create recessed frame.

The stylus set used for this sample has several
different gauge tips. You may wish to begin with
the largest available to start the indentation,
then work toward the smallest to get more definition.

Here is the completed embossed frame
place card.

Two styles of place cards, showing
(left) embossing and (right) faux embossed frame.

No comments:
Post a Comment