
Surprisingly easy to assemble, these top fold action
cards
have internal ‘arms’ mechanism that holds accordion-folded panel.
Lift card
front to open and see panels spread wide.
Offset accent shapes provide scope to
use coordinated prints and panels.
Large rectangle card, above, measures
approx. 4.5" wide x 5.75" tall when closed
(requires 12x12 cutting capacity).
It includes special patchwork classic star optional panel
which can decorate pop out panels if desired
(four panels can alternately be decorated
with stamps
or sentiments, or as a story board for specialty prints).
Small rectangle card, below, measures
approx. 3.5” wide x 4.5” tall when closed.
Add embellishments, dimensional foam to
front accent panels, then tie to close
with
encased ribbon.

Shown here below is the small rectangle card using
the included, optional front accent panel that may be
suitable to cameo a "postcard" style panel
from specialty print paper.
(This one is from "Authentique" Twilight 8x8 bundle.)

These two cards have nearly identical assembly steps.
The large rectangle card will be thoroughly described,
with the basics of smaller card shown after
beginning with Step 18.
The large rectangle card will be thoroughly described,
with the basics of smaller card shown after
beginning with Step 18.
ASSEMBLY: 1. Identify and cut the shapes:
A main card base B card front panel (2)
C front accent base D front accent panel
E pop mechanism shape F interior accent panel
G four-panel "arms" base strip
H patchwork star accent 'squares' for arms (4)
(plain whole squares are also included in file)

2. Prepare the shapes by bending on perforations:
a. 'arms' four-panel strip by bending
at the perforations in accordion style.
NOTE: in its final configuration, the folds
will be re-directed to form 'W', but to begin,
the 'M' form is best.


center perforation - (mountain fold), and also . . .

perforation lines.

3. Now configure the mechanism so that is can
fold up as needed, by assisting the cross fold
indicated here . . .
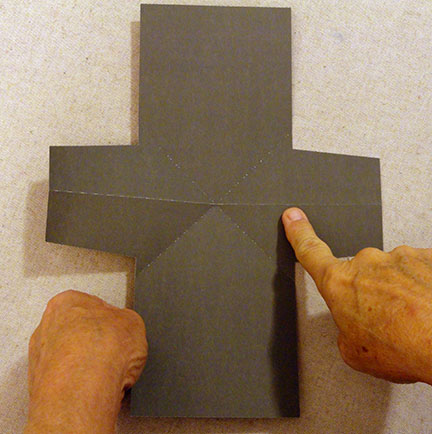
. . . to fold inward directly toward center, as . . .

at each side to continue to move in to meet
at center.

When the mechanism is fully closed, as shown
in this frame, it resembles a classic house block shape.
Apply ample pressure through the layers along
the areas where the perforation edges are laying
underneath. Press from one side, then reverse
the folded shape and apply same pressure again.

Also, apply pressure along the 'crest' diagonal
perforation edges to ensure a crisp crease.

4. Audition the position the mechanism in its
folded form on the back card base panel interior
face, with the point tip exactly at the center of
mid perforation line, with bottom corners offset
within base edges.
5. Apply adhesive (double-stick permanent hold
tape is recommended over liquid here) to the first
face of the folded mechanism, then re-position
on the interior back face of card base as shown above.
NOTE to ensure that the point
self-adjusts to move down slightly to allow the card
to fold appropriately and close, wait to apply pressure
to permanently affix mechanism in place until
the card can be closed, then apply pressure.

6A. Apply adhesive tape to the front
of the mechanism . . .


for best match . . .

. . . and apply pressure through layers to affix.

Demonstrate how the mechanism now installed
functions: lift the card front . . .


. . . they open fully to lay nearly flat on each side.
6B. Position the interior accent panel, slightly offset,
on the lower portion of the mechanism, as shown.

7. Position each of the accent squares onto
a segment of the 'arms' strip, centered.

8. Position the arms assembly to prepare to attach
in place on the arm extensions of the mechanism.

The center fold should be aligned at the intersections
of the mechanisms' perforation lines, and also . . .

the horizontal perforation line. Pointing fingers
in this frame show that the angled margins at
the inner end of arms should be equally revealed
to help indicate the centered position.

of the right arm, keeping glue ONLY about 3/4
in from right end as shown here.

un-adjusting, re-check that it is still squared up,
then apply pressure to affix in place.

11. Fold the left half of strip out of the way
to repeat the 3/4 only glue application to
the LOWER SECTION of the left arm, as shown.

12. Un-fold the panels strip to position and apply
pressure to the arm end, checking
for perpendicular alignment in relation to
the card base edges.

13. Bend the arms in very slightly to re-configure
the bending direction of the panels to the 'W' form.
Continue the bending in, to direct the unattached
arm ends: DOWN and TOWARD CENTER for
right arm, and UP and TOWARD CENTER
for the left arm.
In this frame, those unattached portions are
being fingertip-grasped to pull them in
the directions outlined above, until . . .

. . . the panel begins to ease itself into folded
position with panel squares beginning to stack . . .

together to enclose the squares.
NOTE: it may take a little patience to fold
the initial time, but after that, it will fold as designed.

Apply pressure through all layers to ensure
that everything inside as locked into best position.

14. Cut a 22-24" length of ribbon, locate the center
of both ribbon and card, then . . .

. . . glue the ribbon in place within approx. 1/4"
of each side edge.

Position and attach the backside accent shape,
enclosing and affixing the ribbon between.

15. Use dark colored foam squares to add dimension
to the next panel-attachment steps.
Or, if preferred, set up a multi-squares cutting
job on your die cutter. Those used in this example
are approx. 1/2" square. Cut approx. 9 per 1/8"
thick dimensional square (multiples of 9 for
each square desired).

Layer and glue the squares together, taking care
to line up the edges as precisely as possible,
and apply pressure to the stack.
(If possible, press the stacks under a heavy weight
while they dry completely.)

behind the accent panel/base, then . . .

. . . position and attach the accent panel onto
the front of card.

17. Finish the card by tying the ribbon and
trimming the ends.

Add jewels, nail head studs, etc, as desired.
Here is the sample completed card
ready to give.

18. For the Small Rectangle card version,
Follow steps 1-16 in this tutorial,
substituting the fussy-cut portrait mini postcard
as the front accent panel. Then complete
step 17.
Identify and cut the shapes:
A card base B front and back accent panels (2)
C front accent base D front offset accent panel
E optional fussy-cut accent panel
F mechanism for twist and pop
G interior accent rectangle
H 'arms' panel with 4 sections
I 'arms' accent shapes (4)

19. Position and attach the front accent panel
onto the front accent base.

Complete the card as described in previous steps.

Optional: fussy-cut the desired panel,
adjust size if necessary to cut accent base panel,
then position and attach.

As reference, this is the "Authentique"
Twilight 8x8 bundle from which the panel was cut.

the specialty paper panel.

No comments:
Post a Comment