
Vintage-style angular scuttle has low panel
front,
curved top and upper sides, hexagon based handle,
with reinforcement
overlays for strength and
accent panels for creative designing.
Sized to
feature the printed panels from
Graphic45 Children's Hour Collective monthly
(model
is shown with November).
Sturdy enough to hang on a wall as
a floral sconce,
or
use as a "horn of plenty" style centerpiece.
Measures approx. 14.25" tall (including handle)
x 5.5" wide x 2.25" deep
Measures approx. 14.25" tall (including handle)
x 5.5" wide x 2.25" deep
ASSEMBLY: 1. Identify and cut the shapes.
Here are the structural (with some accent) shapes:
A main hull back with attached sides
B back top rim arc overlay
C duplicate back shape (NOTE: duplicates are for strength)
D left & right duplicate side shapes
E side rims left & right
F hull bottom with attached front
G handle interior brace "box" H brace top cover
I bottom duplicate shape with accent overlay
J front duplicate shape with accent overlay
K handle with section accent overlays
L handle interior struts 1, 2 & 3 (for strength)
M handle collar (for interior bottom panel)
N handle bottom hex offset accent overlay
O optional end cap (replaces N)
P back main panel accent with rim arc,
outside side accent panels with rim arcs
NOT SHOWN: side interior accent overlays


ABOUT THE GRAPHIC45 PRINT PANELS:
The beautiful printed panel card stock sheet
used for this decorated scuttle is part of a year-long series
featuring unique artwork for each of the 12 months.
This project features "November", shown below.
The format and layout for each month is identical,
so the panels rotary cut from the sheet to decorate
this scuttle project could be substituted with those
from any of the other months.
(The scuttle can likewise be created without using
the Graphic45 print papers, in any creative
fashion that can be imagined!)


 . . . so that the side panels will be able to bend forward
without interference from the attached panels.

 10. Add accents to the side accent panels:
assembled plaques, layered left & right leaves.


 . . . turning the assembly face down on a cutting surface
and carefully trimming away excess floral print strip
to match hex handle opening edges exactly.

 . . . position and attach the trimmed stamp panels
from the G45 print panel between the pairs of
guidemarks, and centered top to bottom.

 16. Position and attach the front . . .


 18. Position the collar on the backside of
the bottom panel, taking care that the hexagon
perforation lines/folds line up as precisely
as possible with the hex opening of
the bottom panel, and attach in place.


 22. Form the handle shape into a tube to
overlap straight back edge over back edge flange
to perf line, adjust top to bottom, and join seam.


 . . . slide shape #3 (no cut symbol on shape)
up at center of one/two assembly.
 Shapes should have top and bottom edges
even in this six-arm star configuration.
Each tip will fit snugly into the angles of
the hex handle.


 27. If preferred, omit the bottom hex accent shape
shown in place in previous photos, and instead
prepare the bottom end accent cap wrap
by bending petal tabs back, then positioning
over the handle end, bend tabs up into position
and glue in place.

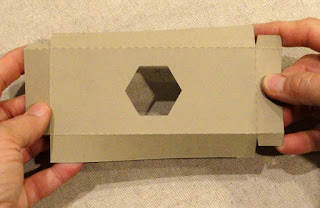 29. Form the shape into a tray to align side end
seams with end corner tabs, and join all four
corner seams.

 Push handle end through reinforcement collar . . .


 . . . and bend top tabs back and apply pressure
to move handle downward, if necessary, so that
tab perfs rest appropriately at top-of-tray level.
Use a piece of masking or other temp tape to
hold the handle in this position in relationship
to outer bottom panel.


 . . . replace brace as before, flush against
walls and bottom panel, and apply pressure
to attach back and side walls.


 34. Insert and attach the interior brace cover
on top of the brace tray to cover the handle opening.


 . . . center and attach the print panel cutout
on top of the stack.
NOTE: When preparing stacked shapes that are
attached with liquid adhesive, use a flat weight
object such as the fabric-covered re-purposed
free-weight shown here, to help keep the stack
flat and help prevent warping or curling,
until it is completely dry and NOT cool to the touch.


Here are the structural (with some accent) shapes:
A main hull back with attached sides
B back top rim arc overlay
C duplicate back shape (NOTE: duplicates are for strength)
D left & right duplicate side shapes
E side rims left & right
F hull bottom with attached front
G handle interior brace "box" H brace top cover
I bottom duplicate shape with accent overlay
J front duplicate shape with accent overlay
K handle with section accent overlays
L handle interior struts 1, 2 & 3 (for strength)
M handle collar (for interior bottom panel)
N handle bottom hex offset accent overlay
O optional end cap (replaces N)
P back main panel accent with rim arc,
outside side accent panels with rim arcs
NOT SHOWN: side interior accent overlays

Here are the additional accent decorations,
including fussy-cut panels from Graphic 45
November Children's Hour Collective monthly:
Q main interior panel decoration: framed panel
with divided edge border leaves
R stamp frames (3) for hull front panel
S black/cream floral strip for hull outside bottom
T "Autumn" and "Harvest" panels with
shaped bracket shapes
U left & right maple leaves with offset bases
V offset base plaque build up shapes (4-5)
plus front accent shape
W "November" word framed panel
X tag build up shapes (3-4) plus front accent
Y "November" calendar panel

The beautiful printed panel card stock sheet
used for this decorated scuttle is part of a year-long series
featuring unique artwork for each of the 12 months.
This project features "November", shown below.
The format and layout for each month is identical,
so the panels rotary cut from the sheet to decorate
this scuttle project could be substituted with those
from any of the other months.
(The scuttle can likewise be created without using
the Graphic45 print papers, in any creative
fashion that can be imagined!)

2. Prepare the main hull section (back/sides)
by bending sides forward on perforation lines.
Prepare the bottom/front section by bending
back on all perforation lines.
3. Align the center bottom edge of main hull
to overlap the back flange (next to the bottom
panel which includes the hex handle opening)
and join the seam.
NOTE: in this image the main hull is face down
and the bottom/front panel is face up.
This will allow faces of both shapes to be seen
from the front of finished project.

4. Prepare the "front" hull accent panel (which will be
inside the scuttle) by aligning and attaching
the top accent arc rim to accent panel.
Prepare and attach the main G45 panel
centered on back panel - below the hang hole
far enough to allow later attachment of
"November" plaque.
Position and attach the leaf strips on each side.

NOTE: if using liquid adhesive that may cause
the paper to warp, curl or otherwise become misshapen,
consider using a heavy, flat weight such as this
smooth surface wood plank or equivalent,
placed over the shaped being glued up.

5. Position and attach the top rim arc to the
duplicate shape inside back panel.
6. Position the back panel assembly front Step 4
onto the duplicate back panel with bottom
and side edges aligned.
7. Position and attach the duplicate back panel
with accent panel onto the main hull shape
centered and with top arch edges aligned.

8. Position and attach the interior side accent shapes
onto the main hull side panels, so that bottom edges
align (as indicated by pointing finger), and also
a tiny margin outward from the main shape bend line . . .

without interference from the attached panels.

9. Prepare the outer accents and duplicate shapes:
(top left = interior back duplicate shape, used in Step 6;
middle left = interior back accent shape, used Step 4)
outer side duplicate panels with rim shapes,
outer side accent panels with rim shapes,
side plaques with cut to size "Autumn" & "Harvest"
G45 print panels.

assembled plaques, layered left & right leaves.

11. Attach side accent panels to duplicate side panels,
lining up bottom and back edges (prepare left & right).
12. Position and attach the side panel assemblies
to corresponding outer side panel of main hull.

13. Prepare the bottom accent panel by centering
and attaching the tonal floral print panel, then . . .

and carefully trimming away excess floral print strip
to match hex handle opening edges exactly.

14. Identify the dash cut guide marks
on the front panel, then . . .

from the G45 print panel between the pairs of
guidemarks, and centered top to bottom.

15. Position and attach the bottom and front accent
panels onto the corresponding duplicate panels.


. . . and the bottom duplicate/accent panels
onto the main hull assembly.

17. Prepare the handle collar support attachment
collar by bending the interior tabs up at perf lines.

the bottom panel, taking care that the hexagon
perforation lines/folds line up as precisely
as possible with the hex opening of
the bottom panel, and attach in place.

19. Bend the bottom panel forward to align
side flange bend/perforation line under the
side panel bottom edge and complete seam.
Repeat for opposite side.

20. Prepare the handle main shape by bending
back on the vertical perforation lines,
bottom tab and hex bottom cap line.
Bend forward on the top tab perf lines.

21. Position and attach the wedge accent shapes
onto the handle sections, toward the bottom,
with equal offset margins at sides and bottom.
Also position and attach the bottom hex offset
accent shape on the bottom hex cap.

overlap straight back edge over back edge flange
to perf line, adjust top to bottom, and join seam.

23. Prepare the handle strut supports by first
identifying the shapes by number as indicated
here by pointing finger.

24. Slide shape #2 up into place at center
of shape #1, then . . .

up at center of one/two assembly.

even in this six-arm star configuration.
Each tip will fit snugly into the angles of
the hex handle.

25. Insert the top/narrow end of strut assembly
into the bottom opening of the handle tube . . .

. . . and slide into position fully so that top is
even with perforation lines of top tabs.

26. Bend bottom tabs inward, bend bottom cap
into position to align edges with handle body edges
and glue in place.

shown in place in previous photos, and instead
prepare the bottom end accent cap wrap
by bending petal tabs back, then positioning
over the handle end, bend tabs up into position
and glue in place.

28. Prepare the handle interior brace tray shape
by bending back on all panel and tab perf lines.

seams with end corner tabs, and join all four
corner seams.

30. NOTE the brace with handle positioning and
attachment is a several step process.
First, insert the handle top end through bottom panel.


. . . until the handle is snugly in place to a position
that is approximately the same offset margin
above the accent shape.

Next, on the inside, position brace tray with handle
tabs inserting through opening . . .

to move handle downward, if necessary, so that
tab perfs rest appropriately at top-of-tray level.
Use a piece of masking or other temp tape to
hold the handle in this position in relationship
to outer bottom panel.

Carefully move brace out of the way.
Apply glue to all brace tabs that can be reached,
and attach to the handle barrel.
When the tabs are secure, remove tape
that was holding handle in position.

Apply adhesive to the back and side walls
of brace, then . . .

walls and bottom panel, and apply pressure
to attach back and side walls.

31. Bend the handle tabs back and glue
to top of brace tray.
32. Bend the front panel into position
to tuck the side flanges onto inside of hull wall,
and between brace and side wall.

33. Bend front panel top flange back
and glue in place.

on top of the brace tray to cover the handle opening.

35. Prepare the November plaque by layering and
attaching the build up duplicate shapes,
taking care to align the edges precisely.

Position the "colored" accent panel on top of
the stack, then . . .

on top of the stack.
NOTE: When preparing stacked shapes that are
attached with liquid adhesive, use a flat weight
object such as the fabric-covered re-purposed
free-weight shown here, to help keep the stack
flat and help prevent warping or curling,
until it is completely dry and NOT cool to the touch.

Attach foam dimensional squares to lower back
of stack, then . . .

. . . position at top interior of scuttle as shown.

36. Repeat the plaque prep step above to
prepare the tag: layer and attach build up shapes . . .

. . . position and attach accent top layer, and . . .

. . . trimmed-to-size calendar panel on top.

Thread a loop of ribbon or twine through
tag hand hole, then attach at top of handle.
It may be helpful to apply double-stick tape
to hold tag in desired position on handle.

Here is the completed decorative hull.

And a front view.


