
Elevate the
"Santa Mail 3D Box" project for visibility
and visual impact by
assembling and attaching
this platform stand with pair of post legs.

Two tier
wide platform has side and top panel accents,
with optional post gap-crossing
emblem bracket
featuring "S" monogram (for Santa).
Box-style top
platform duplicates the base "box"
of Mail Box design, with post
openings
and interior collar supports.
Stand post paper shapes wrap snugly
around
1.25" diameter wood dowel pieces cut to size
for stand strength
(which add weight for stability).
Base and legs measure approx.
5.5" tall
x 7.25" wide x 4.375" deep.
(Mail Box on pedestal measures approx.
16" tall.)
ASSEMBLY: 1. Identify and cut the shapes:
AA reinforcement support struts for platform box
(only 2 of non-tab shape is required)
BB cross brace with emblem
S main platform shape with accent overlay
T post anchor collar build up (2 sets of 8 each)
U main platform boxing strips with accent overlays
V main platform base build up (6-7) with top overlay
W second platform shape with boxing add-on strip
X post shapes (2)
Y top platform cover (for mailbox interior)
Z top platform "box"


2. Layer and attach the base shapes, with contrast
top and bottom shapes as desired, taking care
to match up cut edges precisely. If using liquid
adhesive, it is highly recommended that . . .


 5. Position and attach the accent shapes
while the platform and boxing strips are flat.


 9. Bend the boxing ends into position to attach
each short segment to corresponding platform
edges as shown, tucking under the end tab
and attaching it to the boxing (attached) edge.
Complete attachment of both ends of
platform boxing strips.
NOTE: bottom of platform remains unattached
at this point of assembly.


 12. Bend the boxing top tab/flanges inward, then
bend the boxing walls into position with tabs
under the platform top panel, and attach each
segment in place. As final segments are positioned,
to be glued into place, tuck tab under
opposite straight edge and join the end seam.

 14. Position the 'X' support on the underside
of the platform next to hex openings
(so that extensions won't interfere
with insertion of posts in subsequent steps) . . .


 20. Push the dowel out of the post tube to
apply adhesive on ends, then re-insert fully
to attach tube to dowel.


 23. To assist with post connection to platform
assembly, prepare the petal (half) collars by bending
forward along petal perforation lines,
back along vertical section perf lines.
Apply adhesive to complete backside,
then position the collar half with tall portion
wrapping around the post, short petals joining
to the top of platform 2. Repeat for the second
half collar, and for both posts.


 . . . bend tabs outward and glue in place.


 32. Position cross brace approx. half way up
posts, with brace strip perforations bent back
and aligning with angles of post cover on both ends.
Glue together brace surfaces to post where they touch.


AA reinforcement support struts for platform box
(only 2 of non-tab shape is required)
BB cross brace with emblem
S main platform shape with accent overlay
T post anchor collar build up (2 sets of 8 each)
U main platform boxing strips with accent overlays
V main platform base build up (6-7) with top overlay
W second platform shape with boxing add-on strip
X post shapes (2)
Y top platform cover (for mailbox interior)
Z top platform "box"

NOT SHOWN in layout above: petal attachment collars (4)

and "aa" platform 2 support struts (2)

top and bottom shapes as desired, taking care
to match up cut edges precisely. If using liquid
adhesive, it is highly recommended that . . .

. . . this stack be pressed under a heavy flat weight
as shown here (with a different stack shape)
to help it remain flat and straight until dry,
and avoid warping or curling.

3. Layer the collar rings into two stacks, and glue together.
Press under a flat weight as described above
while liquid glue dries thoroughly.

4. Prepare the main base shape by bending
back on the "boxing" panel perforation lines
near vertical center.
NOTE that panel with slots is TOP of platform.
Also prepare the long and short boxing strips
by bending back on all flange and panel perf lines.

while the platform and boxing strips are flat.

6. Position and attach each of the anchor ring
stacks on the inside of platform shape,
taking care that hexagon interior opening
edges of each are lined up precisely.

7. Join the short boxing strip to the free end of
the longer boxing strip, so that the longest segment
is centered between two shorter segments
on each end.

8. Position the long segment on the outside center
edge of the platform main shape, align and adjust,
then attach flange under platform edge.

each short segment to corresponding platform
edges as shown, tucking under the end tab
and attaching it to the boxing (attached) edge.
Complete attachment of both ends of
platform boxing strips.
NOTE: bottom of platform remains unattached
at this point of assembly.

10. Prepare the second platform shapes by
bending back on panel and tab/flange perforation lines.
NOTE: some of the downward extensions may
appear to be tabs but are actually supports
and must NOT be bent.

11. Join the separate boxing strip end to
attached end by overlapping straight edge
to tab perf line.

bend the boxing walls into position with tabs
under the platform top panel, and attach each
segment in place. As final segments are positioned,
to be glued into place, tuck tab under
opposite straight edge and join the end seam.

13. Prepare the support struts by bending back
top and bottom flanges.
Orient strips so that center slot is upward on
one and downward on the other, then
slot the two together in an 'X' formation.
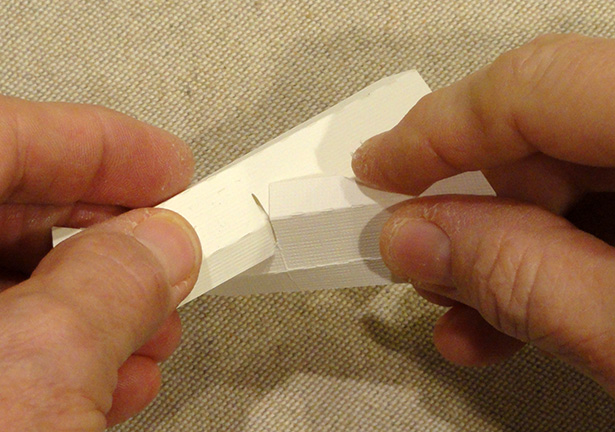
of the platform next to hex openings
(so that extensions won't interfere
with insertion of posts in subsequent steps) . . .

. . . and attach flanges in place.

15. Insert platform 2 tabs and supports through
corresponding slots on top panel of base platform
then underneath . . .

. . . bend the tabs only back and attach in place.
Support tabs that don't have perforations
should remain extended through interior space.

16. Bend the base platform edge flange tabs inward,
apply glue, then . . .

. . . bend the bottom panel into position,
and adjust edges to line up with boxing flanges,
as each is glued in place.
Use hex holes as access to help with attachment.

17. Prepare the post "cover" shapes
by bending back on each vertical perforation
and for each top edge tab.

18. Using the 1.25" diameter wooden dowel
as press-against shape, wrap the post shape
around to overlap straight edge over opposite
flange, snug the seam edges together so that
edge reaches the perforation line, and apply
pressure up and down the seam until secure.
Repeat to prepare two posts.

19. Measure the dowel lengths to cut to size
by bending top tabs back, pushing dowel end
to line up at top end, and marking bottom with pencil.
Cut a dowel length insert for each of 2 posts.

apply adhesive on ends, then re-insert fully
to attach tube to dowel.

21. Insert bottom (non-tabbed) end of post
through second platform hex opening . . .

. . . and through collar to bottom of platform,
then edge back a bit so that glue can be applied
to the thick edge of the collar build up.
22. Push post back into position and brace while
glue dries. Repeat for second post.

assembly, prepare the petal (half) collars by bending
forward along petal perforation lines,
back along vertical section perf lines.
Apply adhesive to complete backside,
then position the collar half with tall portion
wrapping around the post, short petals joining
to the top of platform 2. Repeat for the second
half collar, and for both posts.

24. Apply glue to the bottom of the platform,
then position, centered, onto top of base shape
and attach in place. HINT: it may be helpful
to place weights onto platform to assist with
pressure while this attachment is drying.

25. Prepare the top platform "box" by bending
back on all panel, flange and tab perforation lines.

Also push the hex interior tabs inward.

26. Prepare the collar platform supports by
bending back on vertical perforation lines,
bending top and bottom tabs outward.

27. Form the collar shape into a tube and
complete the side seam.

28. Position the collar over the bottom panel so that
hex opening edges align at platform hexagon
perforation array, then attach in place.
Repeat for second collar and hex opening.

29. Apply adhesive to the remaining collar tabs,
to the platform inner walls, then fold/close the box
fully and apply pressure to join box sides, collar tabs
to top, etc.
30. Position platform over top of posts and
carefully insert post tops through hex openings
(apply adhesive to hex opening tabs first)
until tabs are fully through, then . . .


31. Prepare the cross brace and emblem
using cut shapes shown here.

Layer the discs so that cutouts align precisely.
Layer 'S' upper overlay onto base.
Finally, position and attach disc assembly over
brace shape, 'S' centered over disc.

posts, with brace strip perforations bent back
and aligning with angles of post cover on both ends.
Glue together brace surfaces to post where they touch.

33. Apply glue to the platform walls.
Insert the completed mail box hull and dome assembly
over the top of the platform, slide down until
bottom edges of both are flush, then apply pressure
to attach securely.

Here is the completed mail box on its pedestal.


