
This
dimensional card can be the foundation for
original card creations with double
layered
offset accent panels which fold flat for sending as
a square card sized
to fit a 6x6 envelope.

With sides unfurled, the card has self-easel action,
with
vertical center panel where card elements
can be attached.
Opened flat, card
measures approx.
13.7” wide x 5.875” tall.

Consider using coordinated design
“kits” (separate designs)
that work well with this base, attached to center panel:
“Rocket Ship Over Moon" (shown as completed card above);

“Apron Grill King”,

“Fish Oval Ofishally Cool”.

ASSEMBLY: 1. Identify and cut the shapes:
A & B left & right base side panels with diagonal folds
C base center panel
D layer 1 of offset accent shapes for
sections of card base assembly
E layer 2 of offset accent shapes for
sections of card base assembly
(these fit inside the 'D' shapes

the card center panel, identify and cut these shapes:
F rocket offset base silhouette
G rocket main silhouette (shows as tail exhaust cone)
H & I side fin accents
J flame accents
K nose cone
L cockpit window pane and rim ring
M rocket hull
N circle accents O center end-view fin

on perforation line as "mountain" fold.
 Then bend on the straight perforation lines as

"valley" folds, taking care NOT to fold line beyond
the diagonal fold.
 Finally, re-fold the short portion of the diagonal fold,

to be a "valley" fold.
 4. Work the folds into the "closed" format by gently

bending inward . . .
 . . . to form this shape.
 Crease ALL folds to lock them into the shape.


Use a bone folder or equivalent, if you wish.
 5. Bend back the inward-edge tab on perf line.
 This is how the left and right base panels should look.
 6. Position and attach center panel to the side panel


tabs on each side of center panel.
 7. Prepare ALL two-layer accents by centering

layer 2 shapes on top of corresponding shape/size
layer 1 accent shapes, with even allowance all around.
 8. Position corresponding shape accent units into

the sections of the card base as defined by the perforation
lines of straight cut edges, with even margin
all around.

Here is the completed card base with accents
in position, in flat format.
NOTE that for the rocket decoration, a design
decision was made to use wavy "stripes" placed
on the diagonals to imply upward movement of rocket.

each side inward toward the center as previously
folded. At the backside, one inward rectangular
panel will fold first next to backside of center panel,
and second panel will fold on top of first panel.
 Here is the intermediary folding, and . . .
 . . . here is the completely folded card base.
 ROCKET ASSEMBLY


10. Position and attach the hull overlay onto main
body shape with corresponding edges matched.
Also position and attach side fins, nose cone onto
silhouette where edges match.

ring over pane circle.
 12. Position and attach window into hull cutout,
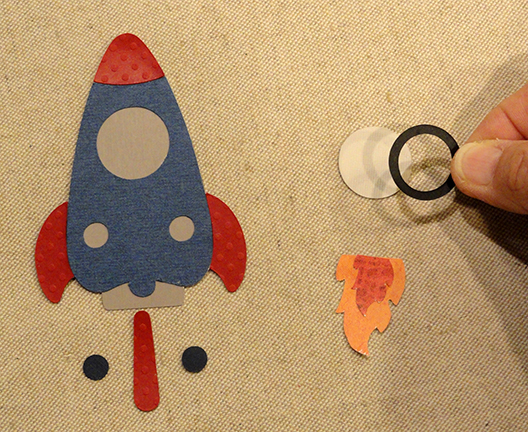
circle accents into corresponding recesses,
center fin on implied centerline, with bottom end
aligned at hull edge.
 13. Position and attach rocket assembly, centered
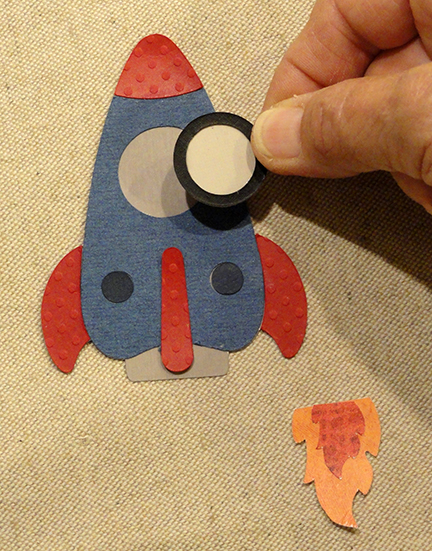
onto offset base shape. Position and attach
flames unit abutted to bottom of rocket base
shape, centered within flame echo shape.

liquid adhesive used for assembling has
thoroughly dried (to prevent warping or curling).
 14. Prepare the spikey arch with word cut outs

by positioning and attaching words phrase, centered
and on implied arch inside the bottom curved edge.
NOTE: if the "weeded" shape can be saved,
it can be used as a positioning guide.
First position guide over arch, then . . .
 . . . either lightly mark with pencil where lead & end letters

of each word should be positioned, or
inlay words into cut out spaces to glue to arch,
then carefully "peel" the guide away while keeping
letters in place.
 15. Position arch centered at top of center panel,

and rocket assembly below.
 Here is the completed rocket card.
 Countless other unique card designs can be completed


using the dbl diagonal folds base with color-coordinated
accent layers and other design elements such as frames,
florals, objects, etc. which are attached to center panel.


