Friday, August 11, 2023

Swirl Top Hex Boxes Leafy and Spiky

Adorn these gift box sides with designer paper print squares 
(design prints not included in either, separate file).
Gift boxes feature six top extensions that swirl closed 
to form leafy or spiky wreath. Contrast underside leaf shapes
 included to camouflage undesirable paper backside.
Leafy box includes half contour overlay for more decorative options. 
Tiny punch holes allow twine to thread through
to figuratively “cinch” box closed then tie 
with knot and bow. A fussy-cutting, view finder “frame” 
is included to help size the cameo squares 
(1.4” for leafy box; 1.7” for spiky box). 
Box compartment measurements:
Leafy approx. 2.25” tall 
with 3” x 3.25” base.  
Spiky approx. 2.125” tall 
with 3.22 long x 2.79” deep base. 

For reference, following are the designer panel
card stock sheets used for these projects
to fussy cut small print panels for outer walls:

Spiky Halloween gift box - 
Echo Park Spooky Journaling Cards SPO284009

Carta Bella Welcome Autumn Seasonal Squares
CBWA138010

ASSEMBLY: 1. Identify and cut the shapes:
SPIKY SWIRL TOP BOX
A main hull  
B opt. "petals" backside overlays (6)
C trimmed designer panels for walls (6)
D interior "floor" hexagon
E exterior bottom panel
F opt. view-finder frame for tracing
fussy-cut panels . . .
. . . as is shown here.
LEAFY SWIRL TOP BOX
A main hull  
B opt. leaf contour overlays (6)
C opt. "petals" backside overlays (6)
D trimmed designer panels for walls (6)
E interior "floor" hexagon
F exterior bottom panel
G opt. view-finder frame for tracing
fussy-cut panels . . .
. . . as is shown here.
NOTE that because of the similarity of assembly,
images of both projects may be used to demonstrate.
Differences are noted when necessary.

2. Prepare the hull by bending back on all
perforation lines for panels and tabs, EXCEPT . . .
. . . bend forward on diagonal lines.
3. Position and attach decorative panel overlays
centered within the outer wall sections 
as defined by perforation lines.
LEAFY BOX: a narrow offset margin on 3 sides,
with enough space above (or below if preferred)
for a "header" space, or a place to attach trim.
SPIKY BOX: designer panels are cut square to fit
within the perf-defined wall sections with narrow
margin all around.
3. For LEAFY version, position and attach leaf contour
overlays on each hull extension, matching outer edges
as precisely as possible.
4. If desired to hide print backside of undesirable
color/pattern, position and attach leaf overlays
on backside.
Shown here is LEAFY box, and here . . .
. . . here for SPIKY box.
5. To help with liquid adhesive glue up remain flat
and not curl or warp, place a heavy flat weight on top
and allow to press flat until dry.
6. Form the hull into a tube to bring sides together,
overlapping straight side edges across flange tabs
to align exactly at perforation line (shown here
for LEAFY box . . .
. . . and here for SPIKY box.
NOTE that either hull can be arranged to press
flat so that fingertip pressure can easily be applied
along side seam.
7. Reconfigure hull to its "open" form, then apply
adhesive to underside of bottom tabs, bend inward.
Insert interior hexagon "floor" panel through top
opening and . . .
. . . slide downward to bottom of hull where straight
hex edges should seat at bottom tab perf bends.
NOTE it will be helpful to reach inside to apply
fingertip pressure thoroughly along each of six seams.
8. Apply adhesive to underside of exterior hex panel
then position it to match edges on box bottom.
9. Opt. for LEAFY box, bend accent trip strips back at
center perforation, then position across two sides
with perf bend aligned exactly at box bend.
NOTE that the strips can be planned and executed
to be above the squares as shown here, or
at bottom, with panels placed at top.
To close the swirl top box . . .
10. Begin by arranging "pleats" at top to swirl in
counter-clockwise direction, with a leaf in top
position. Lay first two or three pleats on top of
each other, one by one, then gently twist so that
left edges of leaves move slightly out of the way
to allow the final few leaves to be laid into swirl.
Final leaf will need to gently be flexed to swing
into final position in full-circle swirl.
Take care to support and coax the leaves
into position without bending or tearing at
top of diagonal perforations.
As final leaf is arranged to swing under or over
adjacent leaves, help swirl to arrange and self-adjust
into fill swirl, urging downward slightly nearer to
"top" of compartment.
11. Thread a 17-18" length of twine onto a darning
or other needle (as fine a gauge as possible to hold
twine, preferably blunt tipped). Thread through
aligned pairs of lacing holes at base of each petal.
When the twine has circuited the box, adjust so it is
centered. Tie knot snug but NOT tight, and bow,
then trim excess ends as desired.
Here are the two completed swirl top boxes.

Friday, August 4, 2023

CHRISTMAS Letter Box Ensemble Project

Create a "master class" holiday display using up to nine
letter boxes.  This sample project substituted 3D objects
for some of the letters, with other embellishments and
delightful paper print accents. To complete the ensemble,
letters and 3Ds were mounted on a 34" long x 2.5" wide
cut-to-size poplar board which was wrapped with sections
of kraft corrugated "board" paper.
Here are closeup images to view details.
Above: letter C with sprig & twig front decoration
with dangling 3D jingle bell and holly leaves;
letter H with 2D thickened cardinal on hex post;
letter R with ribbon-tied miniature candy cane.
Below: Santa pyramid box with arms as
substitute for 'I' letter box;
S gift box with lattice bow as substitute
for first 'S' box;
letter T with ribbon-tied star wand.
At the end are:
letter M with twine-tied Christmas cactus tag;
fir tree slice form as substitute for 'A' box;
large letter S with gingerbread front accent
and hanging 3D elf hat [box] without base.
Letter boxes are combined, 
with some letter boxes replaced by 
dimensional elements or other embellishments.
Here is the list of extras, linked to their tutorials:

Letter boxes assembly tutorials are available
in two separate posts within this blog:
CHRIS can be found HERE,
and TMAS can be found HERE.

Please NOTE that this is a project recommended for
paper crafters who have a good foundation of experience,
and that construction and assembly will require many hours.

For the sample project, once the letter boxes and 
other objects were assembled and the poplar board
cut to size and wrapped with kraft corrugated,
the letters were lined up in their simulated positioning
along the top of the plank, a front alignment line scribed
(5/8" back from front edge places them approximately
along the center of the plank), then they were hot-melt
glued in place. Pieces of temp tape helped plot where
each lead edge would be placed.
Front letter C lead edge aligns with left end of plank,
and end letter lrg S back "bulge" edge aligns
with right end of 34x2.5" poplar plank.


Christmas Word Ltr Boxes Part 2 TMAS

Large letter boxes resembling wood cut outs form 
the first letters T-M-A-S of this seasonal 
display decoration. 
(Part 1 includes first letters.) 
Slightly offset front accent panels can be cut and 
added as front decoration from favorite Christmas 
season paper prints. Larger end letter S also includes 
iced gingerbread cookie decorative overlays. 
Each “box” is composed of a LID which fits 
over a BASE. 
Letter S measures approx. 6.5” tall x 3.625” wide 
x 1.5” deep finished size. Other letter boxes in this set 
measure approx. 5.75” tall x 1.5” deep. 
A designer project can be assembled using separate file 3D 
and 2D decorations which take the place of 
some letter boxes or add accents to others.
Find details about this project HERE.)

ASSEMBLY: 1. Identify and cut the shapes -
Letter Box C
A LID front panel
B LID boxing strips
C accent front panel overlay with star cutouts
D contrast underlay
E BASE back panel
F BASE boxing strips
Letter Box M
A LID front panel
B accent front panel overlay
C LID boxing strips
C decorative star cutouts overlay
D BASE back panel
E BASE boxing strips
Letter Box A
A LID front panel
B accent front panel overlay
C LID boxing strips
D LID interior opening boxing strip
E BASE back panel
F BASE boxing strips
G BASE interior opening boxing strip

LINK for 'A' letter box assembly:
https://needlesnknowledge.blogspot.com/2022/08/america-letter-box-ensemble-part-2.html
LETTER S (Large)
A LID front panel
B & D LID boxing strips with
C & E LID end add-on boxing strips
F BASE front panel
G & I BASE boxing strips with
H & J end add-on boxing strips
K icing lacy edge overlay
L gingerbread accent panel overlay
M icing contrast underlay
NOTE it is recommended to refer to Ltr Boxes Part 1
as review of method of building letter boxes with curves
and straight edges that are similar to the assembly
of the letters included in this tutorial. Letter C assembly
review will provide a good assembly reference.
LETTER BOX T
2. If creating the T box to hold the star wand for designer
project, prepare the post anchor layered squares by
stacking and gluing together the 4-5 anchor squares,
taking care to align the inner opening edges
as precisely as possible. Press the stack under a heavy
flat weight until completely dried.
3. Position and attach the contrast underlay
behind the letter T front panel.
4. Prepare and arrange the boxing strips
around the front panel to orient the bends, etc.
Also, use a tool such as the handle tip of this
hook tool to depress inward the four-corner post
receiving opening in the center of the LID's
top panel.
5. At the center bottom of the BASE lower boxing
strip, locate the dash lines square outline guide,
then position . . .
. . .and attach the star wand post anchor square from Step 2 
so that the opening is exactly over the dashed square.
Press in place with heavy flat weight until dried.
6. Build the LID and BASE following procedures similar
to the 'H' box in Part 1 of the Christmas Letter Box project.
Once ready, insert the post end (possibly with quick grab
glue applied to bottom end) through LID 'opening',
BASE top opening, through center of 'T' then fish
around until the post end seats itself into the collar
recess at bottom. Hold until secure.
Here is the completed box with star.
LETTER BOX M
7. Follow the standard methods to prepare the LID
boxing strips for outer (top edges) curve edges,
inward (under arch) curve edges, and straights.
NOTE that laying out the strips around the front
panel will be helpful to re-direct the cross-folds
to match the letter edge angles.
8. Refer to the similar M project HERE to complete
the assembly for LID and BASE.
LETTER BOX A
9. Follow the usual preparation for A to set up
boxing strips around front panel, as well as
forming the triangular tube with interior opening
boxing strip (tab seam should be on backside.
10. Build the LID and BASE in usual manner.
Refer to 'R' box in Part 1 for a similar interior
shape - though without curves in the case of 'A'. 
Then fit together, finish, etc.
LETTER BOX S - LARGE
11. Assemble the accent front panel by layering and attaching 
the contrast behind the main "gingerbread" shape,
then . . .
. . . position and attach the lacy icing overlay just
within the gingerbread edge.
12. Become familiar with the boxing strips for
large 'S' which includes 2 identical long strips,
each with outside curve multiple tabs with wedge
cutouts between, a center straight, and an inside
curve portion . . . 
. . . that has tabs created by single cuts.
Separate end pieces will be joined during
the attachment sequence.
(NOTE that the small 'S' is identical, except
the end pieces are attached with cut.)
13. Prepare the first long boxing strip by adding
outer curl to the long lower portion. . .
. . . and inward
curl to the upper portion.
Compare the curl tightness to the panel
and add more if needed to echo the edge shape.
14. Locate small cut marks that will help
indicate where the straight portion transitions
to upper - or lower - curves.
14. Position and attach the end pieces to each
long strip prior to beginning to attach to panel.
Bend tabs inward.
15. Position #1 end at top inside curve corner
and attach only the very first tab. Then . . .
. . . locate the guide mark near center . . .
. . . and the beginning of straight segment . . .
. . . to position and attach straight edge/tab.
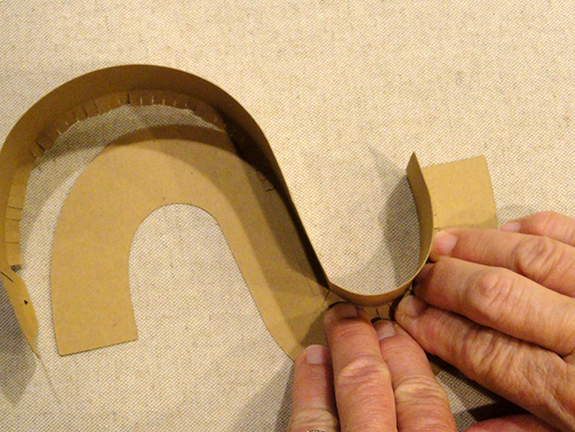
Immediately return and ease the tight inward
curve edge and tabs to match up.
Invert the construction on flat work surface and
apply fingertip pressure around the curve
until very secure.
15. Position and attach the lower end tab at end
of panel's curved edge, then ease tabs in to fit.
Again, invert the construction on flat work surface and
apply fingertip pressure around the curve
until secure.
16. Bend the end segment in to match up
with panel end edge, adjust and attach tab.
17. Prepare the second boxing strip as for the first,
including attaching end segment. Then position
and attach to tab of end segment and repeat
the addition of curves and straight segments,
until the point when . . .
. . . final end segment is swung into position
to attach, when it is easiest to apply glue and
attach final end tab seam at the same time.
18. Complete the BASE in same manner as LID.
Then fit BASE inside LID and attach together.
19. Position and attach the front accent panel to LID.
To manage any "twist" that may appear in 'S' letter box,
place a moderately-heavy flat object such as this book
on top of the letter box until all seams are dry.
20. To prepare the large 'S' box to be part of
the designer ensemble project with 3D elf hat
resting over top curve, omit the hat's BASE, then
fit arm of 'S' inside end, slide into play, angle
as desired, then attach touching edges with glue.