Tuesday, February 13, 2024

Double Ends Popper Box Extra Large

Assemble this two-part hull gift box to decorate
 for holidays, seasons or occasions with boxy ends 
that pull sides-outward to open and close. 
Add "print & cut" for my Valentine oval accent layer
from a separate design file, if desired.
Decorate with coordinated center and end overlay accents, 
fussy-cut text from specialty print paper, stamp, 
or print a festive greeting on accent oval. 
Then fill with candy treats. Surprisingly easy to assemble. 
(Use solid card stock that appears the same on 
front and back; two hull shapes can be cut from 
one 12x12 non-directional sheet.)
 Gift box measures approx. 6” long x 2” wide x 2” deep 
when assembled and fully closed 
(that’s large enough to insert a standard plastic gift card 
diagonally). 

ASSEMBLY: 1. Identify and cut the shapes:
A main hull and B add-on hull end shapes
C accent shapes for center (4)
D accent shapes for ends (8)
E optional scalloped oval and plain edge oval
F substitute "print & cut" plain edge oval
2. Bend back on the long horizontal perforation lines
of the hull to begin to create the box tube, including
the long edge flange tab.
3. At the end, bend the "solid" strip forward so that
it is face-down over the front of the main hull
(valley fold).
4. Bend back (mountain fold) to crease across
the narrow neck of the triangle shapes.
(NOTE that the first fold in previous step is
now hidden under the main hull.)
5. Bend back along the final perforation line in
the series (mountain fold) and crease.
6. Repeat steps 3-5 for the add-on end hull shape.
7. Apply adhesive of choice along the inward edge
tab face surface, then . . .
. . . overlap the straight end edge along the tabs'
perforation lines, taking care to align the segments
of the add-on with the panels of the main hull.
NOTE that there is a slight "notch" at the end of
the final "solid" strip. This extra length for the end
section will help the ends have a bit more "wrap"
allowance for the pull-open ends.)
8. Prepare to attach the accent shapes to the hull
assembly while it is flat. Fold the end panels inward
so that the "solid" portions are covering the side
portions of the middle hull as shown. This will reveal
only the portion of the box hull that will be visible
when the popper-end are in closed position.
9. Position and attach the center accents between
the end folds and the wall sections as defined
by the perforation lines or straight edge.
10. Position and attach the end accents, centering
within the popper end panels as defined by
the perforation creases or straight bottom edge.
11. Prepare the optional oval medallion by centering
and attaching the plain oval (with desired stamp,
hand-penned or fussy-cut message) over the contrast
scalloped oval.
Alternatively, prepare the "print & cut" oval message
following procedures and techniques for that method,
then position (centered) and attach.
12. Position and attach the oval accent medallion
onto one of the center two hull panels. Center the
medallion in the visible portion, or . . .
. . . to one side, if you plan to add a ribbon/bow
accent tied around the hull.
13. Prepare to close the box by pushing the "bridge"
narrow neck outward so that fold line is farthest out.
14. Form the hull into a tube to bring together
the plain long edge to overlap the opposite long flange
tab. Adjust and attach together to close the seam.
15. Prepare to close the first "popper end" by bending
the box end extensions inward. NOTE it may be easiest
to begin at the seam segment, bending first miter
end in, then moving counter clockwise to bend
the next end in so that the miter angle overlays
the regular corner end of the previous end.
Continue until all four ends are bent inward, then . . .
. . . flexing that fourth end so that it can tuck
under the first end as needed for the proper
sequence of overlapping of miter edges. 
16. Arrange the popper end straight edge to
overlap the tucked-under tab, and . . .
. . . join seam.
As the first seam is being set, gently ease the popper end
outward and away from the main hull. Then . . .
. . . adjust and re-attach the seam as necessary.
Hold and apply pressure until secure.
17. Repeat for the second end.
Here is the completed, closed popper box,
with ribbon accent tied on.

Thursday, February 8, 2024

Valentine Lollipop Sleeve Four Variations

 
Dress up a hard candy sucker for a Valentine’s 
special treat with these cover stands. 
Two styles are included with each design: 
tent style with fold-in base flanges to provide 
secure positioning rims; 
or simpler sticky-taped pinch-to-close top edges. 
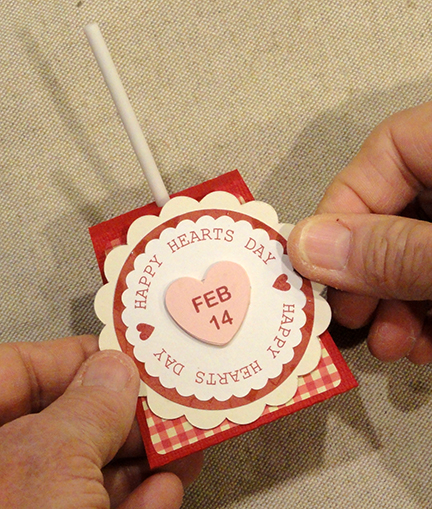
Dress up the front panel with the scalloped discs, 
choosing which shapes you want, or 
the whole ensemble. 
If desired, substitute “print & cut” scallop front layer. 
Three designs available separately:
1) “Happy Hearts Day”, and “Feb 14” candy heart 
that can be stacked for thickness; 
2) Be Mine printed disc; 
or 3) Love You printed disc.
2) Be Mine printed disc; or 3) Love You printed disc.

Fourth design that includes cut shapes only
with swoosh heart and faux stitched disc.
Also suitable to embellish with your own “found” 
stickers and jewels, etc. 
Tent measure approx. 2.375” tall x 2.375” wide 
at base x 1.5” deep. 
Pinch-close style measures approx. 2.375” tall
 x 2” wide x 1.625” deep.

NOTE: the Happy Hearts Day disc "tent" style
design will be described thoroughly first, with 
the "pinch" sleeve simple assembly following in Step 14.
(Identifying and cutting steps are both at beginning.)
The other designs are similar enough that the general
assembly steps will can be followed for all other designs.

ASSEMBLY: 1. For the samples shown of the designs
which include the print & cut disc designs, begin by
identifying the shape that will be set up to print
then cut, then follow the standard processes to
accomplish the printing and cutting.
2. Identify and cut the shapes (tent style):
A main tent hull
B front offset accent shape
C medallion scallop base circle
D accent circle
E print & cut scallop circle
F stacked heart with print & cut front, 6 to layer
3. For the alternate design:
Identify and cut the shapes (pinch-top style):
A main tent hull
B front offset accent shape
C medallion scallop base circle
D accent circle
E print & cut scallop circle
F stacked heart with print & cut front, 6 to layer
For either design: 
4. Layer the main medallion shapes, centered,
and glue together.
5. Layer the candy heart shapes into a stack with
the printed shape on top, taking care to align
all cut edges as precisely as possible,
 and glue together
If possible, press the stacked shape with a heavy
flat weight such as this fabric covered weight brick,
and leave in place for several hours until thoroughly
dried.
6. Position the heart shape, centered on the medallion,
and glue in place.
For the tent style:
7. Prepare the main shape by bending back on
 the perforation lines for the center section . . .
. . . including the top "tent" bridge and flange tab.
For the side extensions, bend the mid lines into
an inverted 'V' to create the ridge.
8. Apply glue inside the ridge perforations, then . . .
. . . bend and flatten the ridge segments so they
stack on top of each other and apply thumbnail
pressure back and forth to securely join.
Take care that the end extension does NOT get
attached to the inward extension.
It may be helpful to bend the end flange back
to prevent attachment while continuing to apply
pressure until the rim is completely joined.
(Complete this step for both extensions.)
9. Apply adhesive to the underside of the extension
from inward perf line to edge of rounded flange . . .
. . . then bend the extension inward and
press in place until well attached.
Repeat for the opposite extension which
will meet up with the previous extension 
end edge.
10. Once the extensions are securely glued in place,
bend the rims into perpendicular position where
they will be ready to help hold the sucker in place.
11. Position the accent shape onto the front panel
with even offset margins at sides and bottom/top
panel-defining perforation lines.
12. To complete the gift, insert the sucker stick
into the "tent" panel hole . . .
. . . and bend the tent panel and back flange down
to overlap the top of back panel, straighten and
glue flange in place.
Here is the completed tent to this point of assembly.
13. Position and attach the medallion.
"PINCH" GLUE TAPE CLOSURE SLEEVE
14. Prepare the main shape by bending back on
the two bottom panel perforation lines.
15. Position and attach the front accent panel.
16. Apply two-sided sticky tape across one end
flange on the inward surface close to cut edge . . .
. . . insert lollipop between and so that it rests
on the center bottom panel.
Bend the front panel into position with stick
centered at half-circle cut out (helps keep lolli
straight), align and pinch the upper edges
until secure.
17. Position and attach the front medallion.


Thursday, February 1, 2024

Hearts Snowflake Vellum Fauxrigami


Fold along perforations of two layers of 
uniquely-folded hexagonal shapes which form base 
to arrange 6 folded points radiating from center 
for a hanging Valentine ornament for interior decor 
or as window-hanging sun catcher. 
Cut from opaque vellum so that the layers create 
gradations of color value. 
Top point includes hang hole for narrow ribbon or twine. 
Snowflake measures approx. 7.75” wide x 8.75” tall 
when fully assembled. 

ASSEMBLY: 1. Identify and cut the shapes:
A base points shape that creates outer points
B hexagon shape that creates middle "pie" layer
C top points shape with hang hole
D top points shapes (5)
2. The size for this hearts snowflake ornament has
been enlarged as fully as it can be to still be able
to fit all the shapes for one ornament onto THREE
8.5x11 sheets of opaque vellum, since that is the common
size available. (A good online resource for colored
vellum sheets is 12x12 CARDSTOCK SHOP 
(12x12cardstock.shop)
The three screens below show the way the three
sheets for this sample project were laid out to be cut:
3. This snowflake has identical construction and
assembly to the original vellum snowflake fauxrigami
project, except that there are cut out hearts at
a couple of edges where particular care should
be taken. Follow this LINK for that tutorial,
refer to Step 1 and follow Steps 2-10.
keeping in mind these small differences, below:

A) as the middle points shape is folded, take care
along the fold where perforation cuts out a bit
at each heart hollow.
This image shows those initial folds, and . . .
. . . here is the second fold that makes the assembly
into the hexagon middle unit.
Finish this unit by taping points in place
as described in the original assembly guide.
Ready to hang in a window or door glass panel,
from peg, knob, chandelier, etc.