Thursday, November 21, 2013

Christmas Countdown Tree Stack Tutorial

***SILH AMERICA
DOWNLOAD FILE ERROR NOTE***
If you purchased and downloaded the 
3d Christmas Tree Drawers Stack Countdown file 
from Silhouette America in 2013,
we have discovered that there is an extra "solid" cut line
that overlays the perforation on the second to largest drawer shape.
A corrected file has been resubmitted to Silhouette and they will replace it
in the online store immediately.
You will be able to download the corrected version.

The colored file available from SVG Attic is correct as downloaded,
except if you purchased and downloaded prior to Sept. 30,
the "stem" base shape for the number 25 design was not included.
Please re-download the file.

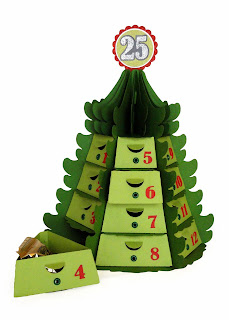
Here is this fun dimensional project 
to help count down the days until Christmas.
Four layers of wedge shaped drawers that fit into "shelves"
and stack into 6 columns and assemble as a Christmas Tree. 
Finished size tree: 9.5” tall x 7.6” diameter base circle; 
largest drawer approx. 3.25” front width x 1.5” depth.

Download the design, then follow this detailed tutorial 
to get yours made in time for December 1st!
TUTORIAL:


Step 1. Identify the parts and cut the quantities needed. 
Base (1) and Reinforcing Base (1)
Pole (1)
Tree Wedges (6)
Tree Topper Shapes (6)
Shelf shapes (6 of each of the 4 sizes)
Step 2. Fold each shelf shape inward on all perforations. Apply glue to the long side tab. Overlap straight edge of opposite side, align edge exactly at perforation fold and apply pressure until glue is secure.

Repeat this step for all 24 shelf shapes. Organize six sets of shelf sizes 1-4. Note that each size shelf shape has the "level" number cut out from the side flange.


Step 3. Arrange so that decorative front edge is on TOP. Apply glue to the UPPER surface of the largest (shelf 1). Align the next level shelf (2) exactly over shelf 1 and hold in place until glue is secure. Apply pressure to the entire areas to be glued by moving fingers around, front to back, sides, etc. "Perfect" alignment and precision adhesion at edges will help with the final product.

Repeat until all four shelves in a set are attached in this way.

Repeat until all six stacks are completed.


Step 4. Fold one tree wedge shape with inward folds up "spine". Fold bottom tabs inward, too.

Apply glue to one side of the stack. (Here I am gluing the left side first.) Position with back corner aligning with corresponding spine perforation, also lower stack edge and tree shape edges exactly even.


Wrap the tree wedge around the stack to help get it positioned as snugly into place as possible, even though the second side has not YET had glue applied.

Here you can see how well the flat back angle of the stack should fit into the spine area of the tree shape. Make sure that the lower corner and edge stay lined up, making any adjustments needed while the glue can still be worked.

Once the first side is secure, open tree shape, apply glue to the second stack side, re-wrap tree and repeat alignment and securing process. 


Step 5. Fold the post on all perforations as inward ("mountain") folds. Position the long tab edge under the opposite straight edge. Apply glue to the tab, overlap edge to perforation exactly, hold in place until glue is secure. It will help to insert a long dowel or equivalent inside to provide a "push-against" surface while the glue is curing. Move fingers along the top surface to ensure even adhesion and accurate gluing.


Step 6. Insert tab end of pole through hexagon hole from face side slotted base shape. Fold pole tabs outward. Slide so tabs are flush with backside surface.


Step 7. Apply glue to tabs and secure in place.


Step 8. Apply glue to bottom of wedge with stack assembly. Position on base shape and slide tabs through base slots. 


Pull tabs through to backside completely. Apply adhesive to INSIDE surface of each tab, then fold toward center, under the area where the stack is being attached. Hold until secure.


Step 9. Separate the tree spine area and the pole as much as possible to apply glue to spine. Realign and apply pressure until secure.


It will help to insert the dowel or other tool into the pole so that pressure can be applied to help stack attach securely.


Once the first stack is secured, complete steps 4, 8 & 9 for the remaining 5 stacks.


Step 10. Apply glue and attach cosmetic base shape onto underside of tree assembly. Here I have cut an extra base shape from Silhouette chip board that I will glue in place first, then the second "green" shape for extra stability, and to hide the tabs construction.


Step 11. Prepare the tree topper shapes by folding inward at center fold, folding narrow tabs outward. Also fold the bottom tabs back.


Step 12. Apply glue to all tabs. Position the topper shape in between tree sides near top of assembly. Push into place so that back tabs attach to the spine area. Push bottom tabs into place so that they attach to top of shelf shape. Adjust sides so that space between each flange of tree is about the same.


To help tabs attach, it may be helpful to use the side of a thin credit card to push into the narrow spaces until glue is secure.

Step 13. Identify the four sizes of drawer shapes (each has a different symbol punched into the back center tab). 


The following steps of this tutorial apply to a version that includes decorative eyelets on the front of each drawer. If you wish to not include the eyelets, BEFORE YOU CUT THE DRAWERS, "release compound path" and "ungroup" drawer shapes in cut file, delete both eyelet holes. regroup and cut shapes.


Step 14. Fold each drawer shape on all perforations as inward folds. NOTE that this includes the tiny triangle tab at the center back.


Step 15. Apply glue to the center ONLY of the inner front area of the drawer, including areas around finger pull cut-out and eyelet holes. (Leave side areas glue-free so that side tabs can be slid into place later in the assembly process.)


Step 16. Attach eyelet to drawer front. 

Push semi-circle pull tab (layers) outward slightly to make sure they extend freely.


Step 17. Open the space at sides between front and inner front surfaces and apply glue.


Fold the side upward and slide the tab into place. Hold until glue is secure. Repeat for the other side.


Step 18. Fold triangle tab upward, fold symbol tab inward and overlap plain tab. Glue in place.

Repeat steps 13-18 for remaining 23 drawers.


Step 19. Slide drawers into positions in stacks. Determine how you will number your drawers, then attach numbers to drawer fronts accordingly.


Step 20. Identify shapes for the "25" topper. (There is NOT a drawer for Christmas Day, since there will be more significant "opening" built into that date.)

Shapes shown here include (bottom up):
base shapes with stems
decorative scallop circles
base plain circles
smaller plan circles
"25" echo shape bases
"2" & "5" shapes

Optional: double-sided adhesive shapes (yellow liner paper here) and silver glitter.


Step 21. Attach all shapes in order (bottom to top), including the numbers onto their base echo shape.


 Step 22. To apply glitter, also attach the double-sided adhesive numbers over the original numbers.


 Apply glitter.

 Step 23. Join the completed marquee shapes back to back.


Step 24. Slide stem into top of pole opening.


And you have your project completed.
Place something into each drawer, and enjoy the fun
as your favorite little people enjoy the anticipation of Christmas
with something to do, eat, or experience each day.
Besides small pieces of candy, you could include clues to find
larger objects or treats such as juice bottles, mini-box cereals,
bakery sugar cookies, etc., that can't fit into the boxes.
An alternative to treats is to place an activity description
written or typed onto a slip of paper.
Have fun using your imagination!


Sunday, November 17, 2013

December Docket Quilt Kit Chart - Quilts Etc.

Below is the kit chart for the fabrics
that are contained in the kits available now (Nov. 2013)
from Quilts, Etc., in Sandy, Utah.
Kits are for the On the Docket Winter pattern project: December.

Please note the instructions for cutting the 4" wide x width of bolt
background strip in the kit into two 2" wide by width of bolt
before starting to piece.

Here is the On the Docket: Winter pattern by Hearthsewn
that includes the December project (left) for which the kit can be used.
Order it by phone from Quilts, Etc., or go to
the Hearthsewn website to mail order it from me.


Wednesday, November 13, 2013

Thanksgiving Turkey and Grateful Phrase Wall Vinyl


As I dreamed of a turkey design for my wall, I had thoughts of
a historic museum at Williamsburg, Virginia in my heart!
The final design has captured just the right folk art feel
that I want to convey .
The turkey design
("fancy turkey folk art reg cut or vinyl)
is available from SnapDragon Snippets
through the Silhouette America online store.
(The hearts full of gratitude phrase is available from me directly and exclusively. 
If you are interested, please email me with a request.
[hearthsewnpatterns at yahoo dot com]
To receive this phrase only design FREE, you will need to purchase
the folk art turkey download from Silhouette first,
and have the existing software (Studio or Studio Designer)
to open the download file that will be sent.
Please note that the cut lines are quite close in some places
and it probably should not be scaled smaller.)


Here is the finished vinyl on my entryway wall.

In order to allow this design to be cut on the machine, large or small, the turkey cut file is prepared as two separate sections: body (with wings) and tail. The phrase is also presented in two sections: left upper (hearts full/THANK) and right upper (of gratitude and/SGIVING). 

This tutorial will demonstrate how these can be re-aligned before or during the steps as application is being made.

If you have the larger capacity equipment and cutting mat, scale your designs larger. ONE NOTE: the turkey as presented in the original cut file size is approx. 11.5" wide. The phrase (in connected layout) should be re-sized to approx. 17" side-to-side measurement to suit. (This is the time I could use the 12x24 cutting mat!)


Step 1. Download, adjust size and settings as you wish, etc., then load the adhesive vinyl into the Cameo or other Silhouette cutting tool and cut. If you are new to vinyl cutting, check out a great Silhouette blog tutorial here.


Step 2. Carefully "weed" away the excess vinyl from it's backing sheet using precision tools and scissors. Cutting away waste sections as they are removed helps avoid the problem of having the sticky backing of accidentally grabbing and breaking the fine parts of this design.

Complete the weeding for all sections.


Step 3. Align the phrase sections after they are weeded. Notice how I have lined up the lower edges of the arch where the 'K' and the 'S' bases meet, while at the same time comparing and matching the spacing between the upper line words "full" and "of". To help this, I have trimming away the excess backing right along the 'S' left lower edge, and through spaces above. This way, I can see how to properly align the sections. Use temporary tape to hold the backing pieces together once aligned.


Step 4. Turn over the phrase assembly and tape the backside securely, too.


Step 5. Position and smooth the transfer paper over the joined vinyl phrase and turkey sections. Here I am using some leftover carrier sheet that came with my Stencil Vinyl from Silhouette America. It is wonderful to have a see-thru transfer paper, but regular transfer works just fine, too. I will use regular transfer for the turkey sections.


Step 6. Analyze the wall space you intend to use, find the center mark, and place temp tape with a drawn center line to help with alignment of the parts on the wall. I have taken away the center part so that I can place my turkey and phrase there. What remains is an upper and lower center line.

Step 7. Temp tape the sections roughly in their final positions to check that north/south and side-to-side placement is really what you want, then make adjustments to guide tape if necessary. Then remove the top phrase and middle tail sections.


Step 8. Follow standard procedures to place temp tape "hinge" strips along the top edge of the transfer paper, locking in the positioning previously achieved. Hinge the layers up and peel off the vinyl's backing sheet, leaving the vinyl on the transfer sheet. Carefully hinge back down the transfer sheet and smooth against the wall. Use the credit card tool to rub the vinyl to create adhesion to the wall surface. Peel back transfer sheet making sure that the vinyl is attaching correctly.

Here the turkey body is being placed.


Step 9. Re-align tail feather section on the center line AND adjust up/down until the inner lower "corners" of the inner arch just touch the body edges.

Follow the same transferring procedures for this section.


Here the tail section has been placed and the transfer sheet peeled off.


Step 10. Position, align, tape in place, etc., to position the phrase section. At this point, you may need to remove the upper part of the tape with alignment marks, if it interferes with the area where the phrase will be transferred.

Here, the transfer sheet is being removed from the phrase.


And here is the finished product.

I love this holiday. It means so much to me and my family to express gratitude and thanks for our many blessings, before all the "gimmees" of Christmas attempt to take over!

Hope your lives are blessed 
during this season of giving thanks!


Cornucopia Tableware Sleeve

 HERE'S SOMETHING FUN AND QUICK 
FOR YOUR 
THANKSGIVING HOLIDAY TABLE 
Show your paper crafting prowess and start the pre-dinner conversation.
This design combines flatware organization and a place card in one.
One-piece cornucopia (available now from SnapDragon Snippets
through the Silhouette America online store)
has open lattice work cut into the front.
A few tabs on the back and the "curl" fold under
to be glued to the backside of the face piece,
plus glue the tail pieces together.
That's all the construction that is required.


If you choose, quickly cut the quantity you need for the 2-piece
layered place card. Use your best penmanship to write the name of each guest,
(or use the print-n-cut Silhouette Designer Studio software to print names first).
Use a brad threaded through card then into top center lattice hole.
What could be more elegant!
The design can also be used as a treat pocket,
to hold a few wrapped candies, caramels, or other treat.
(Leave the silver in its usual place, and lay a place card treat
on the center of each plate!)
The image at top shows how narrow ribbon can be threaded
through a pair of horizontal holes.


Hope this gives you a quick idea for the upcoming harvest feast.