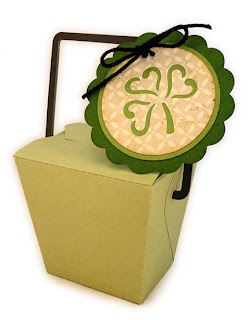
Classic
take out box is composed of lid and base
assembled separately then joined
across back.
(Cut from two 8.5x11 cardstock or one 12x12.)

Side latch tabs help
to keep it closed.
Layered medallion-shaped oval frame tag
can adorn lid, or
use a selected panel from
holiday specialty print cardstock.

Clamshell measures
approx. 3.25” square across top,
4.167” square at mid side, and 3” tall.
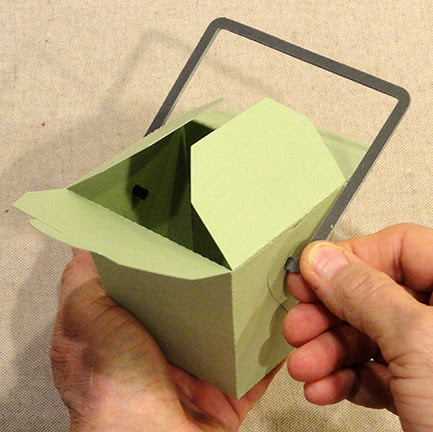
ASSEMBLY: 1. Identify and cut the shapes:
A upper hull (with thumb cut out front)
B lower hull
C medallion base
D medallion frame
E shamrock
Also shown is a trimmed specially print panel
with rounded corners as optional top decor.

This is the Authentique brand specialty print panel.

on all perforations for panels and end tabs,
back lower edge joint flange tab of upper half.
Identify the back bottom hull edge with
the split arrow symbol, which will be useful . . .

at back flap seam, simulated here.
 3. Bend the hull walls back to position angled seam

where plain straight edge overlaps adjacent tab
perforation lines, and join seam. Repeat for all four
seams of both upper and lower hull halves.

then position over back upper edge of lower . . .


of bottom hull wall aligns with the perforation line.

 When upper hull is pushed fully down into position,

5. To close the clamshell box, make sure that
the UPPER hull walls are directed inside the lower
hull raised side walls.

the side hooks should be able to slot into place
under the side end extensions.
 Here is the closed box.


6. Prepare the medallion decor by positioning and
attaching the frame shape over the base shape,
centering, with tie holes aligned. Then position
and attach shamrock inside the frame's oval.

7. Tie knot and bow with narrow ribbon or twine,
then position and attach, centered, on box upper
hull panel.

8. As alternative, use specialty print paper panel,
trimmed out, or to size, then positioned and
attached to hull lid.