
A dozen roses - a bouquet in a box -
is an extra special way to say
"I love you", to your Valentine,
your sweetheart, mother, sister, friend.
This tall box card is designed to evoke
the image of a flower vase.
Two interior bridge strips (plus box back and front)
provide the stage for the multiple layers
of rose stems and rose leaves which organize
the bouquet stems, so assembly is a snap.
A layered tag with heart and "valentine" word cut
attach to the front at a fold out punch tab.
Fold the card flat to send.
Open into its box form for display.
Finished size is approx. 2.5" wide x 2.5" deep x 10.25" tall.
Folds flat to approx. 7" wide x 11.3" tall.

ASSEMBLY GUIDE:
1. Identify and cut the shapes:
A main box shape
B flap overlays and accent swirl shapes
C optional inside back box overlay
D bridges (2)
E layer 1 shapes for inside box front panel
F layer 2 shapes, extra leaf stem
G layer 3 shapes
H layer 4 (box back) shapes
I clear support panel for layer 3
J clear support panel for layer 4

3. Optional: If the card stock selected for the main box shape has a backside you don't want visible as the back panel, position and attach the back interior panel with as many edges aligned as possible. (NOTE this shape does NOT extend to the panel bottom in order to make it possible to cut all shapes that should match to be cut from one 12x12 sheet.

5. Form box into a tube to bring side seam tab perforation and straight back edge together. Align bottom edges of both sides of seam, then apply adhesive and join.
(NOTE: it is possible to fold the box shape flat on work surface to join this seam flat.)

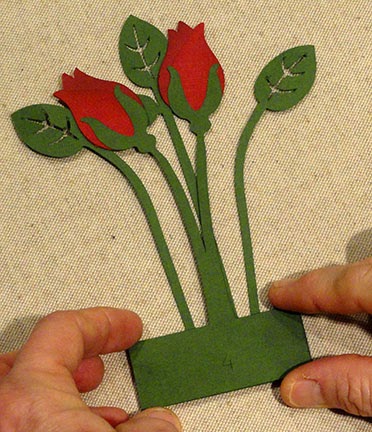
6. Assemble 6 left and 6 right buds by layering the smaller petals shape on top of the larger base petal shape, point and curved edges lined up that match.
Position and glue buds behind stem shapes as shown. Left buds should have the smaller shape as the "outside" most shape (left one here happens to be wrong).

7. Prepare layer 4 assembly for back interior of box. To provide more dimension, place two or three foam squares on the backside of the rose bud unit . . .
. . . then turn it face side, position with rectangle panels lined up, and attach.
NOTE: the "left" and "right" rose bud orientation on this unit is correct, with smaller top layer on the outward half of the bud assembly.
Each rose bud stem unit for layers 1-4 should have left single or pair with "left" bud orientation, right single or pair with "right" bud orientation.
8. (Optional) To provide hidden support for tall stems in layers 3 & 4, clear acetate or equivalent shapes can be cut and attached behind the layers assembly.
Here, a double-sided permanent adhesive in strip form is placed in the bottom section of the layer 4 clear shape ( These adhesive strips will allow the clear shape to attach behind the assembly.

Attach the clear support shape behind the leaf layer, lower and side edges matched up.
Position and attach foam squares behind the clear shape.

9. Position the layer 4 assembly in front of the back of box card, with top edges of rectangle base at same level as flap perforation lines, and with rectangle centered side to side in the box space.
(NOTE: tall stems may flop forward at this point in the assembly. If you prefer, you can apply spots of adhesive to help them stay in place. Once other shapes are in front of these, they flop much less.)

10. Prepare both bridge shapes by folding back side tabs on the perforations.
11. Apply adhesive to the front surfaces of the tabs for the first (back) bridge, then insert it into the box interior and position it one-third of the way forward from back panel. Adjust so that bridge strip is parallel to the front and back panels (while the box is opened and squared up), then attach the tabs to the interior sides of the box. Hold until secure.

Repeat this step after the second (forward) bridge is inserted, too.

13. Begin layer 3 by placing and attaching the taller leaves unit behind the bridge, centered side to side with bridge and rectangle panel top edges lined up.
14. Layer the (f to b) shorter leaves unit, buds unit, and clear support shape in the same manner with dimensional foam squares between all layers as was done for the layer 4 unit in steps 7 & 8 above.

15. Position and attach the layer 3 unit in front of the bridge.

16. Position and attach bridge 2 halfway forward from bridge 1 and the front of the box cavity.
Fold and apply pressure to make final bridge tab adjustments as was done for bridge 1 in step 12.

17. Assemble layer 3 with leaf unit in front of buds unit, foam squares providing dimension between these layers as for other layers.

18. Position and attach layer 2 in front of bridge 2.

19. Layer 2 have a single stem leaf unit that is inserted behind the bridge, at the approximate center. Apply adhesive to the bottom 3/4" or so of the stem, then insert behind the bridge, adjust up/down, side-to-side into the best position for the bouquet arrangements, then apply pressure to attach to the bridge backside.

20. Prepare layer 1 assembly by attaching leaf unit with foam squares in front of buds section.
Also position the shorter leaf pair unit to the front of this assembly (no foam squares suggested here), with both rectangle panel top edge lined up, AND with the backside of the shorter unit facing forward.

Fold the front leaf stem forward.

21. Position and attach layer 1 behind the front of the box, with rectangles upper edges and flap perforations lined up. (No foam squares recommended here.)
Make sure that the front punch hole tab is NOT glued to layer 1, but remains free.

22. Layer the tag and join layers. Thread twine, string or ribbon length through the front punch hole tab and the tag and tie in knot and bow to secure.
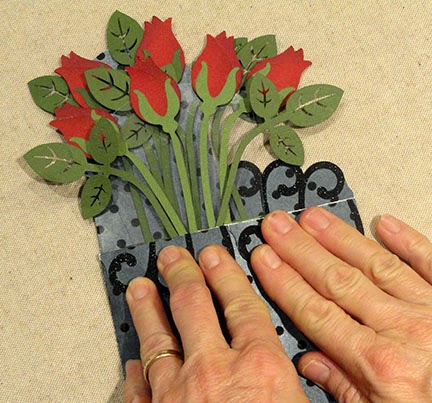
Here is the box finished and open in display mode.

Here is the box card folded flat,
in its "presentation" mode.
(It could be inserted into
an oversized envelope to mail or give.)

Waiting for this! Gorgeous project!
ReplyDeleteHopefully in the Silh store today, at SnapDragon Snippets.com within a day or two. Thanks for kind words.
ReplyDeletebonjour,
ReplyDeletej'achète pratiquement tous vos fichiers qui se distinguent vraiment des autres designer sur silhouette, j'ai hâte d’acquérir celui ci.
par contre je cherche un réverbère 3 d vu sur pinterest , le mettrez-vous sur silhouette ?
merci beaucoup
cordialement martine
Oui, vouz pouvez l'achete sur silhouette au'jourd hui, peutetre. Nous l'offrir aussi sur notre magasin SnapDragon Snippet.com (demain ou quelque jour l'apprez).
ReplyDeleteIt is in the store! Can't wait to get this one. Just beautiful!!!
ReplyDeleteThis project t is gorgeous! I will put a photo of mine on my blog in the next day or two. Your instructions are terrific! I am SO grateful that you took the time and energy to do such detailed instructions and good photos. Thank you!!!! I love this project! I made it as a thank you card, putting "Thanks" on the tag.
ReplyDeleteCan't thank you enough for the excellent instructions...I don't think I've ever made a card with this many pieces in it before, and it would have been a serious challenge without the guidance. With it, though, it turned out absolutely beautiful!
ReplyDeleteThis is fantastic! Could anyone say what kind of paper or card stock that is? I'm a vinyl girl and the first piece of paper I tried to cut stuck to my mat and was a disaster so I haven't tried again...but would love to to make this for my mom!! Tia!!
ReplyDeleteI haven't made this one yet Tia, I'm trying it next week for my Mum, but thought that your paper sticking to the mat might be because you haven't "de-stickied" it yet ... it sounds like my 1st experience cutting but once I knew to de-sticky, all worked great => GOOD LUCK :)
DeleteWhat size envelope would this fit in? Is there a separate file for one I can purchase?
ReplyDeleteThere is not an envelope that this will fit in offered by our design company. It ends up being rather thick, even though the description at the beginning says it folds "flat" to a certain size. You may need to make it and then see what you want to do - such as tuck it into a customized (cut to size) manila or white packet envelope, etc.
ReplyDeleteHello,
ReplyDeleteI just purchased this file in the SVG format from the Silhouette design store. When I opened it I was not expecting to see it blown out with all pieces separated with no color only the outline of the different shapes. Is it supposed to come like that? Everything I have watched on YouTube shows the file coming in to Silhouette in color and then it gets ungrouped and can be cut by color. I would really love to make it but don't want to have to individually add color to all the MANY pieces in the file. I'm wondering if it's actually NOT an SVG as the Silhouette file opens exactly the same way.
This design is a cut file, not a print and cut, or a print and then hand cut out. The cutting lines are intended to cut out the shapes from colored paper. Color on the cut file is offered as a guide to match to the thumbnail photo so that you can identify the shapes. Then you, as maker, decide which colored papers you load into the die cutter (Silhouette Cameo, for instance) to cut out the shapes, to match the colors shown on the cut file, or using your own alternate color scheme.
ReplyDeleteThank you for your quick response. I am aware that the design is a cut file. What I'm trying to figure out is if the SVG file I bought from the Silhouette Design Store is supposed to contain color? When I open the cut file, there is NO color only shapes outlined in red. This is exactly the same as I see when I open the Silhouette Studio file. Unfortunately the thumb nail photo is too small to try and figure out some of the darker colors. With so many pieces to this card it would be nice to be able to see the color scheme that was used to make it.
DeleteSorry for the confusion. This design was prepared in 2015. At that time Silhouette America did not suggest nor require that we color the files. Not sure I have time in the immediate future to color the file and forward it to you. Can you look at the different steps and the shapes layout to get the feel of which pieces are cut from the various colors?
Delete